
Vous pouvez lire le billet sur le blog La Minute pour plus d'informations sur les RSS !
Canaux
4010 éléments (8 non lus) dans 54 canaux
 Dans la presse
(2 non lus)
Dans la presse
(2 non lus)
-
 Cybergeo
-
Revue Internationale de Géomatique (RIG)
-
SIGMAG & SIGTV.FR - Un autre regard sur la géomatique
(2 non lus)
-
Mappemonde
-
Imagerie Géospatiale
-
Toute l’actualité des Geoservices de l'IGN
-
arcOrama, un blog sur les SIG, ceux d ESRI en particulier
-
arcOpole - Actualités du Programme
-
Géoclip, le générateur d'observatoires cartographiques
-
Blog GEOCONCEPT FR
Toile géomatique francophone
(6 non lus)
-
Géoblogs (GeoRezo.net)
-
Conseil national de l'information géolocalisée
-
 Geotribu
-
Les cafés géographiques
-
UrbaLine (le blog d'Aline sur l'urba, la géomatique, et l'habitat)
-
Icem7
-
Séries temporelles (CESBIO)
(2 non lus)
-
Datafoncier, données pour les territoires (Cerema)
-
Cartes et figures du monde
-
SIGEA: actualités des SIG pour l'enseignement agricole
-
Data and GIS tips
-
Neogeo Technologies
(1 non lus)
-
ReLucBlog
-
L'Atelier de Cartographie
-
My Geomatic
-
archeomatic (le blog d'un archéologue à l’INRAP)
-
Cartographies numériques
-
Veille cartographie
-
Makina Corpus (1 non lus)
-
Oslandia
(2 non lus)
-
Camptocamp
-
Carnet (neo)cartographique
-
Le blog de Geomatys
-
GEOMATIQUE
-
Geomatick
-
CartONG (actualités)

Géomatique anglophone
-
sur The Most Popular Music in Your Town
Publié: 30 November 2023, 10:24am CET par Keir Clarke
SZA's Kill Bill was the most listened to song in New York and San Francisco this year. In Denver and New Orleans the most listened to song was Morgan Wallen's Last Night. While Eslabon Armado y Peso Pluma's Ella Baila Sola was the most popular tune in Los Angeles, Houston and San Diego.Spotify has released a new interactive map which reveals the most listened to songs in cities around the world
-
sur GeoServer Team: GeoServer installation methods on Windows
Publié: 30 November 2023, 1:00am CET
GeoSpatial Techno is a startup focused on geospatial information that is providing e-learning courses to enhance the knowledge of geospatial information users, students, and other startups. The main approach of this startup is providing quality, valid specialized training in the field of geospatial information.
( YouTube | LinkedIn | Facebook | Reddit | X )
GeoServer installation methods: “Windows Installer” and “Web Archive”GeoServer installation methods: “Windows Installer” and “Web Archive” In this session, we will talk about how to install GeoServer software by two common methods in Windows. If you want to access the complete tutorial, simply click on the link.
Introduction
GeoServer can be installed on different operating systems, since it’s a Java based application. You can run it on any kind of operating system for which exists a Java virtual machine. GeoServer’s speed depends a lot on the chosen Java Runtime Environment (JRE). The latest versions of GeoServer are tested with both OracleJRE and OpenJDK. These versions are:
- Java 17 for GeoServer 2.23 and above
- Java 11 for GeoServer 2.15 and above
- Java 8 for GeoServer 2.9 to GeoServer 2.22
- Java 7 for GeoServer 2.6 to GeoServer 2.8
- Java 6 for GeoServer 2.3 to GeoServer 2.5
- Java 5 for GeoServer 2.2 and earlier
But remember that the older versions are unsupported and won’t receive fixes nor security updates, and contain well-known security vulnerabilities that have not been patched, so use at own risk. That is true for both GeoServer and Java itself.
There are many ways to install GeoServer on your system. This tutorial will cover the two most commonly used installation methods on Windows.
- Windows Installer
- Web Archive
The Windows installer provides an easy way to set up GeoServer on your system, as it requires no configuration files to be edited or command line settings.
Installation- GeoServer requires a Java environment (JRE) to be installed on your system, available from Adoptium for Windows Installer, or provided by your OS distribution. For more information, please refer to this link: [https:]
Consider the operating system architecture and memory requirements when selecting a JRE installer. 32-bit Java version is restricted to 2 GB memory, while the 64-bit version is recommended for optimal server memory. Utilizing JAI with the 32-bit JRE can enhance performance for WMS output generation and raster operations.
- Install JRE by following the default settings and successfully complete the installation.
- Navigate to the GeoServer.org and download the desired version of GeoServer.
- Launch the GeoServer installer and agree to the license.
- Enter the path to the JRE installation and proceed with the installation. The installer will attempt to automatically populate this box with a JRE if it is found, but otherwise you will have to enter this path manually.
- Provide necessary details like the GeoServer data directory, administration credentials, and port configuration.
- Review the selections, install GeoServer, and start it either manually or as a service.
- Finally, navigate to localhost:8080/geoserver (or wherever you installed GeoServer) to access the GeoServer Web administration interface.
GeoServer can be uninstalled in two ways:
- By running the uninstall.exe file in the directory where GeoServer was installed
- By standard Windows program removal
GeoServer is packaged as a web-archive (WAR) for use with an application server such as Apache Tomcat or Jetty. It has been mostly tested using Tomcat, and so is the recommended application server. There are reasons for installing it such as it is widely used, well-documented, and relatively simple to configure. GeoServer requires a newer version of Tomcat (7.0.65 or later) that implements Servlet 3 and annotation processing. Other application servers have been known to work, but are not guaranteed.
Installation- Make sure you have a JRE installed on your system, then download Apache Tomcat from its website [https:] For the Windows installation package, scroll down and choose the 32bit/64bit Windows Service Installer option.
- Configure Tomcat by selecting components, setting up a username and password, and specifying memory settings. So, before start the Tomcat service, you have to configure the memory settings that will use for Java VM. To do it, open the Tomcat9w from the bin folder, then click on the Java tab. This tab allows for configuration of memory settings, including initial and maximum memory pool sizes. Recommended values are 512MB for the initial memory pool and 1024MB for the maximum memory pool.
- Start Tomcat service and verify its functionality, then navigate to localhost:8080, and get the Tomcat9 web page.
- Navigate to the GeoServer.org and Download page. Select Web Archive on the download page from the version of GeoServer that you wish to download.
- Deploy the GeoServer web archive as you would normally. Often, all that is necessary is to copy the GeoServer.war file to the Tomcat’s webapps directory, then the application will be deployed automatically.
- Now to access the Web administration interface, open a browser and navigate to localhost:8080 and press Manager App button. Enter the username and password of apache tomcat. Click on the start button for the GeoServer. Once it has started, click the GeoServer link. This will take you to the GeoServer web page.
Stop the container application. Remove the GeoServer webapp from the container application’s webapps directory. This will usually include the GeoServer.war file as well as a GeoServer directory.
Difference between GEOSERVER.war and GEOSERVER.exe?- The ‘GeoServer.exe’ NSIS installer registers GeoServer as a Windows Service, which uses the Jetty application server to run GeoServer. The ‘GeoServer.war’ is a platform independent web-archive package to be deployed in your own application server (we recommend Apache Tomcat). Using the ‘GeoServer.exe’ installer is a reliable way to setup GeoServer as a windows background service. The downside is the included Jetty application server is managed using text files (jetty.ini) once installed.
- Use of ‘GeoServer.war’ web-archive is provided to install into your own application server (we recommend Apache Tomcat as the market leader, with excellent documentation and integration options). A single application server may support several web application allowing GeoServer to be run alongside your own java web application.
-
sur Locking Up Louisiana
Publié: 29 November 2023, 11:34am CET par Keir Clarke
The state of Louisiana likes putting its citizens in jail. Nearly 1 in every 100 Louisiana residents are locked up in a state prison or local jail. The reasons for Louisiana's high incarceration rates are simple. It isn't because Louisiana is full of criminals. It is because of racism and the profits to be made from enforced slave labor.I arrived at this conclusion after reading the Vera
-
sur Marco Bernasocchi: New QGIS Courses dates for 2024
Publié: 29 November 2023, 11:03am CET
We published our new dates for all courses in 2024 and are looking forward to your participation

- Cours QGIS de base, 10.01. et 17.01.2024 à Lausanne in French
- Cours QGIS avancé, 24.01. et 31.01.2024 à Lausanne in French
- INTERLIS Webinar, 07.03.24 Online in German
- Modelbaker Kurs, 14.03.24 in Zürich in German
- QGIS Kurs Einsteiger, 22.05 und 29.05.2024 in Zürich in German
- QGIS Kurs Fortgeschrittene, 05.06 und 12.06.2024 in Zürich in German
- QGIS Kurs Einsteiger, 30.10 und 06.11.2024 in Bern in German
- QGIS Kurs Fortgeschrittene, 13.11 und 20.11.2024 in Bern in German
- QGIS Kurs Fortgeschrittene, 13.11 und 20.11.2024 in Bern in German
You can find all course information by clicking on the corresponding link
Subscribe now -
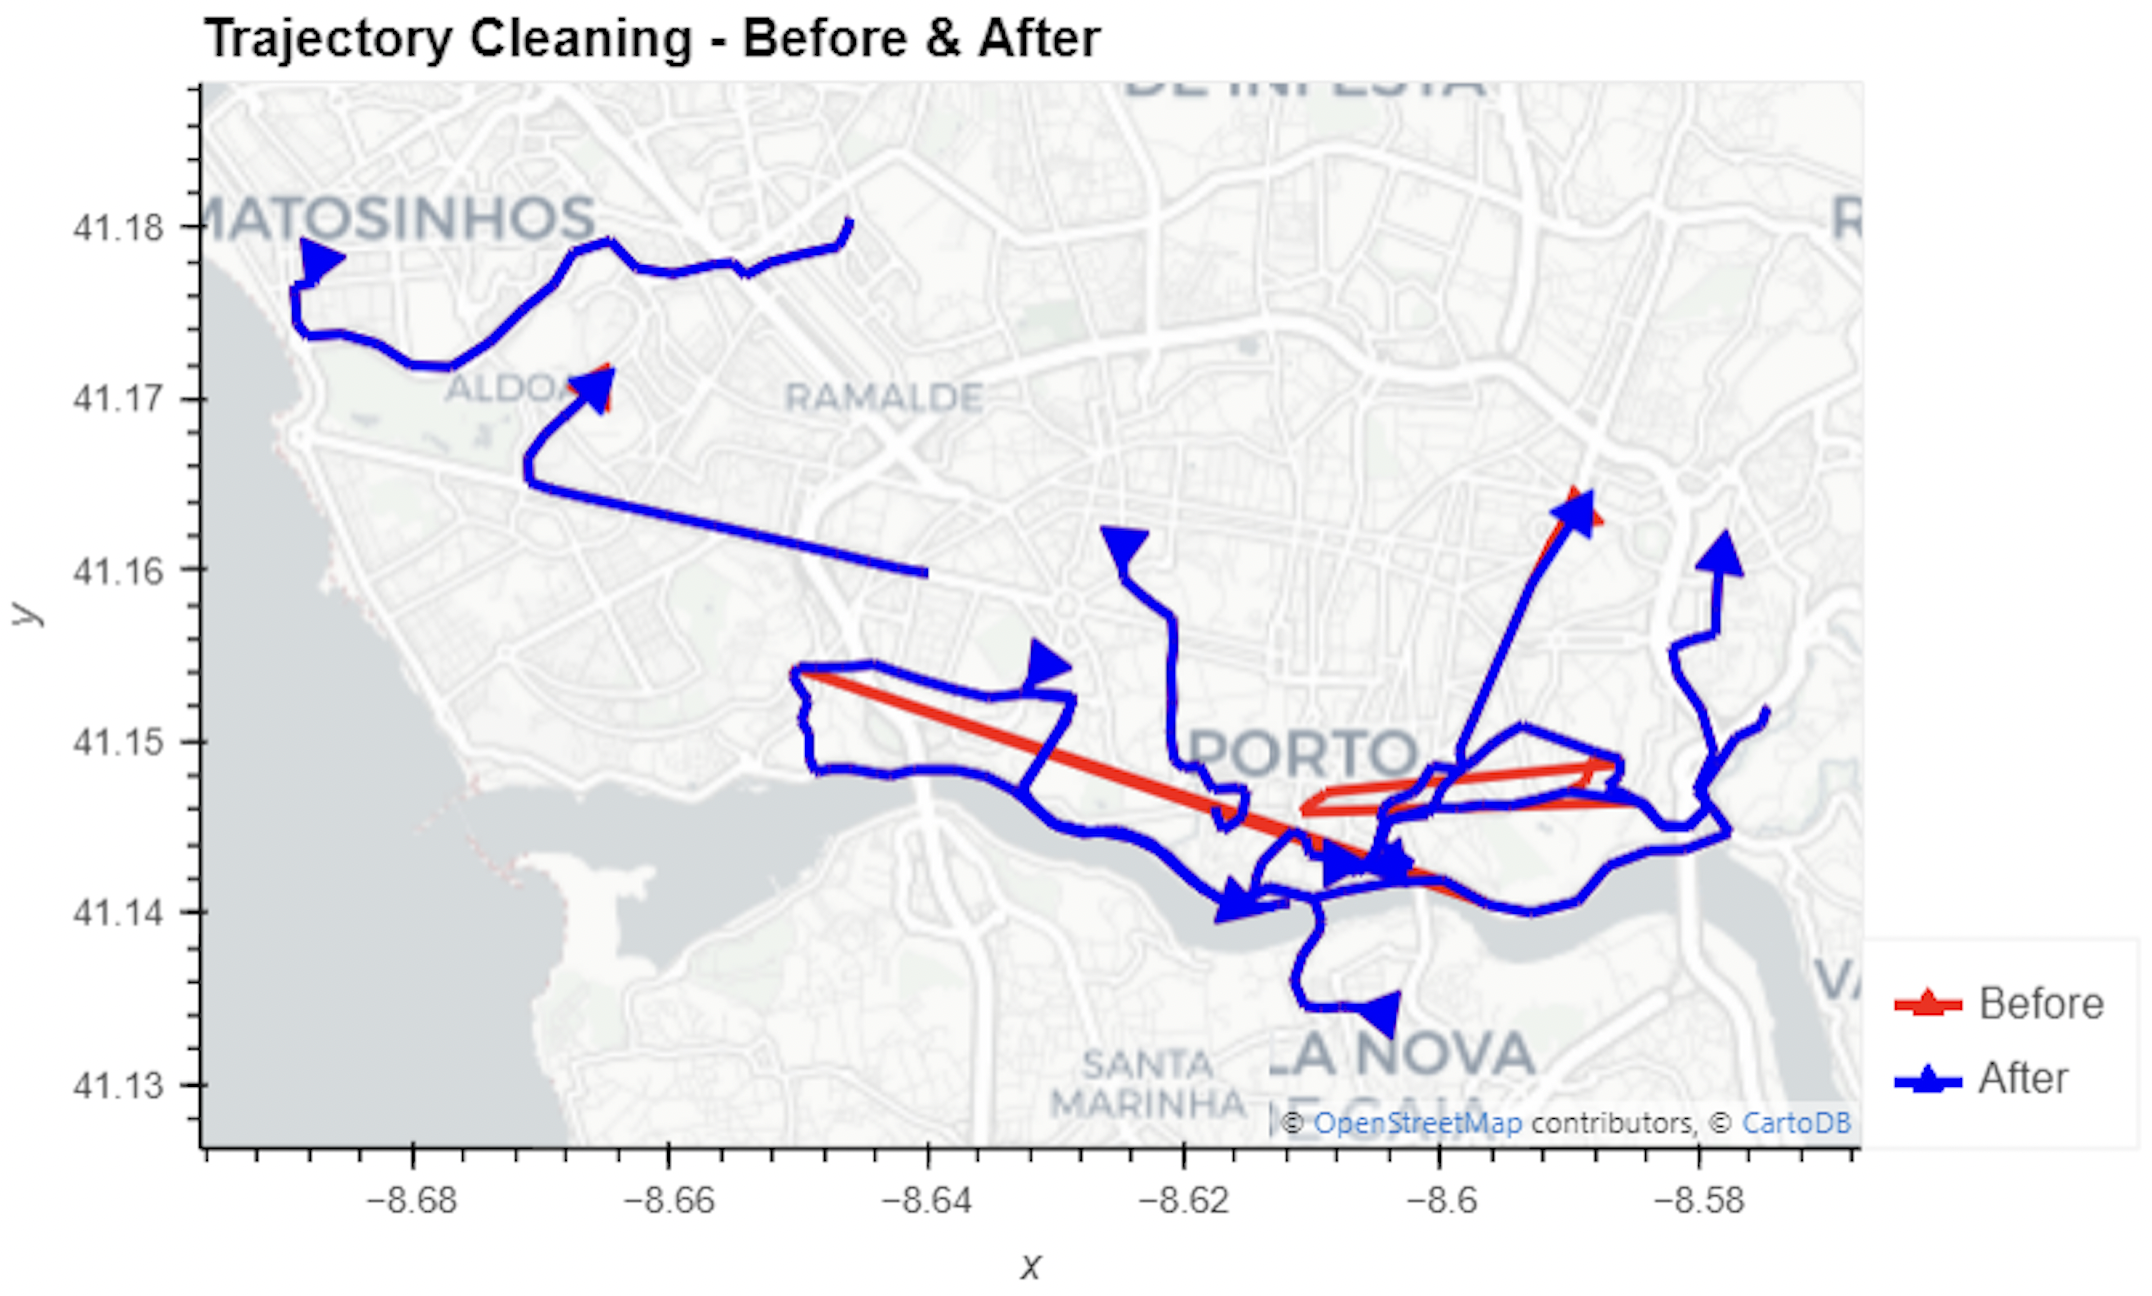
sur Free and Open Source GIS Ramblings: Analyzing mobility hotspots with MovingPandas & CARTO
Publié: 28 November 2023, 6:57pm CET
Today, I want to point out a blog post over at
written together with my fellow co-authors and EMERALDS project team members Argyrios Kyrgiazos and Helen McKenzie.

In this blog post, we walk you through a trajectory hotspot analysis using open taxi trajectory data from Kaggle, combining data preparation with MovingPandas (including the new OutlierCleaner illustrated above) and spatiotemporal hotspot analysis from Carto.
-
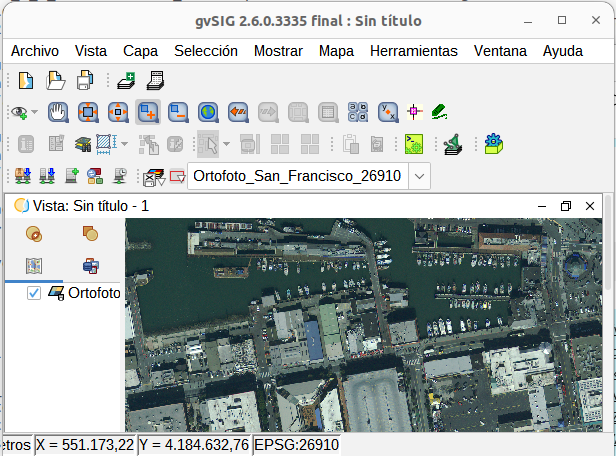
sur gvSIG Team: Free workshop on ‘Introduction to gvSIG,’ using version 2.6 and its new icon set at 19th gvSIG Conference
Publié: 28 November 2023, 3:47pm CET
On November 30, 2023, during the 19th International gvSIG Conference, a free workshop will be held to learn to use version 2.6 of gvSIG, showcasing the new icon set.
To participate in the workshop, simply register using the following link: Workshop Registration.

Version 2.6 comes with an improved default icon set, replacing the one used since its initial versions.
This workshop will cover the main tools of the application, creating views, loading vector and raster layers, both locally and remotely, editing them graphically and alphanumeric, applying geoprocessing, and creating maps. All of this will be done using the new icon set, providing a refreshed version of gvSIG.
Whether you’ve used gvSIG before or it’s your first time, you won’t want to miss this workshop.
To follow it, you’ll need to download the portable version 2.6 of gvSIG for your operating system: Windows 64 – Windows 32 – Linux 64 – Linux 32
You’ll have to extract it to a folder without spaces. For example, you can create a folder called ‘gvSIG’ in C:\ (on Windows) or in the user’s home directory (on Linux), place the zip file inside, and extract it there.
You’ll also need to download the cartography to be used: Workshop Cartography ‘Introduction to gvSIG 2.6’
-
sur The Live Amtrak Train Map
Publié: 28 November 2023, 1:30am CET par Keir Clarke
Trains.fyi is a live interactive map which shows the real-time locations of passenger trains in the U.S. and Canada. The map uses colored markers to show the near real-time positions of trains from a number of different train companies in North America. The arrow on the markers show a train's direction of travel and the colors indicate the transit operators of individual trains. If you
-
sur GeoTools Team: GeoTools 30.1 released
Publié: 28 November 2023, 1:06am CET
The GeoTools team is pleased to the release of the latest stable version of GeoTools 30.1:geotools-30.1-bin.zip geotools-30.1-doc.zip geotools-30.1-userguide.zip geotools-30.1-project.zip This release is also available from the OSGeo Maven Repository and is made in conjunction with GeoServer 2.24.1. The release was made by Jody Garnett (GeoCat).Release -
sur Free and Open Source GIS Ramblings: Setting up a graph db using GTFS data & Neo4J
Publié: 27 November 2023, 10:31pm CET
In a recent post, we looked into a graph-based model for maritime mobility data and how it may be represented in Neo4J. Today, I want to look into another type of mobility data: public transport schedules in GTFS format.
In this post, I’ll be using the public GTFS data for Riga since Riga is one of the demo sites for our current EMERALDS research project.
The workflow is heavily inspired by Bert Radke‘s post “Loading the UK GTFS data feed” from 2021 and his import Cypher script which I used as a template, adjusted to the requirements of the Riga dataset, and updated to recent Neo4J changes.
Here we go.
Since a GTFS export is basically a ZIP archive full of CSVs, we will be making good use of Neo4Js CSV loading capabilities. The basic script for importing the stops file and creating point geometries from lat and lon values would be:
LOAD CSV with headers
FROM "file:///stops.txt"
AS row
CREATE (:Stop {
   stop_id: row["stop_id"],
   name: row["stop_name"],
   location: point({
    longitude: toFloat(row["stop_lon"]),
    latitude: toFloat(row["stop_lat"])
    })
})
This requires that the stops.txt is located in the import directory of your Neo4J database. When we run the above script and the file is missing, Neo4J will tell us where it tried to look for it. In my case, the directory ended up being:
C:\Users\Anita\.Neo4jDesktop\relate-data\dbmss\dbms-72882d24-bf91-4031-84e9-abd24624b760\importSo, let’s put all GTFS CSVs into that directory and we should be good to go.
Let’s start with the agency file:
load csv with headers from
'file:///agency.txt' as row
create (a:Agency {
   id: row.agency_id,
   name: row.agency_name,
   url: row.agency_url,
   timezone: row.agency_timezone,
   lang: row.agency_lang
});
… Added 1 label, created 1 node, set 5 properties, completed after 31 ms.
The routes file does not include agency info but, luckily, there is only one agency, so we can hard-code it:
load csv with headers from
'file:///routes.txt' as row
match (a:Agency {id: "rigassatiksme"})
create (a)-[:OPERATES]->(r:Route {
   id: row.route_id,
   shortName: row.route_short_name,
   longName: row.route_long_name,
   type: toInteger(row.route_type)
});
… Added 81 labels, created 81 nodes, set 324 properties, created 81 relationships, completed after 28 ms.
From stops, I’m removing non-existent or empty columns:
load csv with headers from
'file:///stops.txt' as row
create (s:Stop {
   id: row.stop_id,
   name: row.stop_name,
   location: point({
      latitude: toFloat(row.stop_lat),
      longitude: toFloat(row.stop_lon)
   }),
   code: row.stop_code
});
… Added 1671 labels, created 1671 nodes, set 5013 properties, completed after 71 ms.
From trips, I’m also removing non-existent or empty columns:
load csv with headers from
'file:///trips.txt' as row
match (r:Route {id: row.route_id})
create (r)<-[:USES]-(t:Trip {
   id: row.trip_id,
   serviceId: row.service_id,
   headSign: row.trip_headsign,
   direction_id: toInteger(row.direction_id),
   blockId: row.block_id,
   shapeId: row.shape_id
});
… Added 14427 labels, created 14427 nodes, set 86562 properties, created 14427 relationships, completed after 875 ms.
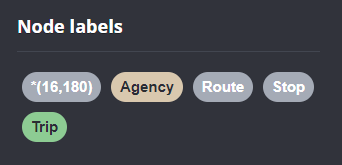
Slowly getting there. We now have around 16k nodes in our graph:
Finally, it’s stop times time. This is where the serious information is. This file is much larger than all previous ones with over 300k lines (i.e. times when an PT vehicle stops).
This requires another tweak to Bert’s script since
using periodic commitis not supported anymore:The PERIODIC COMMIT query hint is no longer supported. Please use CALL { … } IN TRANSACTIONS instead.So I ended up using the following, based on [https:]] ::auto load csv with headers from 'file:///stop_times.txt' as row CALL { with row match (t:Trip {id: row.trip_id}), (s:Stop {id: row.stop_id}) create (t)<-[:BELONGS_TO]-(st:StopTime { arrivalTime: row.arrival_time, departureTime: row.departure_time, stopSequence: toInteger(row.stop_sequence)})-[:STOPS_AT]->(s) } IN TRANSACTIONS OF 10 ROWS;… Added 351388 labels, created 351388 nodes, set 1054164 properties, created 702776 relationships, completed after 1364220 ms.
As you can see, this took a while. But now we have all nodes in place:


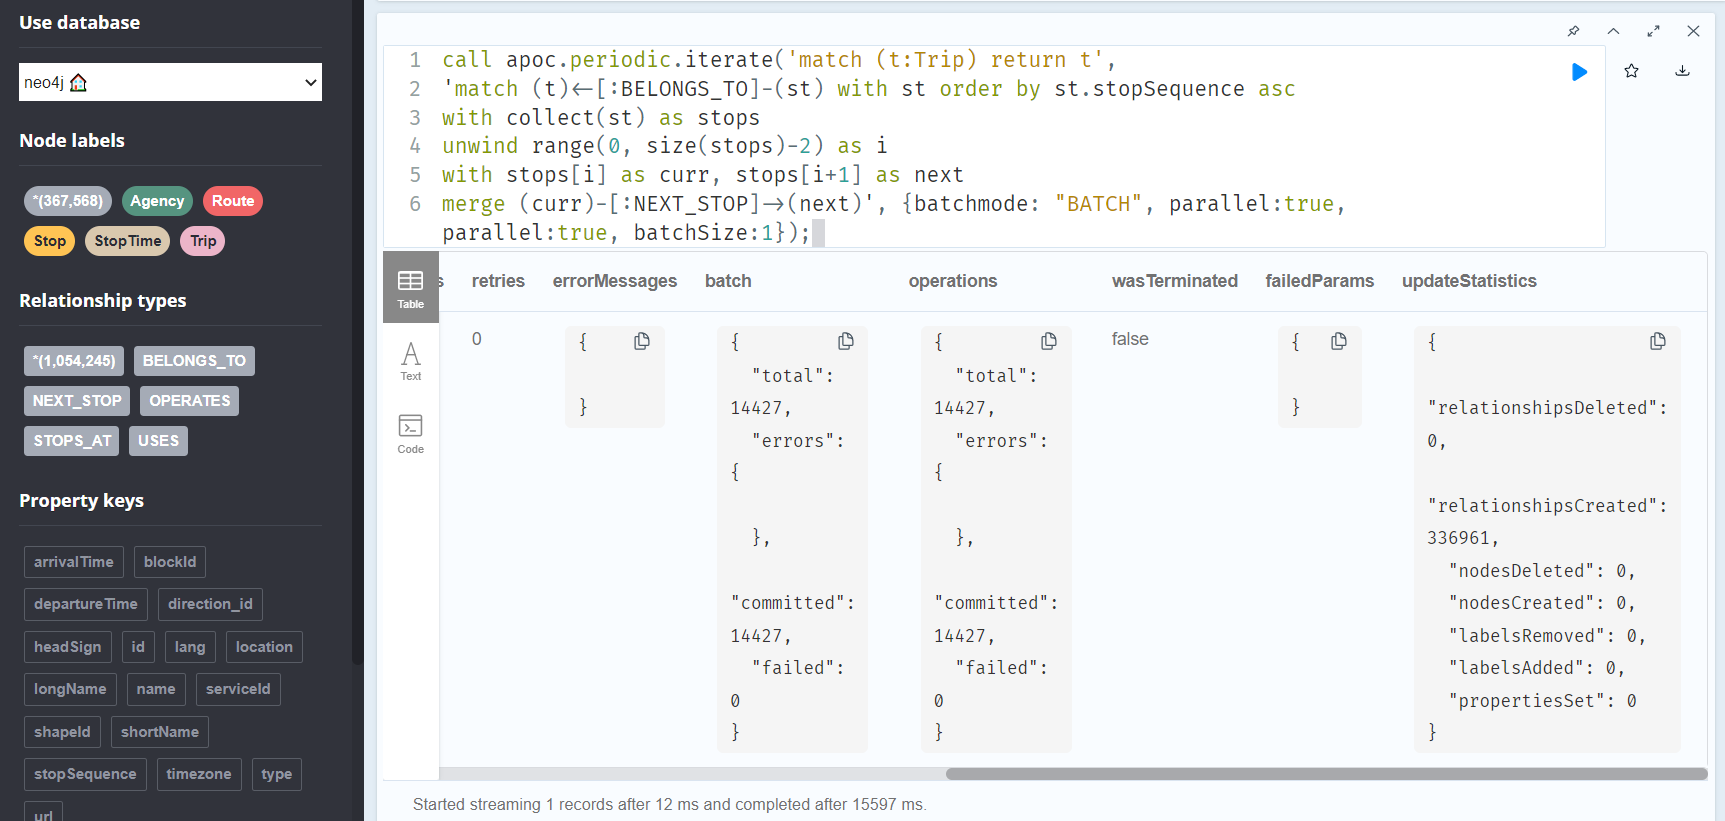
The final statement adds additional relationships between consecutive stop times:
call apoc.periodic.iterate('match (t:Trip) return t',
'match (t)<-[:BELONGS_TO]-(st) with st order by st.stopSequence asc
with collect(st) as stops
unwind range(0, size(stops)-2) as i
with stops[i] as curr, stops[i+1] as next
merge (curr)-[:NEXT_STOP]->(next)', {batchmode: "BATCH", parallel:true, parallel:true, batchSize:1});
This fails with:
There is no procedure with the name apoc.periodic.iterate registered for this database instance. Please ensure you've spelled the procedure name correctly and that the procedure is properly deployed.So, let’s install APOC. That’s a plugin which we can install into our database from within Neo4J Desktop:
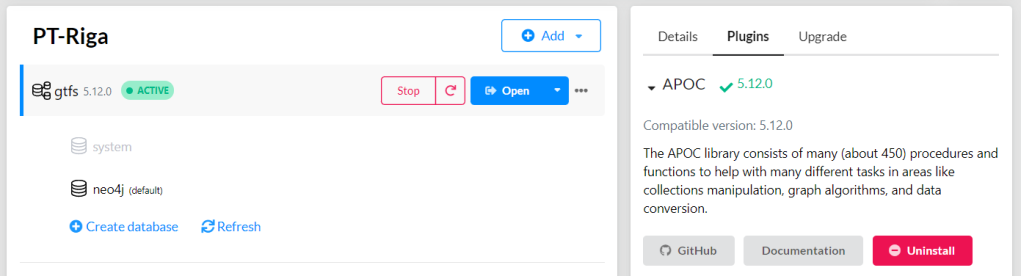
After restarting the db, we can run the query:

No errors. Sounds good.
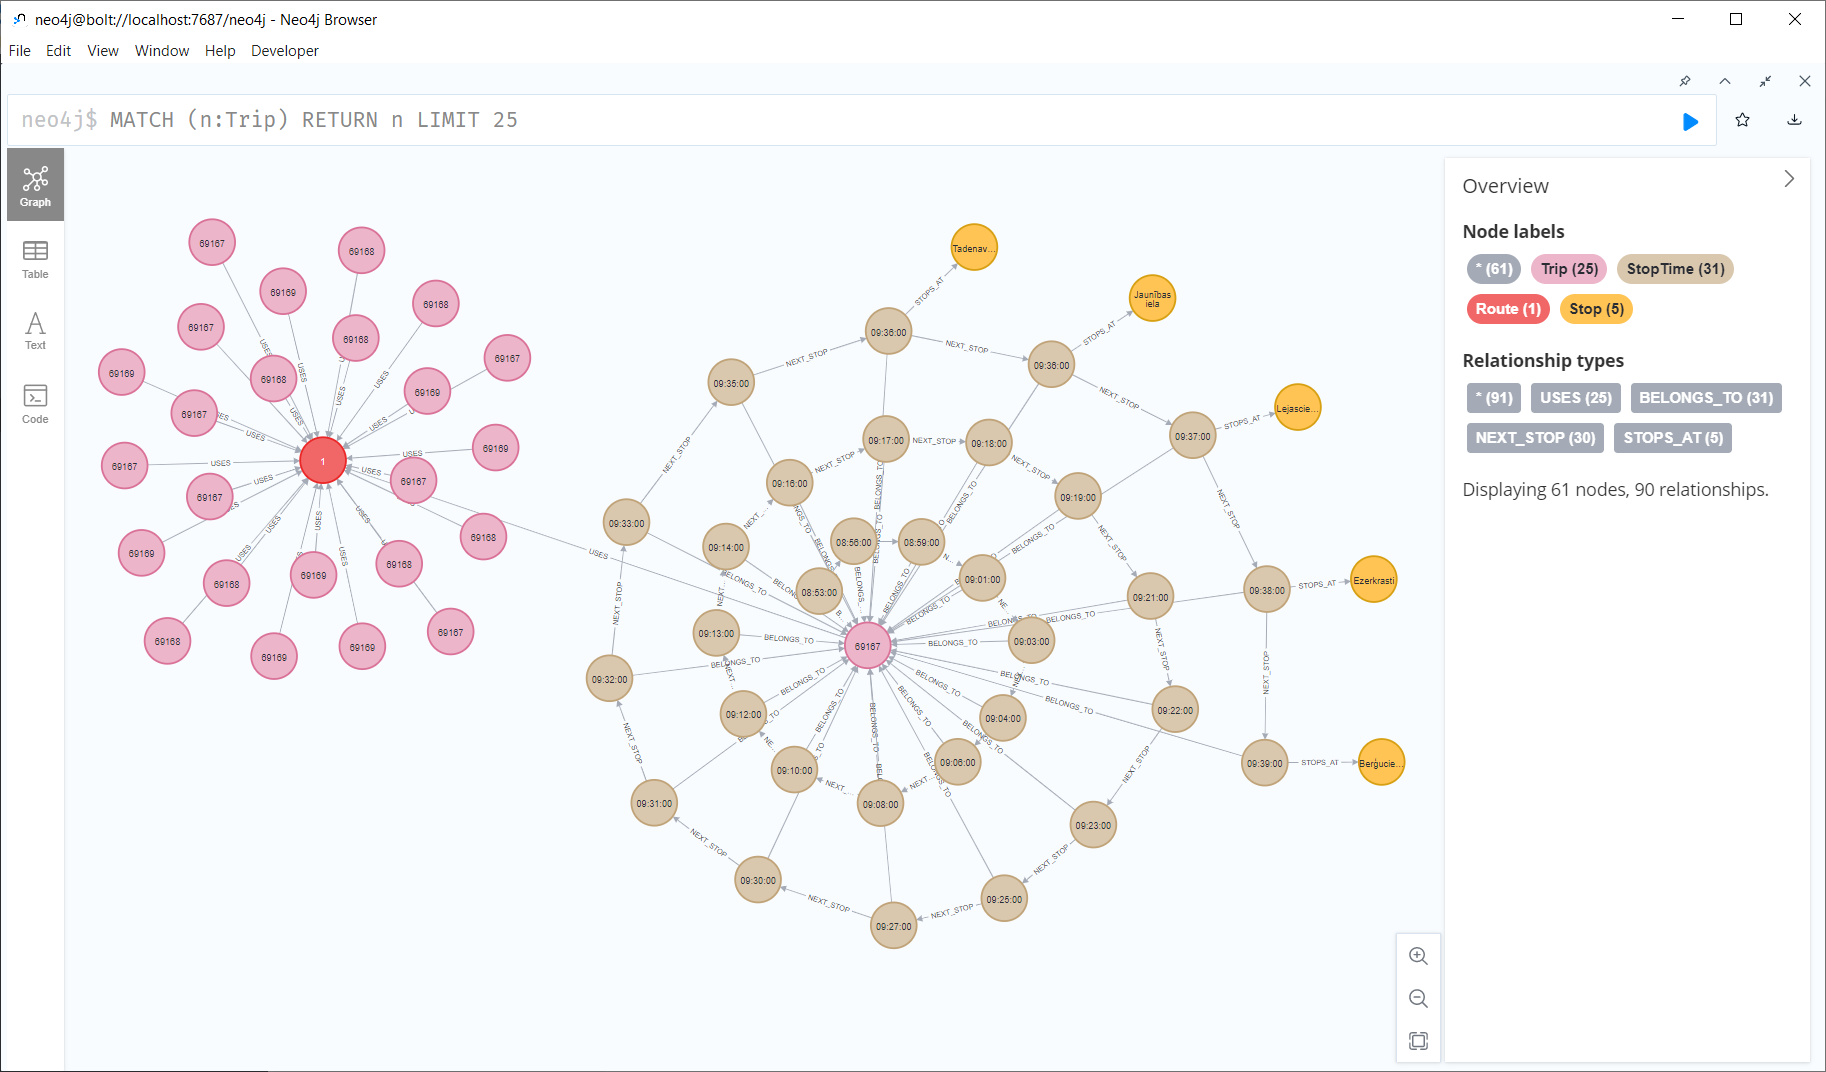
Let’s have a look at what we ended up with. Here are 25 random Trips. I expanded one of them to show its associated StopTimes. We can see the relations between consecutive StopTimes and I’ve expanded the final five StopTimes to show their linked Stops:

I also wanted to visualize the stops on a map. And there used to be a neat app called Neomap which can be installed easily:

However, Neomap does not seem to be compatible with the latest Neo4J:

So this final step will have to wait for another time.
-
sur gvSIG Team: Taller gratuito sobre “Introducción a gvSIG”, con la versión 2.6 y su nuevo juego de iconos en las 19as Jornadas gvSIG
Publié: 27 November 2023, 6:49pm CET
El día 30 de noviembre de 2023, durante las 19as Jornadas Internacionales gvSIG, se realizará un taller gratuito sobre el manejo de la versión 2.6 de gvSIG, con el nuevo juego de iconos.
Para seguir el taller solo deberás registrarte desde el siguiente enlace: Inscripción taller.
La versión 2.6 incluye por defecto un nuevo juego de iconos mejorado, sustituyendo al que llevaba desde sus versiones iniciales.
En este taller se repasarán las principales herramientas de la aplicación, aprendiendo a crear vistas, cargar capas vectoriales y raster, locales y remotas, a editarlas, tanto gráfica como alfanuméricamente, a aplicar geoprocesamiento y a generar mapas. Todo ello se realizará con el nuevo juego de iconos, que da una versión renovada a gvSIG.
Tanto si ya has utilizado gvSIG previamente, como si es tu primera vez, no puedes perderte este taller.
Para poder seguirlo, deberás descargarte la versión 2.6 portable de gvSIG, según tu sistema operativo: Windows 64 – Windows 32 – Linux 64 – Linux 32
Se deberá descomprimir en una carpeta sin espacios ni acentos ni eñes. Se puede crear por ejemplo una carpeta “gvSIG” en C:\ (en Windows) o en el home de usuario (en Linux), dejar el zip dentro, y descomprimir ahí.
Se deberá también descargar la cartografía a utilizar: Cartografía taller “Introducción a gvSIG 2.6”


-
sur The World as 1000 People
Publié: 27 November 2023, 9:20am CET par Keir Clarke
If the world's population was proportionally represented as 1,000 people then 591 of those people would live in Asia, 185 would live in Africa, 91 in Europe, 75 would live in North America, 55 in South America and the remaining 5 people would live in Oceania. The Visual Capitalist has mapped The World's Population as 1,000 People. On the map each marker (shaped as a human figure)
-
sur GeoServer Team: GeoServer 2.24.1 Release
Publié: 27 November 2023, 1:00am CET
GeoServer 2.24.1 release is now available with downloads (bin, war, windows), along with docs and extensions.
This is a stable release of GeoServer recommended for production use. GeoServer 2.24.1 is made in conjunction with GeoTools 30.1, and GeoWebCache 1.24.1.
Thanks to Jody Garnett (GeoCat) for making this release.
Release notesImprovement:
- GEOS-11152 Improve handling special characters in the Simple SVG Renderer
- GEOS-11153 Improve handling special characters in the WMS OpenLayers Format
- GEOS-11154 Improve handling special characters in the MapML HTML Page
- GEOS-11155 Add the X-Content-Type-Options header
- GEOS-11173 Default to using [HttpOnly] session cookies
- GEOS-11176 Add validation to file wrapper resource paths
- GEOS-11188 Let DownloadProcess handle download requests whose pixel size is larger than integer limits
- GEOS-11189 Add an option to throw a service exception when nearest match “allowed interval” is exceeded
- GEOS-11193 Add an option to throw an exception when the time nearest match does not fall within search limits
Bug:
- GEOS-11074 GeoFence may not load property file at boot
- GEOS-11166 OGC API Maps HTML representation fail without datetime parameter
- GEOS-11184 ncwms module has a compile dependency on gs-web-core test jar
- GEOS-11190 GeoFence: align log4j2 deps
- GEOS-11196 NPE in VectorDownload if ROI not defined
- GEOS-11200 GetFeatureInfo can fail on rendering transformations that generate a different raster
- GEOS-11203 WMS GetFeatureInfo bad WKT exception for label-geometry
- GEOS-11206 Throw nearest match mismatch exceptions only for WMS
For the complete list see 2.24.1 release notes.
Community Module Updates OAuth2 OpenID-Connect improvementsTwo improvements have been made to the community module for OAuth2 OpenID-Connect authentication:
- GEOS-11209 Open ID Connect Proof Key of Code Exchange (PKCE)
- GEOS-11212 ODIC accessToken verification using only JWKs URI
In addition the module includes an
OIDC_LOGGINGprofile and updated documentation covering new settings and troubleshooting guidance.Thanks Jody Garnett for these improvements on behalf of GeoBeyond.
note: Over the course of 2024 the OAuth2 plugins will need to be rewritten for spring-framework 6. Interested parties are encouraged to reach out to geoserver-devel email list; ideally we would like to see this functionality implemented and included as part of GeoServer.
About GeoServer 2.24 SeriesAdditional information on GeoServer 2.24 series:
- GeoServer 2.24 User Manual
- State of GeoServer 2.24 (foss4g-na presentation)
- Control remote HTTP requests sent by GeoTools/GeoServer
- Multiple CRS authority support, planetary CRS
- Extensive GeoServer Printing improvements
- Upgraded security policy
Release notes: ( 2.24.1 | 2.24.0 | 2.24-RC )
GeoServer is an Open Source Geospatial Foundation project supported by a mix of volunteer and service provider activity. We reply on sponsorship to fund activities beyond the reach of individual contributors.
-
sur The World's Largest Snow Dome
Publié: 25 November 2023, 10:37am CET par Keir Clarke
This morning I discovered MapTheClouds, which features a whole host of impressive interactive map visuals. I'm sure a lot of the maps featured on MapTheClouds are very useful but as ever I'm drawn to the fun, experimental maps, to the maps that apparently serve no other purpose than they were fun to create and are even more fun to play with.Here are a few links to my personal favorites, but check
-
sur KAN T&IT Blog: Destacada participación de Julia Martinuzzi y Walter Shilman en el Side Event de UN-GGIM Américas
Publié: 24 November 2023, 6:47pm CET
El pasado 20 de octubre, nuestra Directora de Operaciones (COO), Julia Martinuzzi, y nuestro Director de Tecnología (CTO), Walter Shilman, asumieron roles clave durante la Décima Sesión de la Comisión de las Naciones Unidas para América Latina y el Caribe (ECLAC) celebrada en Santiago de Chile. Su destacada participación se centró en la organización y liderazgo del Side Event titulado «Open Source technologies for geospatial information management and their role in the implementation of the IGIF.»
Este evento, coordinado por el capítulo argentino de OSGeo – Geolibres, reunió a destacados expertos de la región para compartir sus conocimientos sobre enfoques sostenibles y accesibles para abordar los desafíos geoespaciales.
La discusión se centró esencialmente en la implementación del Marco Integrado de Información Geoespacial (IGIF), resaltandola importancia de la accesibilidad y sostenibilidad, con un énfasis primordial en la aplicación de tecnologías de código abierto.
Los participantes exploraron temas clave, como la integración de datos estadísticos y geoespaciales, destacando cómo las tecnologías de código abierto fomentan la colaboración y mejoran la toma de decisiones. Además, se examinó el papel esencial de la geoinformación y las tecnologías de código abierto en la gestión de desastres.
El evento concluyó resaltando la necesidad de difundir y promover el uso de tecnologías de código abierto entre los países miembros de UN-GGIM, subrayando su poder en la Gestión de Información Geoespacial. La colaboración e intercambio de conocimientos entre expertos y principiantes fueron identificados como impulsores clave para un uso más efectivo de la información geoespacial en diversas aplicaciones, desde la planificación urbana hasta la gestión de desastres.
En ese momento, Julia Martinuzzi y Walter Shilman lideraron de manera destacada, contribuyendo significativamente al buen desarrollo del evento. Esperamos que esta experiencia positiva siga siendo una fuente de nuevas ideas y trabajo conjunto en el manejo de información geoespacial en América Latina y el Caribe.

Presentación en el Side Event sobre «Open Source technologies for geospatial information management and their role in the implementation of the IGIF,»
Les compartimos la presentación del evento para que todos puedan acceder.
Presentación Side Event: «Open Source technologies for geospatial information management and their role in the implementation of the IGIF»
UN-GGIM-Americas-Side-Event-ENDescarga

-
sur Global Sentiment Towards Israel & Palestine
Publié: 24 November 2023, 9:30am CET par Keir Clarke
The interactive map Israel-Palestine Media Bias visualizes the results of a sentiment analysis of mostly English language media and social media websites to determine whether they have a predominately Israeli or Palestinian bias.Using the map you can explore the Israel/Palestine sentiment bias expressed by the media in individual countries, on different platforms and by the percentage of a
-
sur SIG Libre Uruguay: Un nuevo reconocimiento a gvSIG
Publié: 23 November 2023, 3:05pm CET
-
sur OGC Compliance Certification now available for the GeoPose 1.0 Data Exchange Standard
Publié: 23 November 2023, 3:00pm CET par Simon Chester
The Open Geospatial Consortium (OGC) is excited to announce that the Executable Test Suite (ETS) for version 1.0 of the OGC GeoPose Data Exchange Standard has been approved by the OGC Membership. Products that implement OGC GeoPose 1.0 and pass the tests in the ETS can now be certified as OGC Compliant.
The OGC Compliance Program offers a certification process that ensures organizations’ solutions are compliant with OGC Standards. It is a universal credential that allows agencies, industry, and academia to better integrate their solutions. OGC Compliance provides confidence that a product will seamlessly integrate with other compliant solutions regardless of the vendor that created them.
Implementers of the GeoPose 1.0 Data Exchange Standard are invited to validate their products using the new test suite in the OGC validator tool. Testing involves submitting an OGC GeoPose 1.0 document produced by the product being assessed. These tests typically take only 5-10 minutes to complete. Once a product has passed the test, the implementer can apply to use the ‘OGC Compliant’ trademark on their product.
OGC GeoPose is a free and open Implementation Standard for exchanging the location and orientation of real or virtual geometric objects (“Poses”) within reference frames anchored to Earth’s surface (“Geo”) or within other astronomical coordinate systems. The Standard specifies a JavaScript Object Notation (JSON) encoding for representing conformant poses.
The GeoPose Standard specifies a number of conformance classes, most being optional. One conformance class is defined for each corresponding set of Structural Data Units (SDUs), where each SDU is linked to the Logical Model as an alias for a class or attribute. The following conformance classes from the OGC GeoPose 1.0 Data Exchange Standard (OGC 21-056r11) are supported by the ETS:
- Basic-YPR (Yaw-Pitch-Roll) SDU JSON
- Basic-Quaternion SDU JSON – Permissive
- Advanced SDU JSON
- Graph SDU JSON
- Chain SDU JSON
- Regular Series SDU JSON
- Stream SDU JSON
Some of the products implementing the GeoPose Standard that have already been certified as OGC Compliant include Away Team Software’s 3D Compass 1, OpenSitePlan’s SolarPose 1.0, and Ethar Inc.’s GeoPose C# Library 1.0. These products apply GeoPose in a wide variety of applications, such as Augmented Reality (AR), mobile Location Based Services (LBS), web APIs, and more. To implement GeoPose in your product, please refer to the OGC GeoPose 1.0 Data Exchange Standard document, freely available from OGC. Additional documentation is also available on the GeoPose website.
More information about the OGC compliance process, and how it can benefit your organization, is available at ogc.org/compliance. Implementers of the OGC GeoPose 1.0 Data Exchange Standard – or other OGC Standards – can validate their products now using the OGC Validator Tool.
The post OGC Compliance Certification now available for the GeoPose 1.0 Data Exchange Standard appeared first on Open Geospatial Consortium.
-
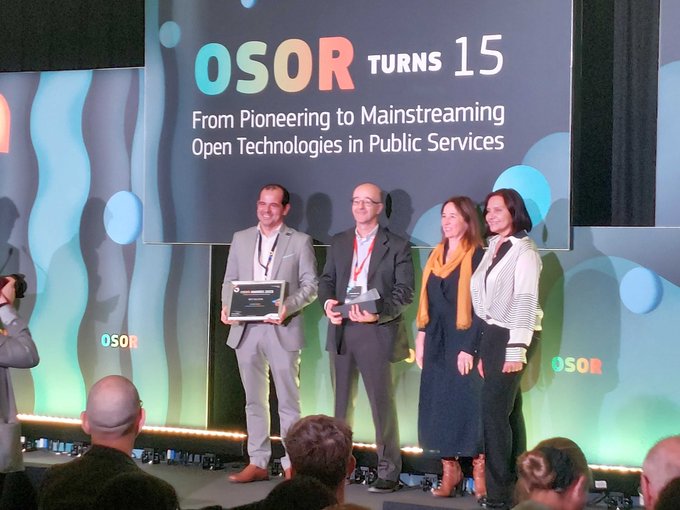
sur gvSIG Team: El Proyecto GVSIG, impulsado por la Generalitat Valenciana y la Asociación GVSIG, galardonado como mejor proyecto de software de Europa en los OSOR Awards
Publié: 23 November 2023, 11:25am CET

El Proyecto GVSIG, una iniciativa conjunta de la Generalitat Valenciana y la Asociación GVSIG, ha sido distinguido con el primer premio en los OSOR Awards. Este galardón reconoce los logros excepcionales que ha logrado el proyecto GVSIG a nivel internacional y reflejan el compromiso continuo de la Generalitat Valenciana con la innovación y la colaboración.
Los OSOR Awards han sido organizados por el Observatorio de Software Libre (OSOR) de la Comisión Europea con motivo de su 15 aniversario, y han querido destacar los mejores proyectos impulsados por las administraciones públicas de toda Europa. En este contexto, GVSIG ha destacado entre todas las nominaciones, convirtiéndose en el ganador de los premios, en los que se ha destacado su impacto global y su contribución al desarrollo tecnológico europeo.
Según los organizadores de los premios se recibieron más de cien candidaturas de 23 países. Tras una primera fase, el jurado seleccionó los seis mejores proyectos, donde GVSIG compartía opciones con proyectos de España, Dinamarca, Italia y Francia. Durante el evento organizado en el día de ayer en Bruselas, los seis proyectos tuvieron que defender su candidatura ante el jurado de la Comisión Europea. Finalmente fue anunciado el ganador: el proyecto GVSIG presentado conjuntamente por la Generalitat Valenciana y la Asociación GVSIG.El Proyecto GVSIG es un catálogo de herramientas informáticas para gestión de información geográfica que desde su nacimiento en 2004 ha ido ganado reconocimiento por su versatilidad y utilidad en una variedad de sectores, desde la gestión de recursos naturales hasta la planificación urbana. La Generalitat Valenciana ha desempeñado un papel fundamental tanto en su impulso inicial como en el respaldo continuo al proyecto. La Asociación GVSIG, por su parte, ha desempeñado un papel esencial en la promoción y difusión de esta plataforma a nivel internacional, facilitando la generación y crecimiento de un sector empresarial valenciano especialista en tecnologías de información geográfica. Un ejemplo de colaboración público-privada que ahora obtiene el reconocimiento de Europa.
Este prestigioso galardón no solo reconoce el éxito del Proyecto GVSIG, sino que también destaca el compromiso de la Generalitat Valenciana y la Asociación GVSIG con la promoción de soluciones tecnológicas abiertas y accesibles, fomentando la innovación y la colaboración como motor de desarrollo.
GVSIG da solución a todas las necesidades relacionadas con la geolocalización y la administración del territorio. En la Generalitat Valenciana se multiplican sus usuarios y entre los diversos ejemplos de uso se encuentran desde aplicaciones para ayudar a proteger las praderas fanerógamas, la conocida posidonia, evitando fondear en zonas protegidas a aplicaciones de gestión del registro vitivinícola, pasando por soluciones para fomentar la movilidad sostenible mediante un planificador de rutas más versátil que el propio Google Maps o aplicaciones para analizar los accidentes de tráfico.
Si su uso es transversal en la Generalitat Valenciana, otro tanto ocurre a nivel global. Son innumerables las entidades de todo tipo que utilizan esta tecnología valenciana. En la presentación de los OSOR Awars se citaron varias de ellas. A nivel supranacional entidades como Naciones Unidas la han adoptado como tecnología de referencia en usos tan destacados como facilitar la seguridad de las misiones de los Cascos Azules en sus desplazamientos ante ataques terroristas. A nivel nacional ha sido igualmente adoptada, contando casos tan significativos como el del Gobierno de Uruguay, donde GVSIG es la base tecnológica para todos los proyectos de gestión y difusión de información territorial del país, habiendo servido también para crear un sistema único de direcciones. En Uruguay ha sido tal el nivel de adopción que en la educación secundaria es utilizada para el aprendizaje de las materias relacionadas con la geografía. Su uso a nivel regional y local nos lleva a citar ejemplos como el del Estado de Tocantins en Brasil, donde se ha convertido en la plataforma de gestión geográfica y estadística o el Gobierno de Córdoba en Argentina, donde es utilizada para analizar los datos de criminalidad y seguridad ciudadana. Y donde todavía está más implantada es en las administraciones locales, donde GVSIG está siendo adoptada a gran velocidad por decenas de ayuntamientos de toda España; los últimos han sido los Ayuntamientos de Alicante, Albacete, Cartagena y Talavera de la Reina. Solo en la Comunidad Valenciana el número de ayuntamientos que confían en GVSIG es innumerable: Cullera, Onda, Picassent, L’Eliana, La Pobla de Vallbona, Nàquera, Alzira, Benicarló… e igualmente otras entidades valencianas han adoptado GVSIG como el Consorcio Provincial de Bomberos de Valencia, donde su uso se centra en la gestión de emergencias. Y más allá de la administración pública, cuya relación con el territorio es directa, GVSIG también ha entrado a formar parte de las soluciones informáticas que utilizan empresas que trabajan con información geoposicionada, como es el caso de Repsol que hace un uso extensivo de GVSIG en su división de energías renovables.
El premio otorgado a la Generalitat Valenciana y a la Asociación GVSIG se suma a otros galardones obtenidos anteriormente, de entidades tan diversas como el Diario Expansión o la NASA.
GVSIG es un referente en lo que se ha denominado Infraestructuras de Datos Espaciales, la puesta en marcha de plataformas que permitan a las administraciones públicas compartir su información geográfica mediante estándares.
El impacto del proyecto tiene numerosas derivadas, a nivel académico se imparte formación en GVSIG en universidades de todo el mundo, se publican anualmente cientos de artículos científicos donde se utiliza GVSIG como herramienta de los investigadores, se multiplican las conferencias y eventos donde se presentan todo tipo de proyectos desarrollados con GVSIG.
GVSIG, un proyecto basado en el conocimiento libre, ejemplo de colaboración público-privada que sitúa a Valencia como uno de los indiscutibles polos de referencia en el ámbito de la geomática, la tecnología aplicada a la dimensión geográfica de la información. El premio obtenido ayer es un reconocimiento a todo el camino recorrido.
Recientemente ha sido nominado al Premio Nacional de Ciencias Geográficas, todavía por resolver. Lo que nos han confirmado fuentes de la Asociación gvSIG es que esta candidatura ha recibido más de 150 cartas de apoyo de entidades de todo el mundo, desde el Departamento de Transporte de Washington al Ordnance Survey, la agencia cartográfica del Reino Unido. -
sur gvSIG Team: The GVSIG Project, driven by the Generalitat Valenciana and the GVSIG Association, awarded as the best software project in Europe at the OSOR Awards
Publié: 23 November 2023, 9:24am CET
The GVSIG Project, a joint initiative of the Generalitat Valenciana and the GVSIG Association, has been honored with the first prize at the OSOR Awards. This award recognizes the exceptional achievements of the GVSIG project on an international level and reflects the ongoing commitment of the Generalitat Valenciana to innovation and collaboration.
The OSOR Awards were organized by the Observatory of Open Source Software (OSOR) of the European Commission on the occasion of its 15th anniversary, aiming to highlight the best projects driven by public administrations throughout Europe. In this context, GVSIG stood out among all nominations, becoming the winner of the awards, emphasizing its global impact and contribution to European technological development.
According to the award organizers, over a hundred nominations from 23 countries were received. After an initial phase, the jury selected the top six projects, where GVSIG competed alongside projects from Spain, Denmark, Italy, and France. During the event held yesterday in Brussels, the six projects had to defend their candidacy before the European Commission’s jury. Finally, the winner was announced: the GVSIG project jointly presented by the Generalitat Valenciana and the GVSIG Association.
The GVSIG Project is a catalog of computer tools for geographic information management that, since its inception in 2004, has gained recognition for its versatility and usefulness in various sectors, from natural resource management to urban planning. The Generalitat Valenciana has played a fundamental role in both its initial promotion and continuous support for the project. The GVSIG Association, in turn, has played an essential role in promoting and disseminating this platform internationally, facilitating the generation and growth of a Valencian business sector specializing in geographic information technologies. An example of public-private collaboration that now receives recognition from Europe.
This prestigious award not only acknowledges the success of the GVSIG Project but also highlights the commitment of the Generalitat Valenciana and the GVSIG Association to promoting open and accessible technological solutions, fostering innovation and collaboration as drivers of development.
GVSIG addresses all needs related to geolocation and territory management. Its users in the Generalitat Valenciana are multiplying, and among various use cases are applications to help protect seagrass meadows, such as the well-known posidonia, by avoiding anchoring in protected areas, applications for managing the vineyard registry, and solutions to promote sustainable mobility through a route planner more versatile than Google Maps itself, or applications to analyze traffic accidents.
If its use is widespread in the Generalitat Valenciana, the same is true globally. Countless entities of all kinds use this Valencian technology. Several were mentioned in the presentation of the OSOR Awards. At the supranational level, entities like the United Nations have adopted it as a reference technology for prominent uses, such as enhancing the security of Blue Helmets’ missions during their travels in the face of terrorist attacks. Nationally, it has been similarly adopted, with significant cases such as the Government of Uruguay, where GVSIG is the technological basis for all territorial information management and dissemination projects in the country, also serving to create a unique addressing system. In Uruguay, its adoption is so extensive that it is used in secondary education for learning subjects related to geography. Its use at the regional and local levels leads to examples such as the State of Tocantins in Brazil, where it has become the platform for geographic and statistical management, or the Government of Córdoba in Argentina, where it is used to analyze crime and public safety data. It is even more deeply entrenched in local administrations, with GVSIG being rapidly adopted by dozens of municipalities throughout Spain, including the recent additions of the municipalities of Alicante, Albacete, Cartagena, and Talavera de la Reina. In the Valencian Community alone, the number of municipalities trusting GVSIG is countless: Cullera, Onda, Picassent, L’Eliana, La Pobla de Vallbona, Nàquera, Alzira, Benicarló, and many other Valencian entities have also adopted GVSIG, such as the Provincial Fire Consortium of Valencia, where its use focuses on emergency management. Beyond the public administration, whose relationship with the territory is direct, GVSIG has also become part of the computer solutions used by companies working with geopositioned information, such as Repsol, which extensively uses GVSIG in its renewable energy division.
The award granted to the Generalitat Valenciana and the GVSIG Association adds to other accolades previously obtained from diverse entities such as Diario Expansión or NASA.
GVSIG is a reference in what is called Spatial Data Infrastructures, the implementation of platforms that allow public administrations to share their geographic information through standards.
The impact of the project has numerous ramifications; academically, GVSIG training is offered at universities worldwide, hundreds of scientific articles are published annually using GVSIG as a tool by researchers, and conferences and events showcasing various projects developed with GVSIG abound.
GVSIG, a project based on free knowledge, is an example of public-private collaboration that positions Valencia as one of the undisputed reference hubs in the field of geomatics, technology applied to the geographic dimension of information. The award obtained yesterday is recognition for the entire journey taken.
Recently, it has been nominated for the National Geographic Sciences Award, still pending resolution. Sources from the GVSIG Association have confirmed that this candidacy has received more than 150 letters of support from entities worldwide, from the Department of Transportation in Washington to the Ordnance Survey, the cartographic agency of the United Kingdom.
-
sur America is a Jigsaw
Publié: 23 November 2023, 8:22am CET par Keir Clarke
If you want a little Thanksgiving fun today then you should play TripGeo's State Locator game. State Locator is an interactive map of the United States. A map which you have to assemble yourself based on the shapes of the individual states and a few image clues.At the beginning of the game you are presented with a random state. Your job is to place this state onto a blank map of the United
-
sur gvSIG Team: Program of 19th International gvSIG Conference (online) is now available, and registration (free of charge) period is open
Publié: 22 November 2023, 10:18am CET
Free registration period for the 19th International gvSIG Conference is now open. The Conference is an online event, and it will be held from November 29th to 30th.
The full program of the Conference is available on the event website, where registration to the different sessions can be done.

The webinar platform allows to connect to the webinars from any operating system, and in case you can’t follow them, you will be able to watch them at the gvSIG Youtube channel later.
In reference to workshops, all the information about cartography and gvSIG version to install will be published at the gvSIG blog before the conference.
Don’t miss it!
-
sur gvSIG Team: Programa e inscripciones gratuitas abiertas para las 19as Jornadas Internacionales gvSIG (online)
Publié: 22 November 2023, 10:09am CET
Ya están abiertas las inscripciones gratuitas para las 19as Jornadas Internacionales gvSIG, que se celebrarán de forma online los días 29 y 30 de noviembre.
El programa completo está disponible en la página web del evento, desde donde se puede realizar la inscripción a cada una de las ponencias.

La plataforma de webinar permite conectarse desde cualquier sistema operativo, y en caso de no poder seguirlos en directo se podrán ver a posteriori, ya que se publicarán en el canal de Youtube del proyecto al igual que en años anteriores.Respecto a los talleres, en el blog de gvSIG informaremos sobre la cartografía a descargar para seguirlos, así como de la versión de gvSIG a instalar.
-
sur Where Your Food Comes From
Publié: 22 November 2023, 9:32am CET par Keir Clarke
When you begin to prepare your Thanksgiving dinner you may wonder about where all that food comes from. Well a new interactive map from CU Boulder and The Plotline, can help show you where. The Food Twin shows you where food is grown and consumed in America and how crops travel from producers to consumers.Click on your county on the map and you will see colored dots flowing into your
-
sur SIG Libre Uruguay: Las TIG ante los nuevos retos globales en un contexto cambiante. Actas de la XVIII CONFIBSIG 2023. Cáceres, 16-19 de mayo de 2023
Publié: 21 November 2023, 3:52pm CET
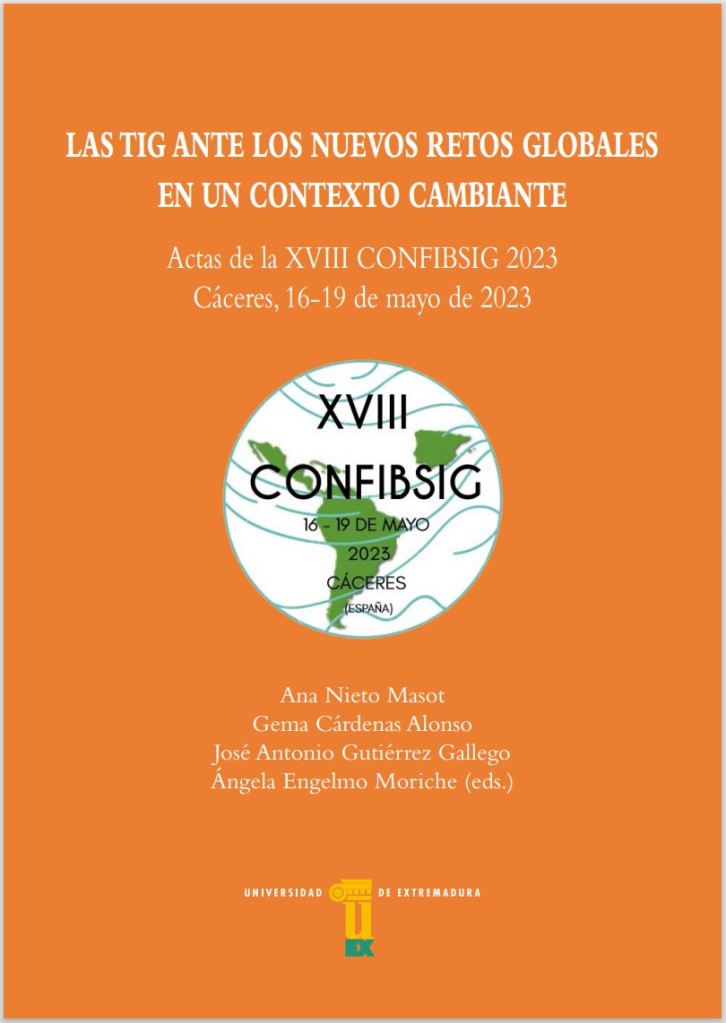
Descarga de la publicación aquí
-
sur America's Changing Plant Hardiness Zones
Publié: 21 November 2023, 7:37am CET par Keir Clarke
Around half of Americans have been moved into a new plant hardiness zone. If you check out the USDA's new Plant Hardiness Zone Map you have a very good chance of discovering that your home is now in a new hardiness zone.In recent years, like many gardeners, I've discovered that I can successfully sow plants a few weeks before their recommended earliest dates and that I can continue -
sur Alternatives to Google Maps Street View
Publié: 20 November 2023, 10:26am CET par Keir Clarke
Panoramax is an open-source photo-mapping platform that allows users to share and exploit street level photography. It is a free alternative to proprietary services, such as Google Maps Street View, providing a freely available resource for sharing and mapping field photos. The Panoramax platform allows anyone to capture street level photographs and contribute them to the Panoramax database and
-
sur Sean Gillies: Bear 100 retro
Publié: 20 November 2023, 3:50am CET
After the race I needed some time to deal with my disappointment about rolling my ankle and dropping out at mile 61. Then I got busy looking for a new job. Writing up a retrospective that I could use in the future was delayed. Here it is, at last. I hope it's interesting and useful to others. This kind of retrospective is something I've learned to use at work. It's roughly organized around what went well, what could be better, lessons learned, in the areas of preparation and training, planning, and execution.
First of all, the race itself was great! Other runners I know said it was, and they were right. It was very well run. The aid stations were well stocked and operated smoothly. The course was beautiful and well marked. I felt constantly challenged, safe, and encouraged. I won't forget the super runnable single track down into Leatham Hollow, the springy soil made of pine needles, the ferns, and the view of the cliffs on the sunny slope. I lived just a few miles away for 10 years, but I'd never been on that trail before. The shady side of the canyon was super lush and green, almost Pacific Northwestern compared to Colorado's Front Range foothills. My memory of arriving at the Upper Richards Hollow aid station is another favorite. After a tough climb out of a wooded canyon, we were greeted on the flat bench above by an aid station volunteer holding a tray of cool, moist towels! They invited us to freshen up and enjoy a fancy brunch at clothed tables served by volunteers in tuxedo t-shirts. More than one of us expressed the feeling that it was way too early to be having hallucinations.
Much went according to plan, or better. My summer training volume was adequate and I did plenty of hiking and running on similar terrain at a similar, or higher, elevation. 4.5 weeks of fine tuning and tapering suited me well. I started the race feeling fresh. Flying to Salt Lake City and driving to Logan worked well for me. I was able to close my eyes and snooze while others transported me from Fort Collins to SLC. After landing, I had a sentimental and tasty lunch at Red Iguana, one of my favorite restaurants. In Logan, I enjoyed an entire day of hanging out with my aunt and her dog before race day.
My simple race plan was fine. I started out aiming to leave aid stations at the times that previous 36 hour finishers have, and did that. I aimed to slow down less than the typical 36 hour finisher after 40 miles, and achieved that, too. It was a good pacing plan for finishing in less than 36 hours. At each aid station I knew how many 100 calorie portions of food I should be picking up, and how many drink bottles to fill, and this was a fine fueling and hydration plan. I didn't bonk, cramp, or run out of drinks at any point, thanks to the water drop above Temple Fork.
We had exceptionally good weather on race day and night, so flaws in my equipment choices didn't surface like they might have. Tony Grove was, in fact, a good place to have a change of clothes, pants, and a sweater. Temple Fork would have been too early for warm layers. Franklin Basin would have been too late.
My feet suffered less in 60 miles of the Bear than in any of my previous 100K runs. I lubed them well before the start and changed socks at 28 and 50 miles. I had no blisters and no hot spots. I started the race in a pair of newish HOKA Mafate Speed 4 and they were fine. In the weeks before the race I had some persistent soreness on the top of my right foot and was concerned about a stress injury, but this didn't get any worse during the Bear.
I had no crew at the race, but found good company on the trail multiple times. Sometimes with other people making their own first 100 mile attempt. Sometimes with people going for their third or fourth Bear finish. I heard hilarious stories about the extreme hallucinations you can experience after 48 hours without sleep. I met a guy who graduated from Cache Valley's other high school a year after I graduated from Logan High. I ran with a woman who lost her colon to cancer a year ago. I spent four hours on the trail before Tony Grove with a guy from Boulder who runs a molecular biology center at CU. We run many of the same routes in Rocky Mountain National Park.
Now for the things that didn't go as well. Some flaws in my training and overall fitness were exposed by the Bear's long and rough downhills. I should lose at least 10 pounds. 15 might be better. I can feel the extra weight in my knees and the sensation compounded over 20+ hours. Also, I feel like I've lost foot speed and spatial sense over the last year or so. Three years ago my favorite fitness trainer went out of business and exercises like skaters and box jumps fell out of my repertoire. I believe that I can improve my proprioception by bringing these kinds of exercises back. If I can, I should be better able to dodge impacts instead of absorbing them.
My stomach was fine at the Bear, but I struggled with lower intestinal trouble from miles 20-40. I had to make a lot of stops in the trees, used up my supply of toilet paper, and had to resort to various leaves. Burdock is my friend in this situation. It wasn't the end of the world, but was a distraction. I don't know what the cause was. In the interest of keeping things simple, I had decided to go with the race's drinks instead of bringing, and mixing, my own, but I didn't train with them beforehand. Gnarly Fuel2O treated me well enough at Kettle Moraine, so I felt safe at the Bear. I started the race with 3 bottles of GU Roctane because I spaced packing some Tailwind mix for my initial bottles. I've never tried this stuff before. It has more ingredients than Taillwind or VFuel, my staples, including taurine. Maybe that was the culprit? I can only speculate. As I said, this was not a problem that would have prevented me from finishing.
Long descents in the dark made my brain and eyes tired. I was not fully prepared for this. I had a 350 lumen light on my belt and 500 lumens on my head. This was fine for 9 hours at Kettle Moraine in June, but not great for 12 hours at the Bear. I'll bring more light next time. Why spend energy trying to figure out mysteries on the trail that could be solved by better illumination?
Without a crew, my stop at Tony Grove to change clothes and get set for seven more hours of night running was overly long. I wonder if I'd left 20-30 minutes earlier I might have reached Franklin Basin without incident? At the very least, I'd have reached Franklin Basin that much sooner. A crew wouldn't have helped earlier, but would have helped at 50 miles when I was trying to change clothes, stay warm, and get fed simultaneously. It was mentally tiring at a moment where I was already mentally tired.
I've mentioned before that I left Tony Grove alone at 11 pm and had a sprained ankle at 1 pm. I was out there by myself and am not sure what happened. I could have fallen asleep on my feet; this has been known to happen. Having a pacer could have helped get me to Franklin Basin and beyond in good shape. Being able to follow someone with fresh eyes and a fresh mind would have helped with the issues I mentioned two paragraphs above. It's always easier to follow than to break trail. Even without a pacer, if I'd been in a small group I could have done some leading and some following. This would have been good. And I think getting out of Tony Grove earlier would have made it more likely to join such a group.
In hindsight, I should have had some plan for resting or napping. At 20 hours, I was more groggy than I expected, perhaps because I was alone with nothing but my breath, footsteps, and sleepy thoughts. Recently, a friend of mine shared his tactic of laying down on the trail for short naps, to be woken by the next runner 5-10 minutes behind. This issue is very connected to the previous ones. With less exertion, there is less need to nap. Even if I solve other problems, I bet I'll still run into the need to shut my eyes at 3 or 4 am. I'm going to think about this for next year.
Lastly on the could-have-gone-better front, how about my reaction to my ankle injury? My fuzzy recollection is that I came to full consciousness with a painful and unstable ankle in the dark at 1 am, a mile from the Franklin Basin aid station. I was concerned and went gingerly over that mile, and my plan was to try 15-20 minutes of elevation and compression before deciding whether to continue. I wasn't otherwise physically tired, hungry, or thirsty. My ankle became more swollen and painful while I was off my feet, and after 30 minutes I concluded that I could could not continue.
What if I had not stopped and just grabbed some hot food and kept going? The worst case scenario would have been hiking some small way toward the next aid station and having to return to Franklin Basin, with some damage done to my ankle. What if I had been able to hobble 8 miles to the Logan River aid station and continue slowly from there? I've run through mild sprains several times this year, and have endured worse grade 2 sprains than this one, yes, but not this year. Being alone out there make it harder to push on. If I was pacing myself, I may have been able to convince myself to take a shot at continuing. I think dropping out was 99% the right decision overall. My chance of making it another 8 miles to Logan River was maybe 50%, though? It's hard to say.
I learned two lessons. The TSA says no hiking poles allowed in carry on luggage! I had to leave mine behind at DEN and get new poles at the Farmington REI after leaving SLC. I won't make this mistake again.
While I was mentally prepared for the possibility of dropping out of the race, I did not have any plan for getting back to town after I did so! After two hours of sitting by the campfire at Franklin Basin I did finally meet someone who was heading directly back down the canyon to Logan.
As I said earlier, things mostly went my way. Except for some bad luck and a misstep I believe I would have finished. Registration for the 2024 edition of the Bear opens on December 1. I'm going to try again with more or less the same simple plan, stronger ankles, more light, and fewer distractions.
-
sur Sean Gillies: Status update
Publié: 20 November 2023, 1:41am CET
Finally, I have a professional update. I started work at TileDB on Wednesday. I'll be working from Fort Collins alongside colleagues around the world. I know a slice of TileDB's market, dense multi-dimensional arrays like earth observation data, well, but have a lot to learn about genetic data, embeddings, and storing graphs in adjacency matrices. I expect this to be both challenging and fun. I'll post more about it once I'm settled in.
I'll be resuming work on open source projects, which I've paused while job hunting, soon!
-
sur PostGIS Development: PostGIS Patch Releases
Publié: 20 November 2023, 1:00am CET
The PostGIS development team is pleased to provide bug fix and performance enhancements 3.4.1, 3.3.5, 3.2.6, 3.1.10, 3.0.10 for the 3.4, 3.3, 3.2, 3.1, 3.0 stable branches.
-
sur Introducing the Sunderland Collection
Publié: 18 November 2023, 11:17am CET par Keir Clarke
The Sunderland Collection of antique maps has been digitized in full and can now be explored in detail on the new virtual platform Oculi Mundi (Eyes of the World). The Sunderland Collection was started by Dr Neil Sunderland in the 1990s. The collection now consists of around 130 vintage globes, maps and atlases which date back to as early as the 13th century. The new Oculi Mundi platform takes
-
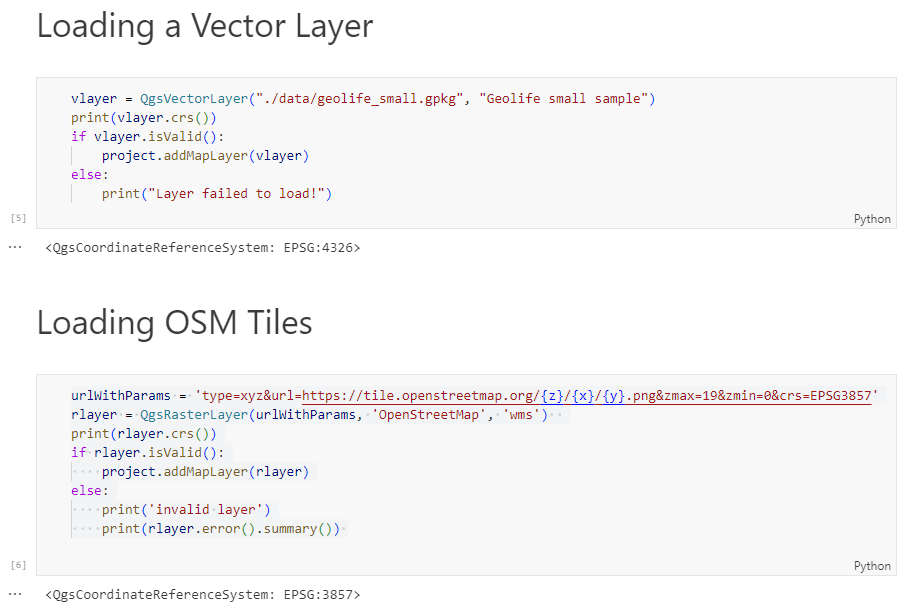
sur Free and Open Source GIS Ramblings: Adding basemaps to PyQGIS maps
Publié: 17 November 2023, 1:00pm CET
In the previous post, we investigated how to bring QGIS maps into Jupyter notebooks.
Today, we’ll take the next step and add basemaps to our maps. This is trickier than I would have expected. In particular, I was fighting with “invalid” OSM tile layers until I realized that my QGIS application instance somehow lacked the “WMS” provider.
In addition, getting basemaps to work also means that we have to take care of layer and project CRSes and on-the-fly reprojections. So let’s get to work:
from IPython.display import Image
from PyQt5.QtGui import QColor
from PyQt5.QtWidgets import QApplication
from qgis.core import QgsApplication, QgsVectorLayer, QgsProject, QgsRasterLayer, \
    QgsCoordinateReferenceSystem, QgsProviderRegistry, QgsSimpleMarkerSymbolLayerBase
from qgis.gui import QgsMapCanvas

app = QApplication([])
qgs = QgsApplication([], False)
qgs.setPrefixPath(r"C:\temp", True)  # setting a prefix path should enable the WMS provider
qgs.initQgis()
canvas = QgsMapCanvas()
project = QgsProject.instance()
map_crs = QgsCoordinateReferenceSystem('EPSG:3857')
canvas.setDestinationCrs(map_crs)

print("providers: ", QgsProviderRegistry.instance().providerList())
To add an OSM basemap, we use the xyz tiles option of the WMS provider:
urlWithParams = 'type=xyz&url=https://tile.openstreetmap.org/{z}/{x}/{y}.png&zmax=19&zmin=0&crs=EPSG3857'
rlayer = QgsRasterLayer(urlWithParams, 'OpenStreetMap', 'wms')
print(rlayer.crs())
if rlayer.isValid():
    project.addMapLayer(rlayer)
else:
    print('invalid layer')
    print(rlayer.error().summary())
If there are issues with the WMS provider,
rlayer.error().summary()should point them out.
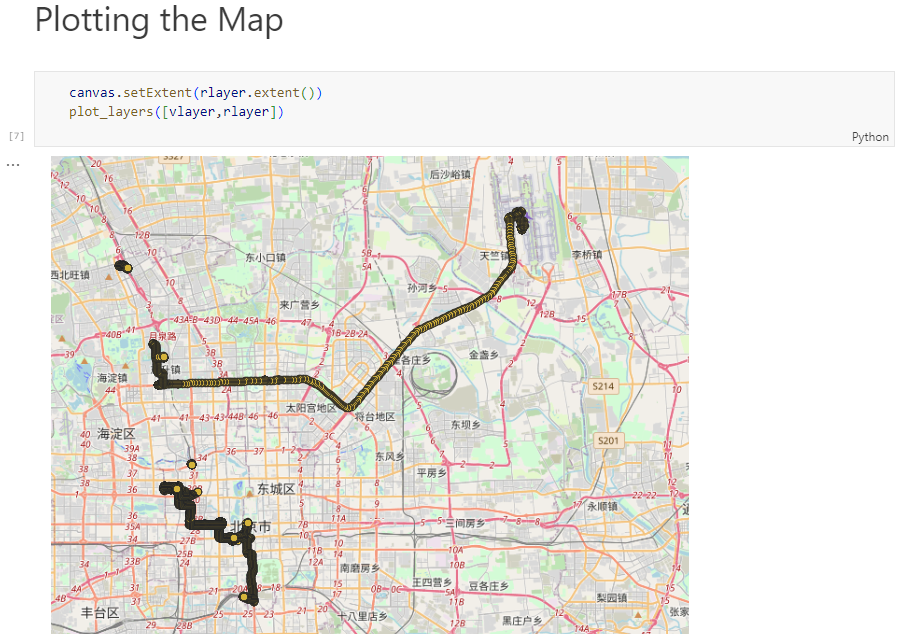
With both the vector layer and the basemap ready, we can finally plot the map:
canvas.setExtent(rlayer.extent())
plot_layers([vlayer,rlayer])

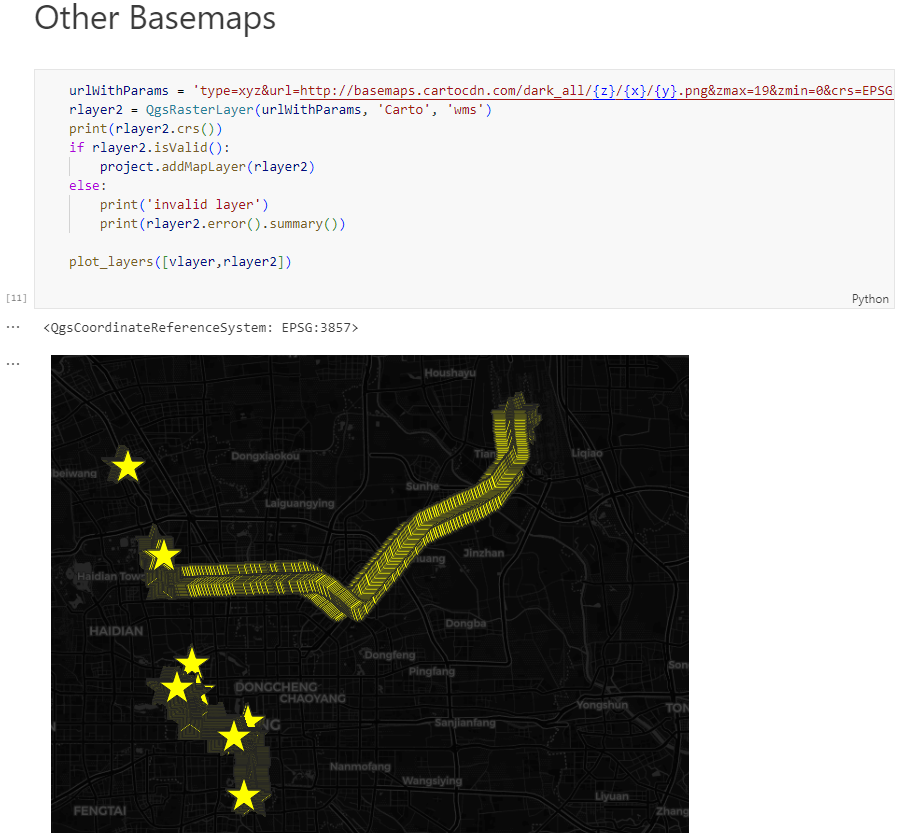
Of course, we can get more creative and style our vector layers:
vlayer.renderer().symbol().setColor(QColor("yellow"))
vlayer.renderer().symbol().symbolLayer(0).setShape(QgsSimpleMarkerSymbolLayerBase.Star)
vlayer.renderer().symbol().symbolLayer(0).setSize(10)
plot_layers([vlayer,rlayer])
And to switch to other basemaps, we just need to update the URL accordingly, for example, to load Carto tiles instead:
urlWithParams = 'type=xyz&url=http://basemaps.cartocdn.com/dark_all/{z}/{x}/{y}.png&zmax=19&zmin=0&crs=EPSG3857'
rlayer2 = QgsRasterLayer(urlWithParams, 'Carto', 'wms')
print(rlayer2.crs())
if rlayer2.isValid():
    project.addMapLayer(rlayer2)
else:
    print('invalid layer')
    print(rlayer2.error().summary())

plot_layers([vlayer,rlayer2])
You can find the whole notebook at: [https:]]


-
sur Mapping Damage in Gaza
Publié: 17 November 2023, 12:20pm CET par Keir Clarke
A researcher at UCL's CASA has released a new interactive mapping tool which can help researchers and news agencies "estimate the number of damaged buildings and the pre-war population in a given area within the Gaza Strip". The Gaza Damage Proxy Map is based on an earlier tool which was developed to estimate damage caused by Russia in Ukraine. The Gaza Damage Proxy Map colors individual -
sur The Rise & Fall of National Rail Networks
Publié: 16 November 2023, 11:06am CET par Keir Clarke
The Berliner-Morgenpost has visualized the rise and fall of the German rail network from its rapid growth in the 19th Century right up to its 21st Century post-privatization contraction. The German Rail Network from 1835 Until Today uses an interactive map to show all the active rail lines in Germany for every single year from 1835 until 2022.On December the 7th 1835 a six-kilometer rail line
-
sur Lutra consulting: 3D Tiles in QGIS
Publié: 16 November 2023, 9:00am CET
Earlier this year, in collaboration with North Road we were awarded a grant from Cesium to introduce 3D tiles support in QGIS. The feature was developed successfully and shipped with QGIS 3.34.
In this blog post, you can read more about how to work with this feature, where to get data and how to display your maps in 2D and 3D. For a video demo of this feature, you can watch Nyall Dawson’s presentation on Youtube.
What are 3D tiles?3D tiles are a specification for streaming and rendering large-scale 3D geospatial datasets. They use a hierarchical structure to efficiently manage and display 3D content, optimising performance by dynamically loading appropriate levels of detail. This technology is widely used in urban planning, architecture, simulation, gaming, and virtual reality, providing a standardised and interoperable solution for visualising complex geographical data.
Examples of 3D tiles:
Data from Swisstopo [https:]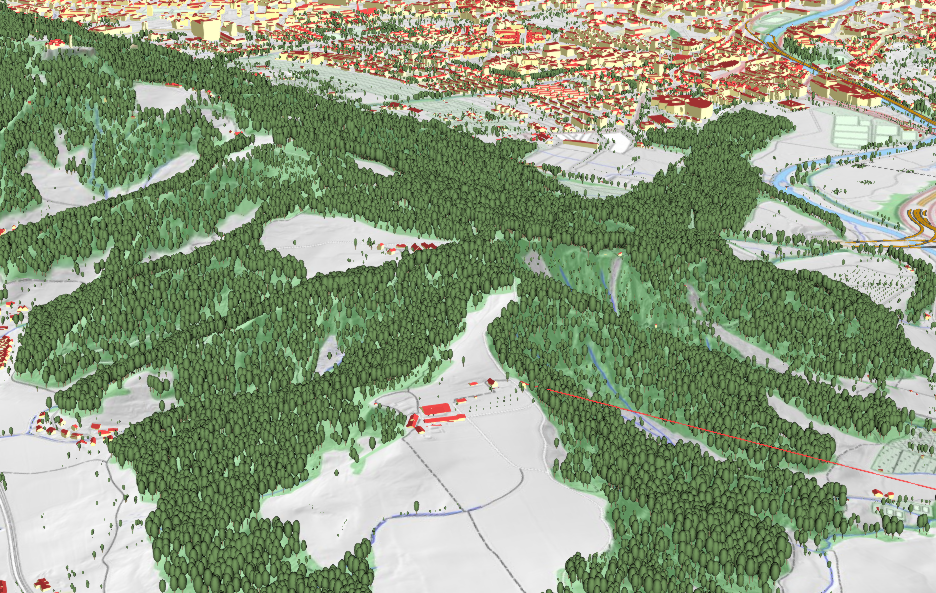
Washington - 3D Surface Model (Vricon, Cesium) 3D tiles in QGIS
To be able to use 3D tiles in QGIS, you need to have QGIS 3.34 or later. You can add a new connection to a 3D tile service from within the Data Source Manager under Scene:
Adding a new 3D tile service from Data Source Manager in QGIS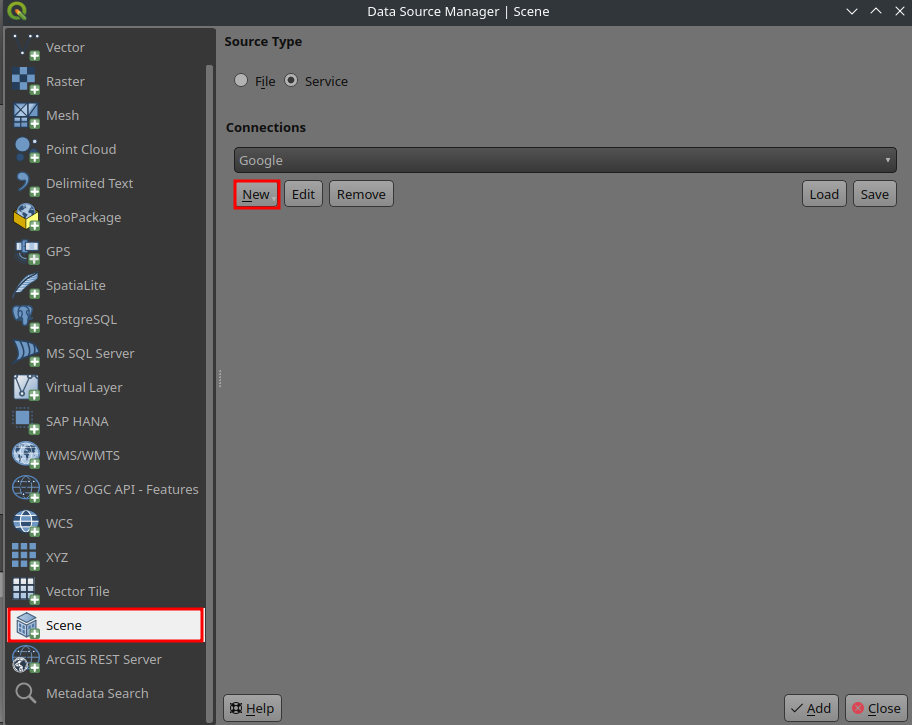
Alternatively, you can add the service from your Browser Panel:
3D tiles data provider in the Browser panel
To test the feature, you can use the following 3D tiles service:
Name: Bathurst
URL: [https:]
Creating a new connection to a 3D tiles service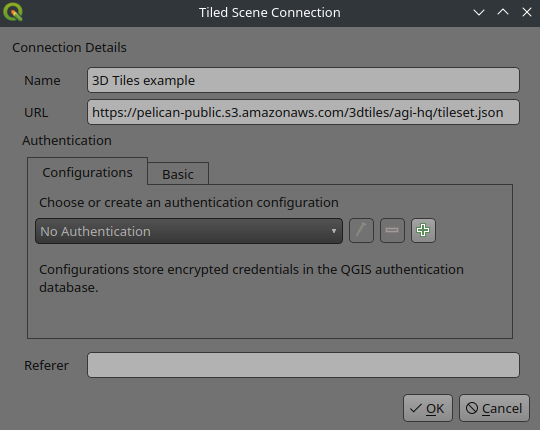
You can then add the map from the newly generated connection to QGIS:
Adding a new 3D tiles to QGIS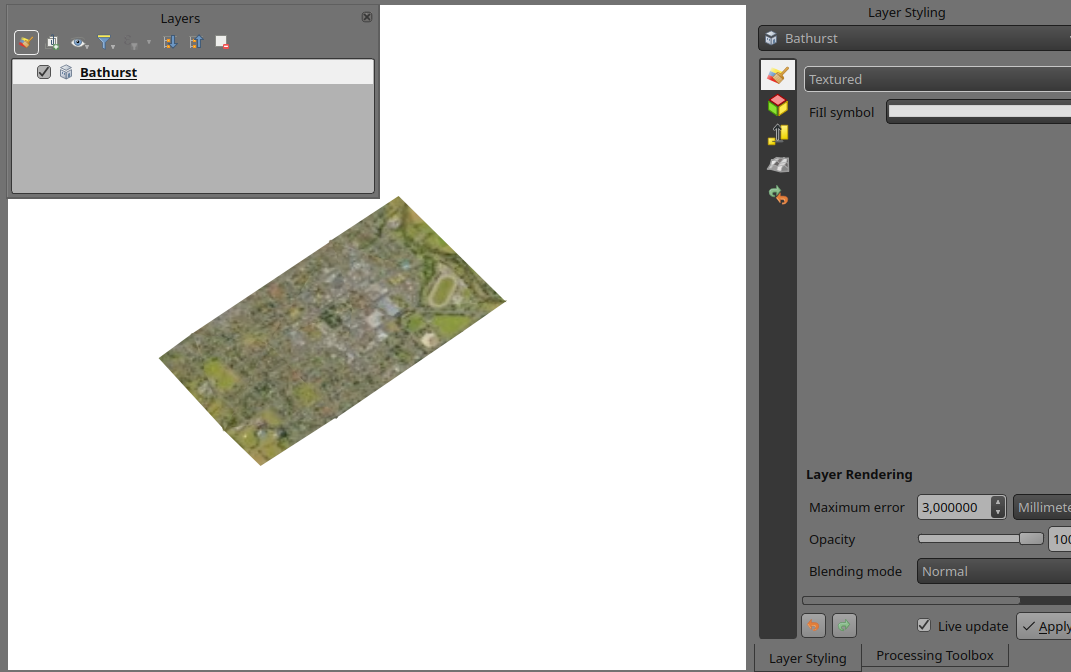
By default, the layer is styled using texture, but you can change it to see the wireframe mesh behind the scene:
3D tiles’ mesh wireframe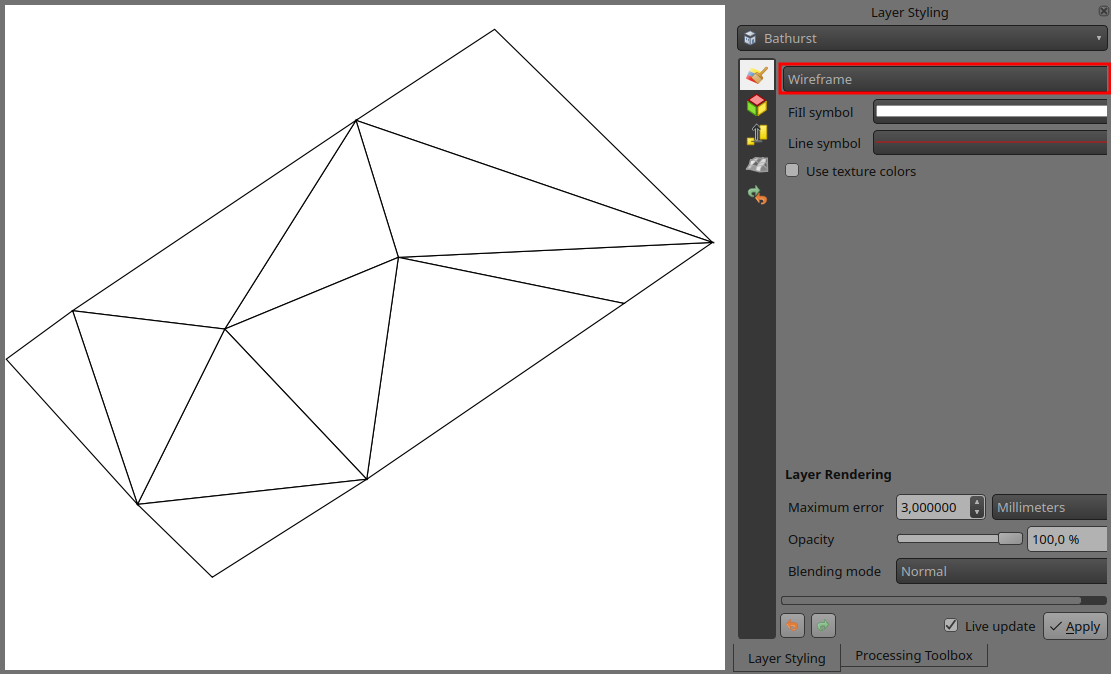
You can change the mesh fill and line symbols similar to the vector polygons. Alternatively, you can use texture colors. This will render each mesh element with the average value of the full texture. This is ideal when dealing with a large dataset and want to get a quick overview of the data:
3D tiles with texture color for meshes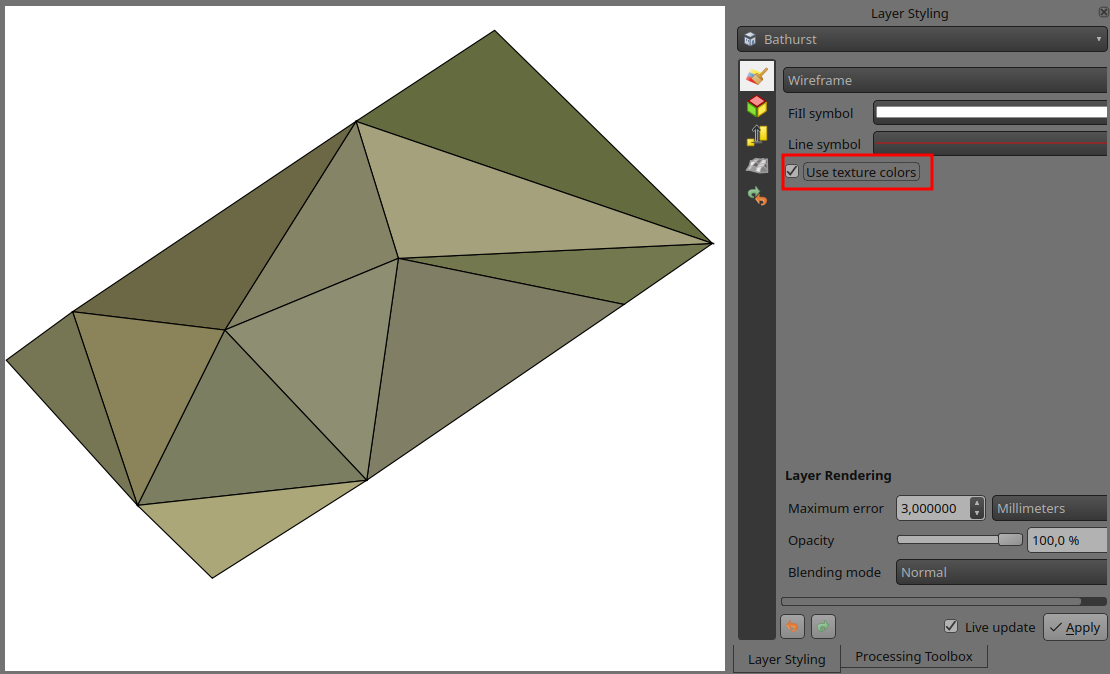
To view the data in 3D, you can open a new 3D map. Similar to 2D map, by zooming in/out, finer resolution tiles will be fetched and displayed:
Using data from Cesium ionCesium ion is a cloud-based platform for managing and streaming 3D geospatial data. It simplifies data management, visualisation, and sharing.
To add 3D tiles from Cesium ion, you need to first sign up to their service here: [https:]
Under Asset Depot, you will see a catalogue of publicly available datasets. You can also upload your own 3D models (such as OBJ or PLY), georeference them and get them converted to 3D tiles.
You can also add one of the existing tile service under [https:]] and select the tile service and then click on Add to my assets:
Adding an existing dataset to your Cesium ion assets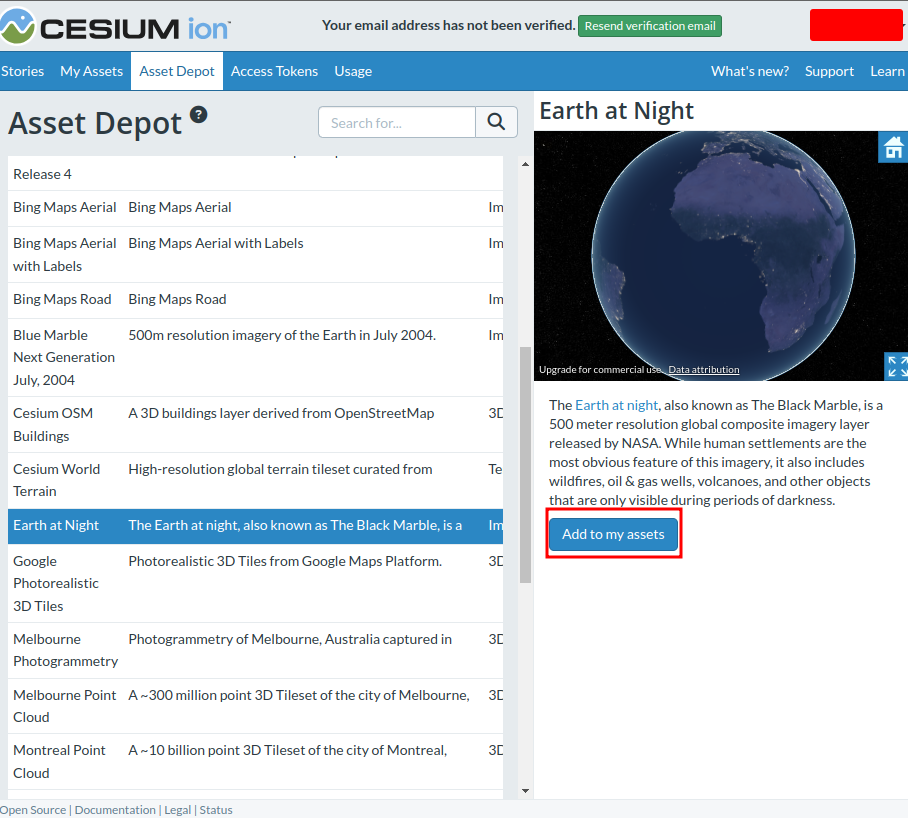
You can use the excellent Cesium ion plugin by North Road from the QGIS repository to add the data to QGIS:
Adding Cesium ion assets to QGIS Working with Google 3D data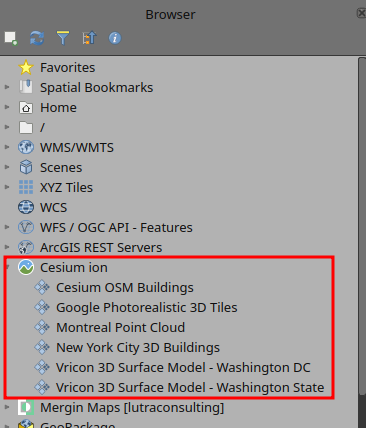
In addition to accessing Google Photorealistic 3D tiles from Cesium ion, you can also add the tiles directly in QGIS. First you will need to follow the instructions below and obtain API keys for 3D tiles: [https:]]
During the registration process, you will be asked to add your credit card details. Currently (November 2023), they do not charge you for using the service.
Once you have obtained the API key, you can add Google tiles using the following connection details:
Adding Google Photorealistic tiles in QGIS Notes and remarks
- Adjusting map extents for large scenes
When dealing with large scenes, map extents should be set to a smaller area to be able to view it in 3D. This is the current limitation of QGIS 3D maps as it cannot handle scenes larger than 500 x 500 km.
To change the map extent, you can open Project Properties and under View Settings change the extent. In the example below, the map extent has been limited only to a part of London, so we can view Google Photorealistic tiles in the 3D map without rendering issues.
Limiting project extent in QGIS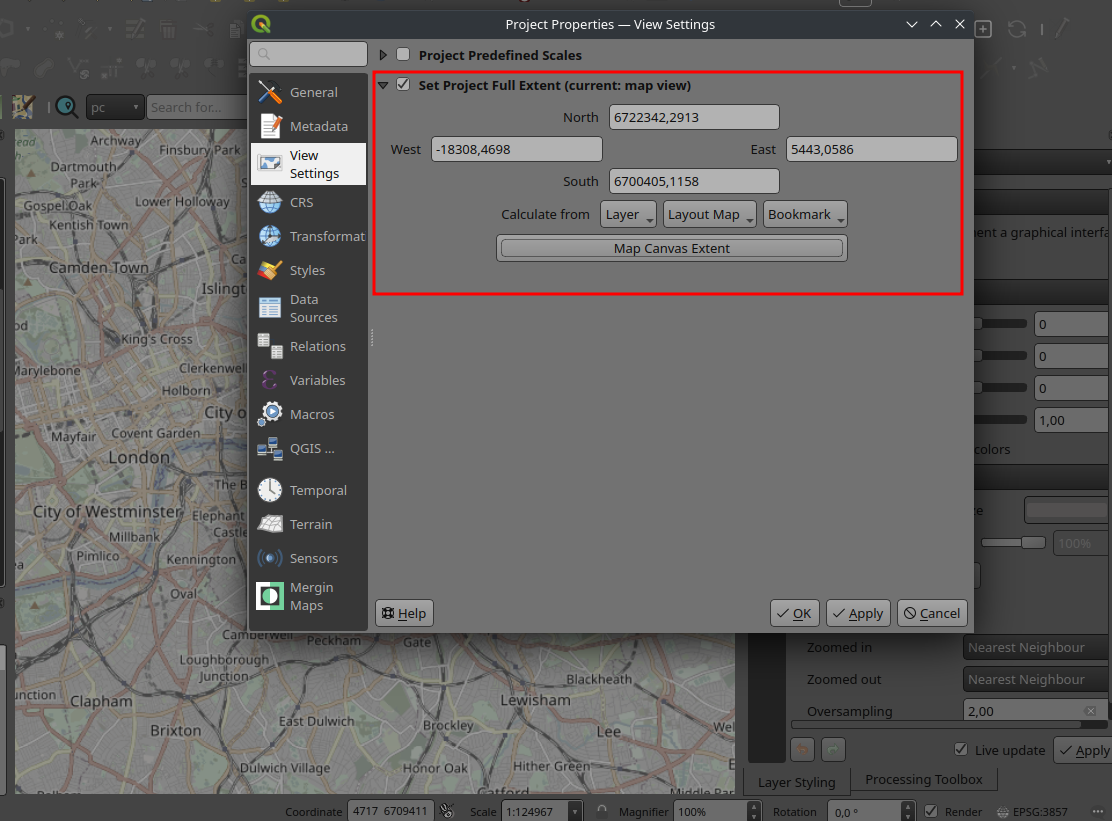
3D tiles from Google in QGIS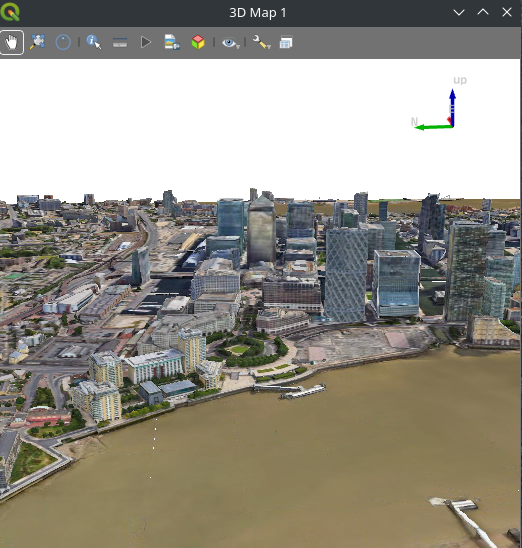
- Network cache size
If you are handling a large dataset, it is recommended to increase network cache size to 1 GB or more. The default value in QGIS is much lower and it results in slower rendering of the data.
Increasing Cache size in QGIS for faster rendering
- Overlaying other 3D data
When you try to overlay other data sets on top of a global 3D tiles, the vertical datum might not match and hence you will see the data in the wrong place in a 3D map. To fix the issue, you may need to use elevation offsetting to shift the data along the Z axis under Layer Properties:
Offsetting elevation of a layer in QGIS Future works
This is the first implementation of the 3D tiles in QGIS. For the future, we would like to add more features for handling and creation of the 3D tiles. Our wishlist in no particular order is:
- Globe view: QGIS 3D cannot handle large scenes or unprojected views.
- More advanced styling of meshes: as an example, users will be able to create their own style.
- 3D In-door navigation: as an example users will be able to navigate inside buildings and potentially it will bring BIM data closer to QGIS
- Generation of 3D tiles inside QGIS: adding a processing tool in QGIS to generate 3D Tiles from your map data.
Styling of 3D tiles (image from [https:]
If you would like to see those features in QGIS and want to fund the efforts, do not hesitate to contact us.
-
sur Free and Open Source GIS Ramblings: MovingPandas v0.17 released!
Publié: 15 November 2023, 7:16pm CET

Over the last couple of months, I have not been posting release announcements here, so there is quite a bit to catch up.
The latest v0.17.2 release is now available from conda-forge.
New features (since 0.14):
- Improved MovingFeatures MF-JSON support
- New OutlierCleaner #334
- Faster stop detection #316
- New arrow markers to indicate trajectory direction in plots fb1174b
- Distance, speed, and acceleration unit handling #295
- New aggregation parameter (agg) for to_traj_gdf() 5745068
- New get_segments_between() for TrajectoryCollection #287
Behind the scenes:
- We now have a dedicated Github organization: [https:]] that houses all related repositories
- And we finally added [https] support to the website
As always, all tutorials are available from the movingpandas-examples repository and on MyBinder:

If you have questions about using MovingPandas or just want to discuss new ideas, you’re welcome to join our discussion forum.
-
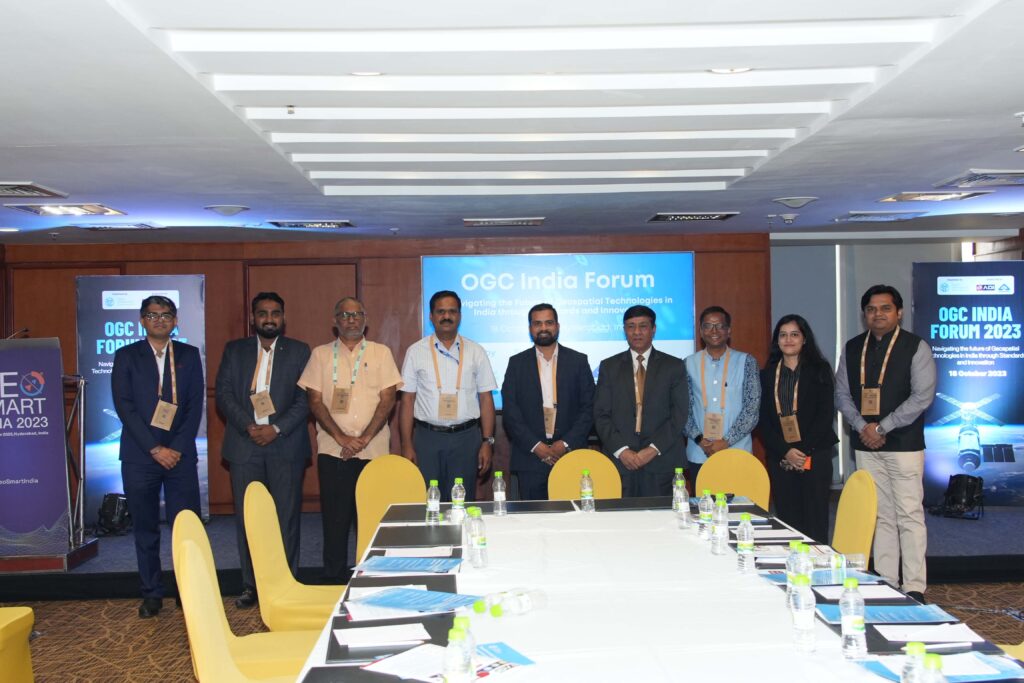
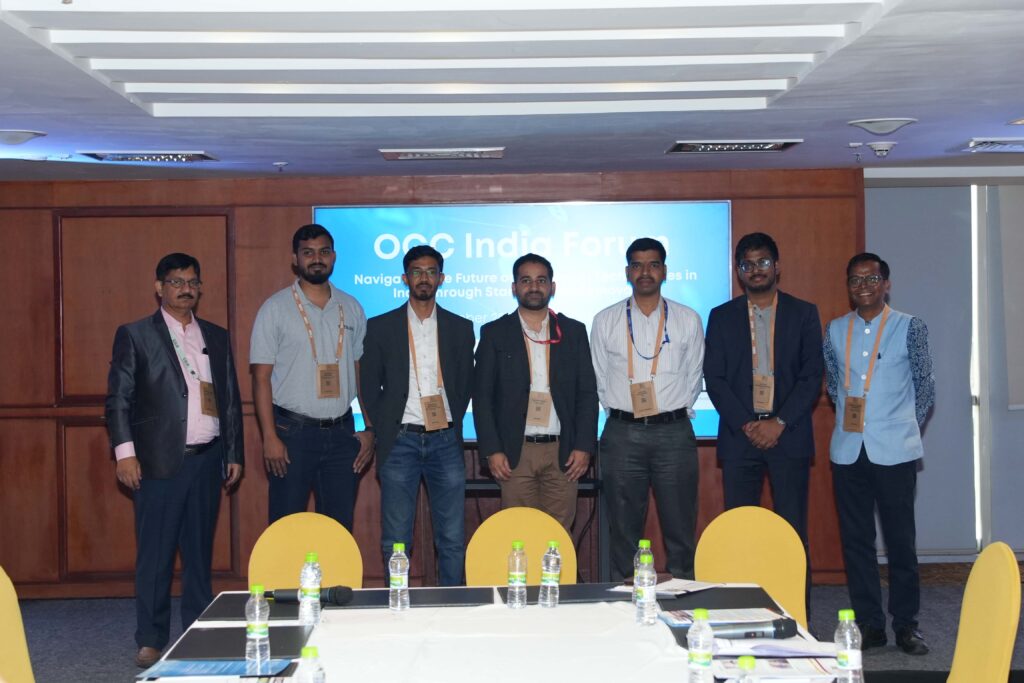
sur OGC India Forum 2023: Key Highlights from Hyderabad
Publié: 15 November 2023, 3:09pm CET par Simon Chester
A meeting of the OGC India Forum was held on October 18, 2023, in Hyderabad, where over 40 experts from government, industry, and academia met to discuss the future of geospatial technologies in India. With its booming tech industry, Hyderabad provided an apt backdrop for discussions on innovation and standards in the geospatial realm.
The event was supported by the following organizations: The Association of Geospatial Industries (AGI India), which represents India’s geospatial private sector capabilities; the Bureau of Indian Standards (BIS), the national standards body that underpins technical excellence; and Geospatial World, a media company and the host for GeoSmart India 2023, where the forum was organized.
A pivotal moment at the event was the unveiling of the OGC India Forum’s new Charter, heralding a renewed commitment to advancing geospatial standards and innovation within the Indian context. Also at the Forum, OGC and AGI India renewed their partnership in line with the policy priorities of India.
 Harsha Madiraju, OGC, and Sreeramam GV, AGI India, exchanging the partnership agreement.
The forum facilitated a series of expert-led panels, dissecting the latest trends, challenges, and opportunities in the geospatial and Earth Observation sectors. It provided a platform for participants to contribute insights and actively shape the Forum’s committees and future directives.
Emphasizing the Economic Value of Geospatial StandardsHarsha Madiraju, Lead – OGC India Forum, set the stage with a presentation on the economic impact of standards in geospatial technologies. Citing the 2012 ISO publication on Standards and Economic Growth, he highlighted the positive correlation between the proliferation of standards and national economic development. This underscores the importance of investment in geospatial interoperability and its tangible benefits to industries and economies.
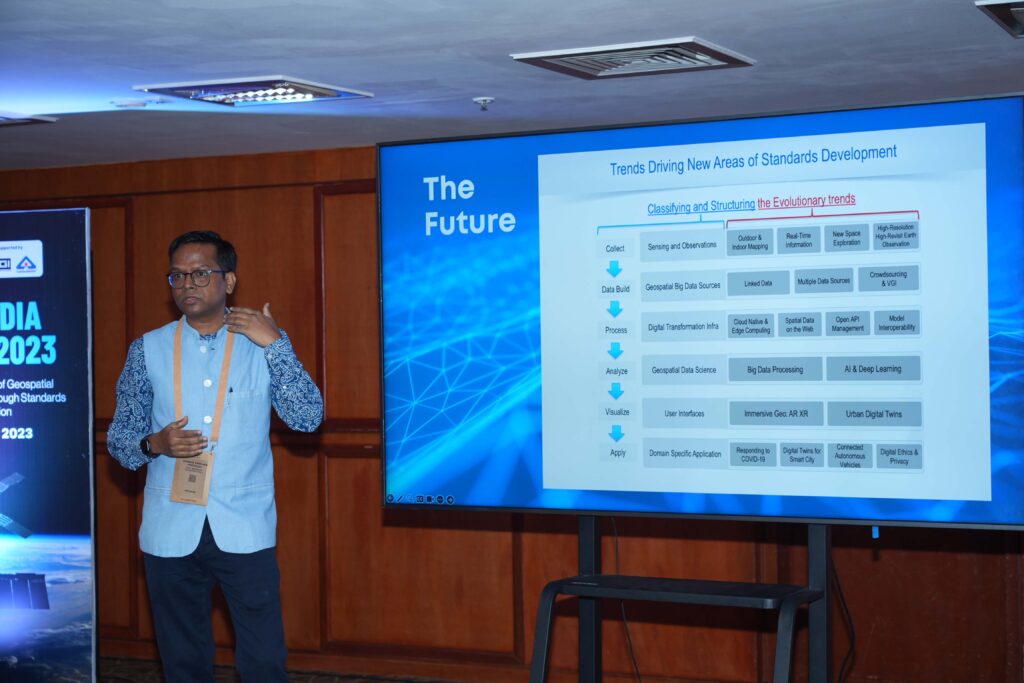 Harsha Madiraju, Lead – OGC India Forum, delivering his opening address.
From the Indian Context, Harsha said that we need proven methodologies and best practices for implementing Standards in India’s diverse and complex landscape. From this perspective, he said, the “Guide to the Role of Standards in Geospatial Information Management” prepared by ISO/TC 211, OGC, and IHO, and endorsed by UN-GGIM, provides a reliable framework around geospatial standards implementation. Quoting the guide, he said the Indian community can refer to the Goal-based Approach to geospatial standards implementation, where different maturity levels from Tier 1 to Tier 4 are prescribed.
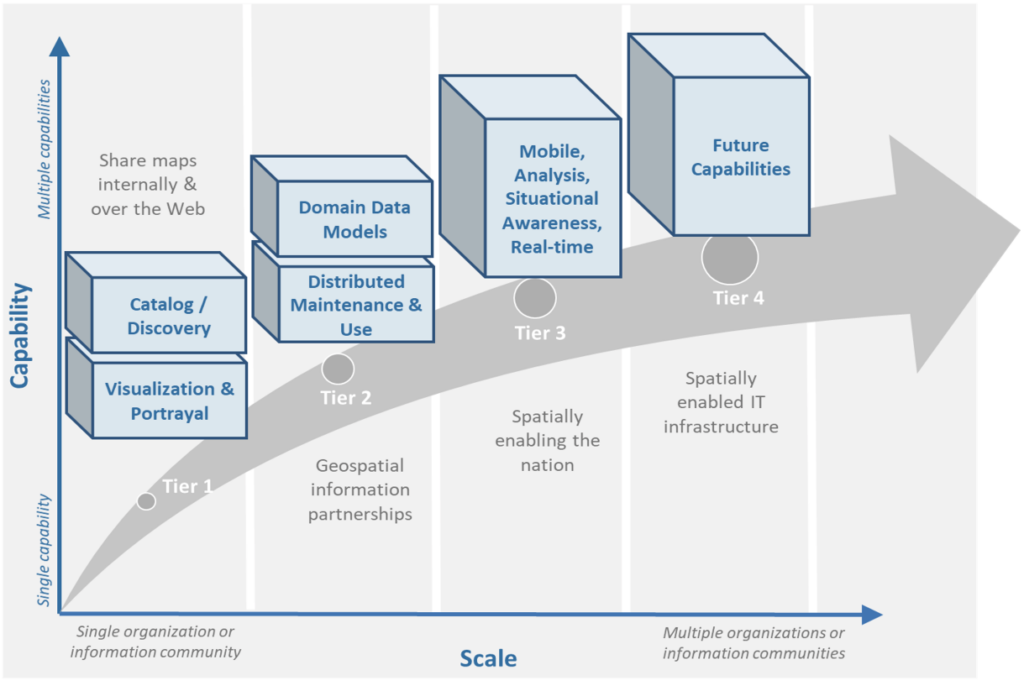 Goal-based Approach to geospatial standards implementation
Harsha said about the interoperability scenario in India: “Our data and systems are not yet fully interoperable, and our community is at varying stages of maturity compared to more developed geospatial ecosystems. The opportunity here is immense. It’s not just about sharing maps: it’s about evolving towards a spatially enabled nation where we can take advantage of the authoritative datasets coming up for India.”
He further called for collaboration by saying “In a country like India, with its unique challenges and opportunities, the role of standards in accelerating the maturity of our technology ecosystems is crucial. At OGC India Forum, we aim to work on standards, compliance, and innovation. It’s not just the responsibility of a few: it’s a collective endeavor. Your expertise and contributions can shape the future of geospatial technology in India.”
Concluding his talk, he said, “We have the framework, the global endorsement, and, most importantly, a community willing to drive change. Let’s invest wisely in standards to shape a future that benefits us all.”
Panels and Discussions for India – Tech Trends, Adoption of Standards, and Academic Perspectives.The event then proceeded with three panels on the following topics:
Panel on Geospatial and Earth Observation Technology Innovation in IndiaThe panel discussed India’s contributions to geospatial and Earth Observation technologies and the possible advancements that may come from the Indian government, private sector, and especially start-ups. The session also discussed the untapped sectors and applications that these technologies could significantly impact. Finally, the discussions identified key challenges in technology adoption and scalability and discussed how the community can help overcome these challenges.
 Panelists on Geospatial and Earth Observation Technology Innovation in India, along with along with AGI and OGC Staff (on the right side)
Rajesh Mathur, Esri India, said that federated GIS architecture is a new paradigm enabling collaboration and data sharing. According to him, India’s National Geospatial Policy 2022 is a progressive and transformational initiative that will accelerate the adoption of geospatial technologies by encouraging collaboration and data sharing among all the stakeholders. This opens up exciting opportunities for GIS deployment – both on the Cloud and in a federated architecture. Data partnerships enabled by Standards and interoperability will allow users from multiple organizations to collaborate and share content through trusted and secure workflows.
Shubham Sharma, GalaxEye Space, said that the OGC India Forum provided a great platform to interact with the panel members and the audience with diverse experiences. With discussions ranging from the evolution of technology in the geospatial sector to standardization, the discussions centred around the implementation of OGC standards in India. With the continued expansion of the geospatial sector, Open Standards will pave a smoother road for building scalable and sustainable products.
S S Raja Shekar, National Remote Sensing Centre (NRSC), said OGC standards have changed how geospatial data and applications are handled, providing simple solutions to complex exchanges of data and services. A growing focus on standards in the space domain and in sectors of priority to the country where geospatial applications are critical is needed. This session also brought perspectives and ideas from entrepreneurs and proved to be highly constructive.
Akshay Loya, Founder & CEO of GISKernel Technologies, said “I was asked how I envision the evolution of the geospatial industry in India. My response was straightforward: we, as young founders, can share our insights alongside esteemed figures on a platform like OGC India Forum, which is a significant evolution in our industry.”
Panel on Geospatial and Earth Observation Standards in IndiaThe second panel examined the current adoption of BIS/ISO and OGC standards in India, focusing on areas where they are most – and least – implemented. The panel also discussed the avenues available for contributing to geospatial and Earth Observation Standards, both at a national and international level. The session then also delved into the compliance and procurement aspects.
 Speakers at the Panel on Geospatial and Earth Observation Standards
Abhiroop Bhatnagar, Lead, Platform at Aereo, said “I would like to share the message regarding the importance of cloud-native geospatial formats. The essential property of cloud-native formats is that they allow data delivery directly from cloud-based storage to clients without involving any compute in between – for example consider direct requests to S3 from web browsers. The world is quickly transitioning towards a cloud-based data-delivery paradigm. Under this new paradigm, if we have to ensure scalability along with preserving efficiency, it is critical to utilize cloud-native geospatial formats. In that respect, Cloud-optimized GeoTIFF has already been accepted as an OGC standard and is well-supported by the ecosystem. We at Aereo have already integrated support for COGs in our WebGIS platform, Aereo Cloud. We actively promote it as the preferred format for raster data within the industry and the government.”
Ashish Tiwari, Joint Director of the Bureau of Indian Standards (BIS), said that ISO/TC211 and OGC have a strong history of collaboration on geospatial standards. BIS, through the Geospatial Information Sectional Committee, has adopted over twelve Standards and is working on adopting fourteen more. BIS looks forward to collaborating with the OGC community, as this will be valuable in many areas where BIS can understand recent trends and best practices.
Participating in this session, Vishnu Chandra, Former Deputy Director General & HOG -NIC, Geospatial Technology Services Division, said that open geospatial Standards are the core foundation of geospatial information interoperability and play a crucial role through open geospatial APIs for the exchange of data and Service Delivery. OGC India Forum can play a critical role in bringing the global OGC standards to India in collaboration with various government, industry, and academic stakeholders.
OGC standards have a significant role given the context of the Indian National Geospatial Policy 2022, which calls for the creation of the National Geospatial Foundation around 14 Thematic Areas to support UN-GGIM objectives associated with the UN Sustainable Development Goals. These themes also have relevance in digital public infrastructures and platforms for specific governance, planning, and service delivery in the Indian context. Therefore, each data theme needs Standards implemented across the entire geospatial information value chain.
Panel providing Perspectives from Academia & Research on Innovation and Standards in IndiaThe final panel discussed the current awareness and usage of geospatial and Earth Observation Standards in academic programs and research projects. The discussions explored the extent to which Standards are integrated into educational curricula. The panel also delved into how academic and research institutions can contribute to standards development, implementation testing, and even lead the creation of new standards.
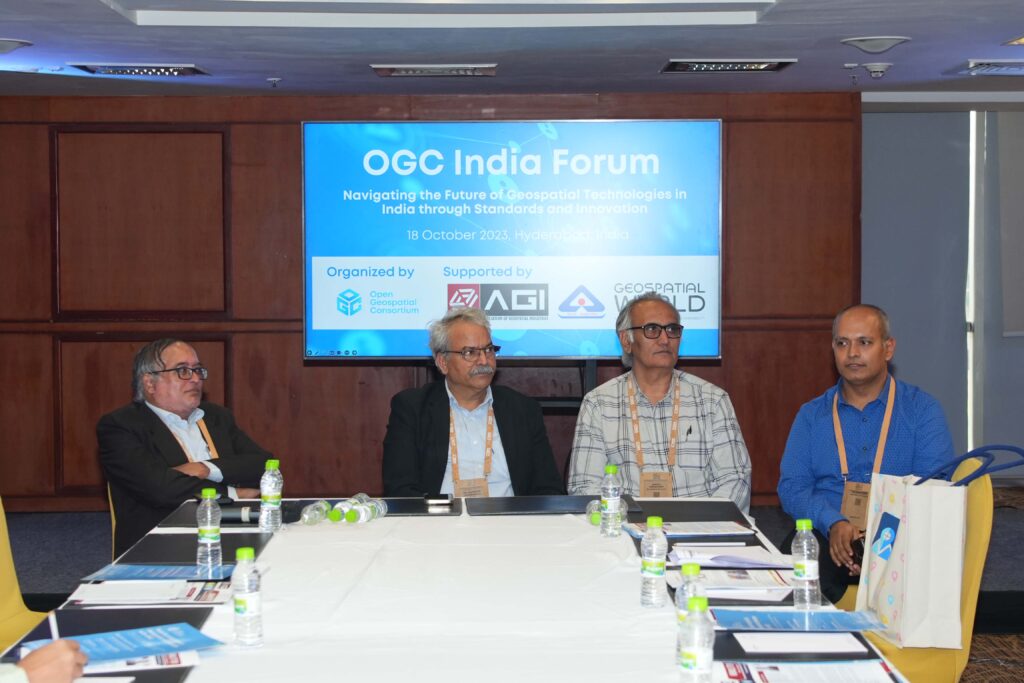 Speakers at the Panel Providing Perspectives from Academia & Research
Dr. Sanjay Chaudhary, Professor and Associate Dean, Ahmedabad University, School of Engineering and Applied Science, said “There is a lack of interest in geospatial technologies in India from the students in the broader computer science and IT community. Helping them understand the value and opportunities available in this sector will be important. With the evolution of OGC Standards into APIs and the availability of developer resources, we can make these students learn and invest in this direction, which will be valuable to their professions and bring skilled resources to India.”
Professor Dr. Karbhari Vishwanath Kale, Vice-Chancellor of Dr. Babasaheb Ambedkar Technological University, Lonere, Raigad, Maharashtra, said “Through our engagement with the Bureau of Indian Standards, I have been making personal efforts to bring awareness in our professional circles on the value and importance of Standards. As an OGC Member, our university closely follows the development of international Standards by OGC. Some of our core interests lie in the intersection of multi- and hyper-spectral sensor data for agriculture, material detection, disaster management, and health care. We must invest in developing sensors and data dissemination platforms and make applications and data more broadly available, specifically in agriculture. In line with the Indian National Education Policy 2020, our university has set goals to establish and design the course curriculum with a research lab where IoT, sensors, and Standards can be brought together for the overall benefit of end users. We look forward to collaborating with the international network of OGC and taking this on.”
Dr. Sumit Sen, GISE Hub, IIT Bombay, said “Our Hub is established as an interdisciplinary project funded by the Department of Science and Technology, Govt. of India, to enable the research and development of geospatial technology solutions. In turn, our hub works with many academic and research organizations to further fundamental research in GIScience. Standards and Interoperability is one of the focus areas, and we continue to work closely with OGC and other stakeholders like IIT Kanpur, IIT Tirupati, and IIIT Hyderabad in enabling the geospatial community with the right skills on OGC Standards and APIs. The Winter School is one of India’s unique learning programs on geospatial standards. It is a fifteen-day on-campus training program supported by OGC Staff and Members. It provides hands-on and practical training on OGC Standards to India’s government, private, and research organizations. The 2023 program will be on the OGC API Stack. We will continue our international engagement and work closely with the OGC India Forum community.”
Next StepsThe OGC India Forum 2023 event was a success. The event concluded with a broader agreement around the need to identify areas of engagement in the coming days. It was agreed that there is a need for partnerships and to organize events, training programs, and policy roundtables on geospatial standards, in collaboration with OGC Members and Partners in India and the broader community.
The post OGC India Forum 2023: Key Highlights from Hyderabad appeared first on Open Geospatial Consortium.
-
sur Wednesday Night is Game Night
Publié: 15 November 2023, 10:02am CET par Keir Clarke
Following the huge runaway success of Benjamin Tran Dinh's the London Tube Memory Game (which bears an uncanny resemblance to my own London TubeQuiz) it is not that surprising that a number of other map memory games have now suddenly appeared on the scene. US States QuizMy own US States Quiz is similar to the London Tube Memory Game. The only real difference is that instead of having
-
sur Markus Neteler: Translating Open Source Software with Weblate: A GRASS GIS Case Study
Publié: 14 November 2023, 4:27pm CET
Open source software projects thrive on the contributions of the community, not only for the code, but also for making the software accessible to a global audience. One of the critical aspects of this accessibility is the localization or translation of the software’s messages and interfaces. In this context, Weblate (https://weblate.org/) has proven to be a powerful tool for managing these translations, especially for projects such as GRASS GIS, which is part of OSGeo (Open Source Geospatial Foundation).
What is Weblate?

Weblate is an open source translation management system designed to simplify the translation process of software projects. It provides an intuitive web interface that allows translators to work without deep technical knowledge. This ease of use combined with robust integration capabilities makes Weblate a popular choice for open source projects.
GRASS GIS and LocalizationGRASS GIS ( [https:]] ), a software suite for managing and analyzing geospatial data, is used worldwide and therefore needs to be available in many languages. The project uses Weblate, hosted by OSGeo, to manage and facilitate its translation work (see OSGeo-Weblate portal).
Marking messages for translationBefore translation work can begin, the messages to be translated must be marked for translation in the GRASS GIS source code. This is done with the gettext macro _(“…”). GNU gettext is a GNU library for the internationalization of software. Here is a simplified overview of the process:
- Identify the strings to be translated: The developers identify the strings in the source code that need to be translated. These are usually user messages, while debug messages are not marked for translation.
- Use the gettext macro: The identified strings are packed into a gettext macro. For example, a string “Welcome to GRASS GIS” in the source code would be changed to _(“Welcome to GRASS GIS”). This change indicates that the string should be used for translation.
- Extraction and template generation: Tools such as xgettext are used to extract these marked strings from the source code and create a POT (Portable Object Template) file. This file is used as a template for all translations. In the GRASS GIS project the template language is English.
There are three template files in the GRASS GIS project: one with the graphical user interface (GUI) messages, one with the library functions (libs) and one with the modules (mods).
Connecting the software project to WeblateWhile the POT files could be transferred to Weblate manually, we chose the automated option. The OSGeo Weblate instance is directly connected to the GRASS GIS project via git (GitHub) using the Weblate version control integration.
How it works in practice:
- Developer makes a commit to the GRASS GIS repo on GitHub
- A GitHub webhook makes a call to weblate.osgeo.org – note that it has it’s own local git repo for GRASS GIS, as it does for other OSGeo projects, with translations being managed in this Weblate instance. This local git repo is updated when the webhook is fired.
- As messages are translated in OSGeo-Weblate, they are eventually pushed to the Weblate Github fork of GRASS GIS (the push frequency is set to 24 hours by default, i.e., new translations are collected over a day), and Weblate then triggers a pull request to the main GRASS GIS repo on GitHub.
For technical background on the OSGeo Weblate installation, see the related OSGeo-SAC Weblate page.
Translation process in WeblateHere is how the typical translation process looks like:
- Translator registration: Registration (via OSGeo-ID) and login to the Weblate instance.
- Language selection: Select the language to be translated. If a language does not exist yet, it can be added with the approval of the project managers.
- Translation interface: Weblate provides an easy-to-use web interface where translators can view the original texts and enter their translations. If activated, machine translation can also be used here (DeepL, Google Translate, etc.). The Weblate translation memory helps to quickly translate identical and similar sentences.
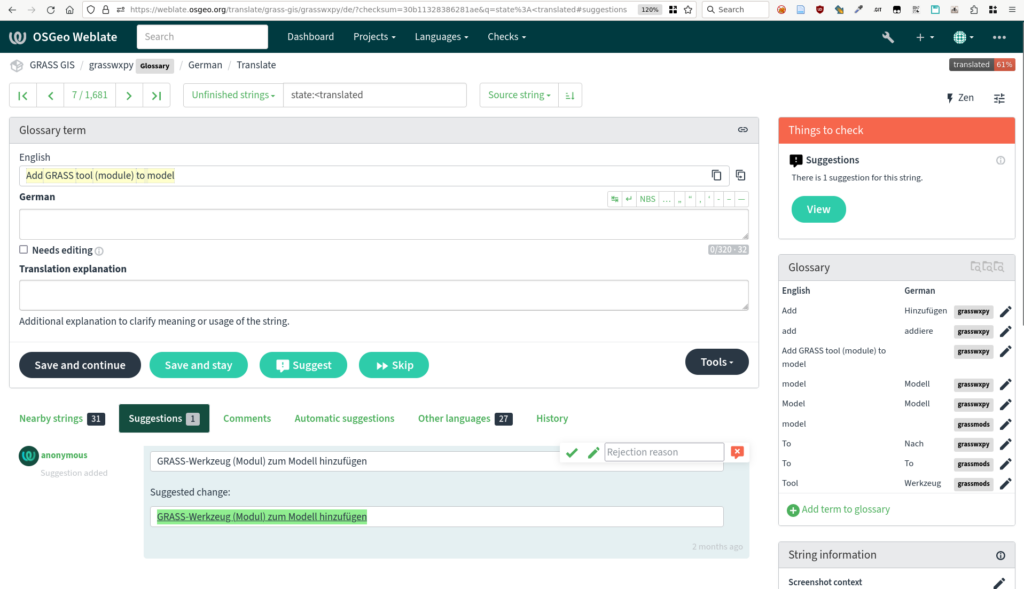
GRASS GIS messages in Weblate
- Together we are better: translators can discuss translations, resolve conflicts and suggest improvements. Weblate also offers quality checks to ensure consistency and accuracy. Translations in different languages can be compared in tabular form.
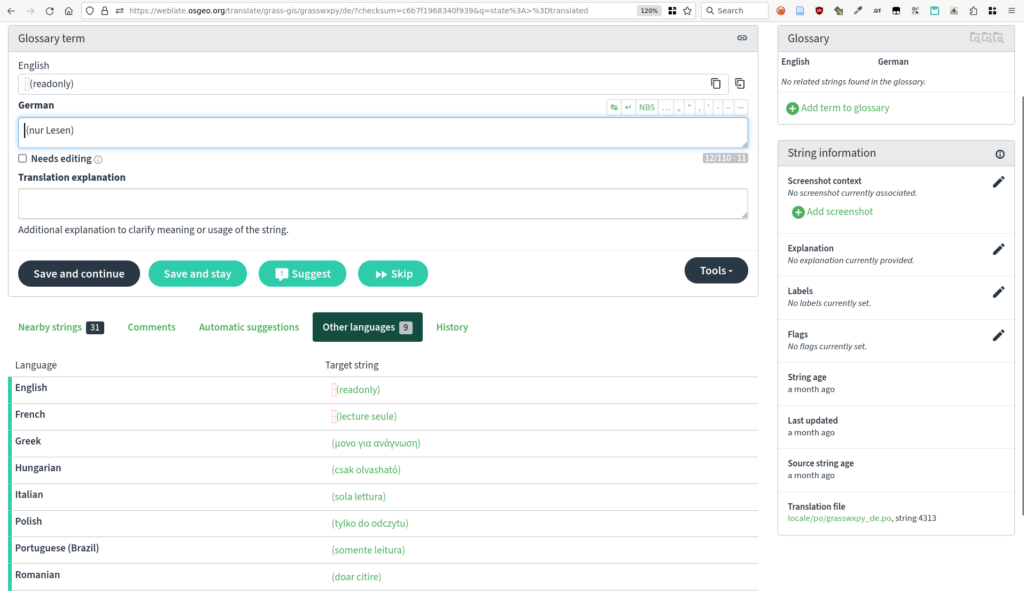
Message translation comparison in Weblate (GRASS GIS project example)
- Integration with source code: Once translations are completed and checked, they are written back into the GRASS GIS source code (see above). Weblate supports automatic synchronization with source code repositories.
- Continuous updates: As the source code evolves, new strings can be marked for translation and Weblate is automatically updated to reflect these changes.

Pull request with new translations opened by Weblate in GRASS GIS Github repository
Benefits for the GRASS GIS projectBy using Weblate, GRASS GIS benefits from the following advantages:
- Streamlined translation workflow: The process from tagging strings to integrating translations is efficient and manageable.
- Community engagement: Weblate’s ease of use encourages more community members to participate in the translation process.
- Quality and Consistency: Weblate ensures high quality translations through integrated quality checks and collaboration tools.
- Up-to-date localization: Continuous synchronization with the source code repository ensures that translations are always up-to-date.
The integration of Weblate into the GRASS GIS development workflow underlines the importance of localization in open source software. By using tools such as gettext for message tagging and Weblate for translation management, GRASS GIS ensures that it remains accessible and usable for a global community, embodying the true spirit of open source software.
ThanksThanks to Regina Obe from OSGeo-SAC for her support in setting up and maintaining the OSGeo-Weblate instance and for her explanations of how things work in terms of Weblate/GitHub server communication.
The post Translating Open Source Software with Weblate: A GRASS GIS Case Study appeared first on Markus Neteler | Geospatial Analysis | Remote sensing | GRASS GIS.


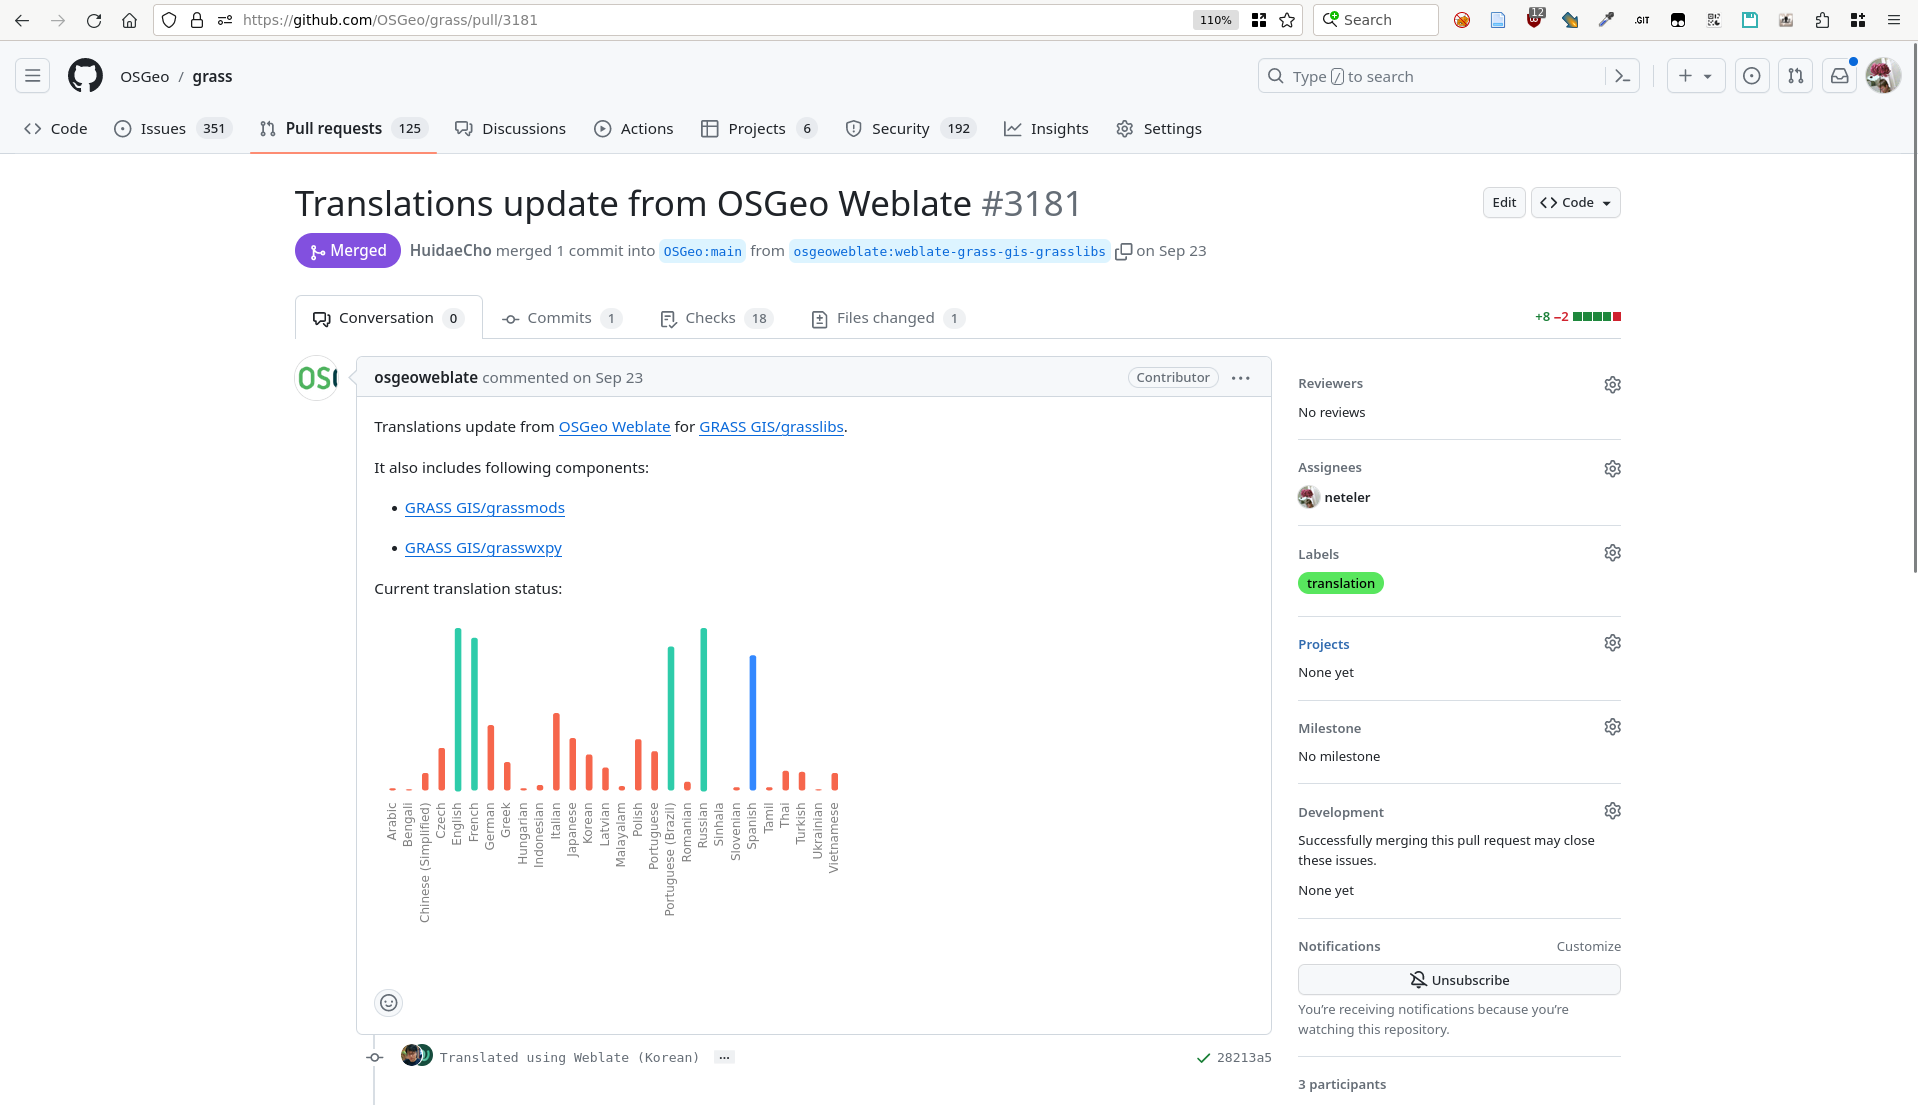
-
sur Ten Years of Global Marine Traffic
Publié: 14 November 2023, 10:14am CET par Keir Clarke
The Global Marine Traffic Density Service (GMTDS) map visualizes global marine traffic over the last ten years. The map is designed to support a number of uses, including monitoring fishing activity, monitoring port activity, and environmental and economic activity monitoring. The GMTDS Map has processed hundreds of billions of AIS signals from over ten years of marine traffic around the world -
sur Standing on Top of the World
Publié: 13 November 2023, 10:15am CET par Keir Clarke
If you want an uninterrupted view towards the horizon in all directions then you need to stand on top of a mountain. But not just any mountain. What you need is an 'on top of the world' mountain. On Top of the World Mountains An "on top of the world" mountain, also known as an OTOTW mountain, is a mountain that is so high that no other mountains can be seen above the horizon from its
-
sur Sean Gillies: Wellsville fall colors
Publié: 13 November 2023, 3:01am CET
After crashing out of the Bear, I picked myself up by going for a short hike in the Wellsville Mountains. This range frames Cache Valley on the west side and is covered with bigtooth maple.
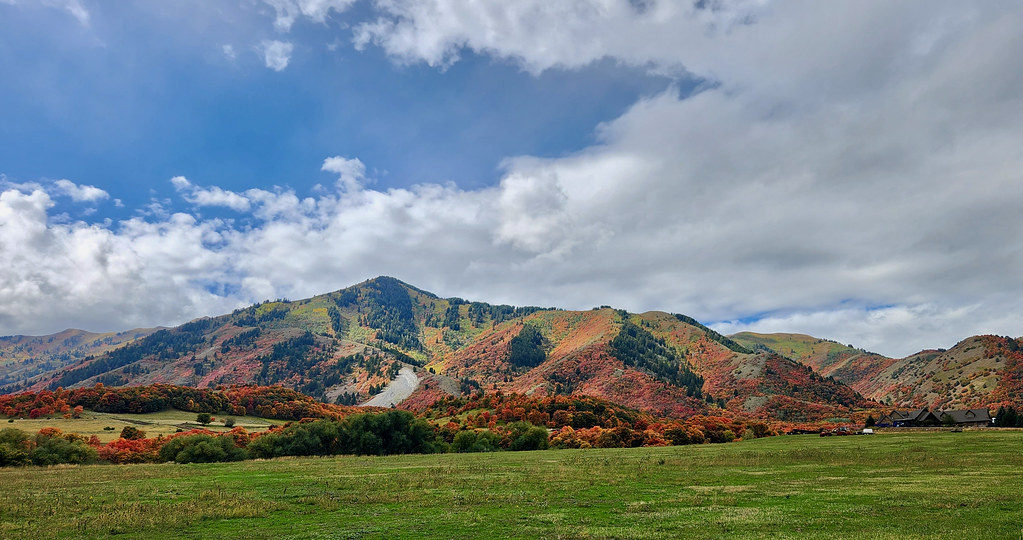
The Wellsville Range draped in red maples.
The colors made my jaw drop. I lived in Cache Valley for 10 years and don't remember a better show.
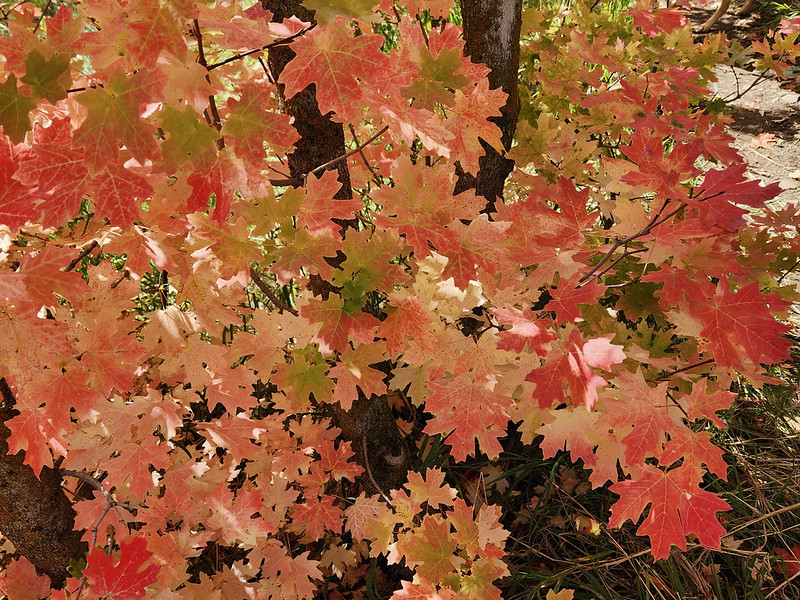
Closeup on pink and red maple leaves.
Dark red chokecherry leaves.
Hobbling through this landscape and seeing the color change as the sunlight fluctuated improved my mood by several hundred percent.

View across a sunlit pasture to red maple covered slopes under a partly stormy sky.
-
sur The Spanish Wealth Divide
Publié: 11 November 2023, 10:54am CET par Keir Clarke
El Diario has released an interactive map which shows how much people earn across the whole of Spain. The map starkly reveals not only the huge income inequality between northern and southern Spain but also the inequality between many urban and rural communities. The map in Rich Neighborhood, Poor Neighborhood uses data from the National Statistics Institute to show the average gross
-
sur Ian Turton's Blog: Is GeoJSON a spatial data format?
Publié: 11 November 2023, 1:00am CET
Is GeoJSON a good spatial data format?A few days ago on Mastodon Eli Pousson asked:
Can anyone suggest examples of files that can contain location info but aren’t often considered spatial data file formats?
He suggested EXIF, Iván Sánchez Ortega followed up with spreadsheets, and being devilish I said GeoJSON.
This led to more discussion, with people asking why I thought that, so I instead of being flippant I thought about it. This blog post is the result of those thoughts which I thought were kind of obvious but from things people have said since may be aren’t that obvious.
I’ve mostly been a developer for most of my career so my main interest in a spatial data format is that:
- it stores my spatial data as I want it to,
- it’s fast to read and to a lesser extent, write.
- It’s easy to manage.
One, seems to be obvious, if I store a point then ask for it back I want to get that point back (to the limit of the precision of the processor’s floating point). If a format can’t manage that then please don’t use it. This is not common but Excel comes to mind as a program that takes good data and trashes it. If it isn’t changing gene names into dates then it’s reordering the dbf file to destroy your shapefile. GeoJSON also can fail at this as the standard says that I must store the data in WGS:84 (lon/lat), which is fine if that is the format that I store my data in already, but suppose I have some high quality OSGB data that is carefully surveyed to fractions of a millimetre and the underlying code does a conversion to WGS:84 in the background and further the developer wanted to save space and limited the number of decimal places to say 6 (OK, that was me) when it gets converted back to OSGB I’m looking at centimetres (or worse) but given the vagaries of floating point representation I may not be able to tell.
Two, comes from being a GeoServer developer, a largish chunk of the time taken to draw a web map (or stream out a WFS file) is taken up by reading the data from the disk. Much of the rest of the time is converting the data into a form that we can draw. Ideally, we only want to read in the features needed for the map the user has requested (actually, ideally we want to not read in most of the data by having it already be in the cache, but that is hard to do). So we like indexed datasets both spatial indexes and attribute indexes can help substantially speed up map drawing. As the size of spatial datasets increases the time taken to fetch the next feature from the store becomes more and more important. An index allows the program to skip to the correct place in the file for either a specific feature or for features that are in a specific place or contain a certain attribute with the requested value. This is a great time saver, imagine trying to look something up in a big book by using the index compared to paging through it reading each page in turn.
After one or more indexes the main thing I look for in a format is a binary format that is easy to read (and write). GeoJSON (and GML) are both problematic here as they are text formats (which is great in a transfer format) and so for every coordinate of every spatial object the computer has to read in a series of digits (and punctuation) and convert that into an actual binary number that it can understand. This is a slow operation (by computer speeds anyway) and if I have a couple of million points in my coastline file then I don’t want to do 4 million slow operations before I even think of drawing something.
Three, I have to interact with users on a fairly regular basis and in a lot of cases these are not spatial data experts. If a format comes with up to a dozen similarly named files (that are all important) that a GIS will refuse to process unless you guess which is the important one then it is more of a pain than a help. And yes shapefile I’m looking at you. If your process still makes use of Shapefiles please, please stop doing that to your users (and the support team) and switch over to GeoPackages which can store hundreds of data sets inside a single file, All good GIS products can process them by now, they have been an OGC standard for nearly 10 years. If you don’t think that shapefiles are confusing go and ask your support team how often they have been sent just the
.shpfile (or 11 files but not the.sbn) or how often they have seen people who have deleted all the none.shpfiles to save disk space.My other objection to GeoJSON is that I don’t know what the structure (or schema) of the data set is until I have read the entire file. That last record could add several bonus attributes, in fact any (or all) of the records could do that, from a parsers view it is a nightmare. At least GML provides me with a fixed schema and enforces it through out the file.
When I’m storing data (as opposed to transferring it) I use PostGIS, it’s fast and accurate, can store my data in whatever projection I chose and is capable of interfacing with any GIS program I am likely to use, and if I’m writing new code then it provides good, well tested libraries in all the languages I care about so I don’t have to get into the weeds of parsing binary formats. If I fetch a feature from PostGIS it will have exactly the attributes I was expecting no more or less. It has good indexes and a nifty DSL (SQL) that I can use to express my queries that get dealt with by a cool query optimiser that knows way more than I do about how to access data in the database.
If for some reason I need to access my data while I’m travelling or share it with a colleague then I will use a GeoPackage which is a neat little database all packaged up in a single file. It’s not a quick as PostGIS so I wouldn’t use it for millions of records but for most day to day GIS data sets it’s great. You can even store you QGIS styles and project in it to make it a single file project transfer format.
One final point, I sometimes see people preaching that we should go cloud native (and often serverless) by embracing “modern” standards like GeoJSON and COGs. GeoJSON should never be used as a cloud native storage option (unless it’s so small you can read it once and cache it in memory in which case why are you using the cloud) as it is large (yes, I know it compresses well) and slow to parse (and slower still if you compressed it first) and can’t be indexed. So that means you have to copy the whole file from a disk on the far side of a slow internet connection. I don’t care if you have fibre to the door it is still slow compared to the disk in your machine!
-
sur KAN T&IT Blog: Simplificá tu Análisis Geoespacial con KICa, el Innovador Plugin de QGIS para acceder a catálogos de Imágenes
Publié: 10 November 2023, 9:04pm CET
Pièce jointe: [télécharger]
KICa, «Kan Imagery Catalog», es un plugin para QGIS. Esta herramienta innovadora simplifica el acceso a catálogos de imágenes satelitales, en un principio, utilizando metodología estándar como es STAC (sigla en inglés de Catálogos de Recursos Espacio- Temporales) el cual es un lenguaje único para el acceso a catálogos de imágenes satelitales de una manera estándar y uniforme. Esto nos permite tener un objetivo agnóstico basado en la posibilidad de centrarnos en la necesidad de resolver nuestro análisis geoespacial sobre una zona y no tener que estar buscando cada uno de los proveedores por separado.
En un principio se incorporan proveedores de imágenes satelitales (gratuitas y comerciales), pero está previsto, en las siguientes versiones, incorporar imágenes de drones, vuelos entre otros recursos que faciliten el análisis geoespacial. Hoy podrán observar que están disponible los proveedores como UP42 o Sentinel Hub, dentro de una región geográfica definida por el usuario.
Con este potente plugin, los usuarios tienen la capacidad de explorar de manera eficiente los catálogos disponibles, así como consultar pisadas (footprints) y vistas rápidas (quicklooks) de las imágenes que se encuentran en su área de interés para estimar su uso sin la necesidad de ser descargada la imagen completa para su análisis.
Así, este plugin se convierte en una herramienta esencial para todos aquellos que trabajan con datos geoespaciales, ya que les proporciona un acceso rápido y sencillo a imágenes satelitales, facilitando tanto el análisis como la visualización de datos. No importa si sos un profesional en el campo de la geoinformación, un científico de datos o un entusiasta de la cartografía; «KICa» enriquecerá tu flujo de trabajo y mejorará tus capacidades de exploración y utilización de imágenes satelitales.
Nuestra solución es de código abierto y colaborativa, por lo que te invitamos a visitar nuestro repositorio donde podrás ver más documentación, reportar bugs y nuevas mejoras, y también contribuir en el código con tus “push request”.
¡Optimizá tus proyectos geoespaciales con esta valiosa herramienta!
#satellite #QGIS #SentinelHub #Copernicus #Sentinel -
sur Free and Open Source GIS Ramblings: Bringing QGIS maps into Jupyter notebooks
Publié: 10 November 2023, 7:03pm CET
Earlier this year, we explored how to use PyQGIS in Juypter notebooks to run QGIS Processing tools from a notebook and visualize the Processing results using GeoPandas plots.
Today, we’ll go a step further and replace the GeoPandas plots with maps rendered by QGIS.
The following script presents a minimum solution to this challenge: initializing a QGIS application, canvas, and project; then loading a GeoJSON and displaying it:
from IPython.display import Image

from PyQt5.QtGui import QColor
from PyQt5.QtWidgets import QApplication

from qgis.core import QgsApplication, QgsVectorLayer, QgsProject, QgsSymbol, \
    QgsRendererRange, QgsGraduatedSymbolRenderer, \
    QgsArrowSymbolLayer, QgsLineSymbol, QgsSingleSymbolRenderer, \
    QgsSymbolLayer, QgsProperty
from qgis.gui import QgsMapCanvas

app = QApplication([])
qgs = QgsApplication([], False)
canvas = QgsMapCanvas()
project = QgsProject.instance()

vlayer = QgsVectorLayer("./data/traj.geojson", "My trajectory")
if not vlayer.isValid():
    print("Layer failed to load!")

def saveImage(path, show=True):
    canvas.saveAsImage(path)
    if show: return Image(path)

project.addMapLayer(vlayer)
canvas.setExtent(vlayer.extent())
canvas.setLayers([vlayer])
canvas.show()
app.exec_()

saveImage("my-traj.png")
When this code is executed, it opens a separate window that displays the map canvas. And in this window, we can even pan and zoom to adjust the map. The line color, however, is assigned randomly (like when we open a new layer in QGIS):
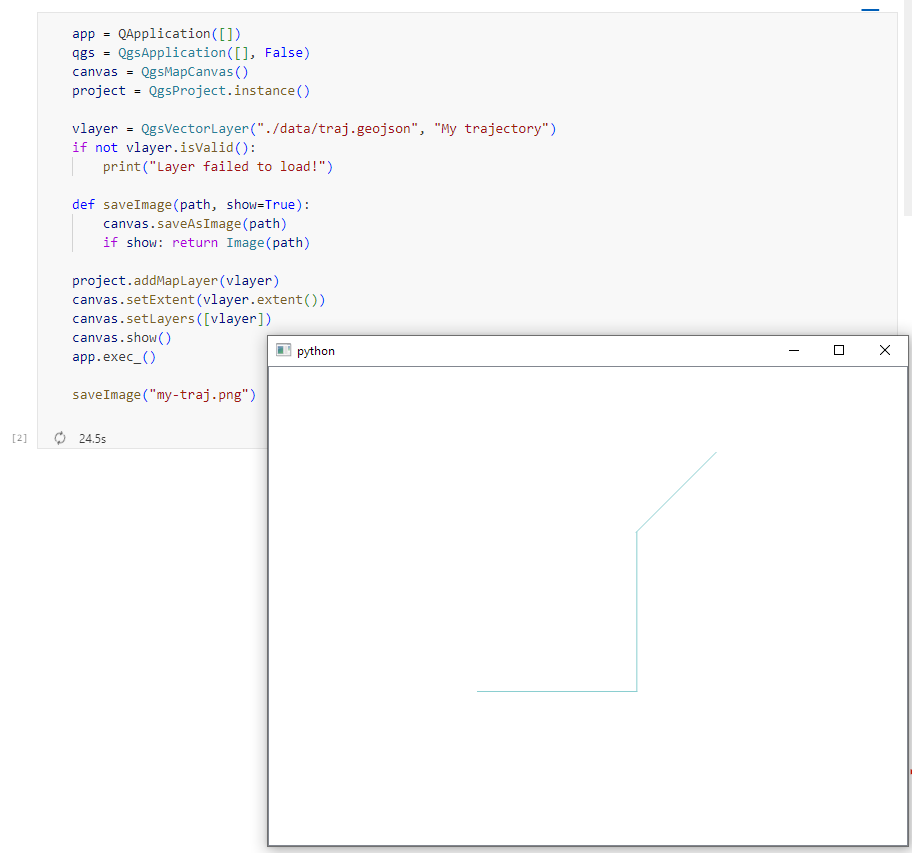
To specify a specific color, we can use:
vlayer.renderer().symbol().setColor(QColor("red"))

vlayer.triggerRepaint()
canvas.show()
app.exec_()
saveImage("my-traj.png")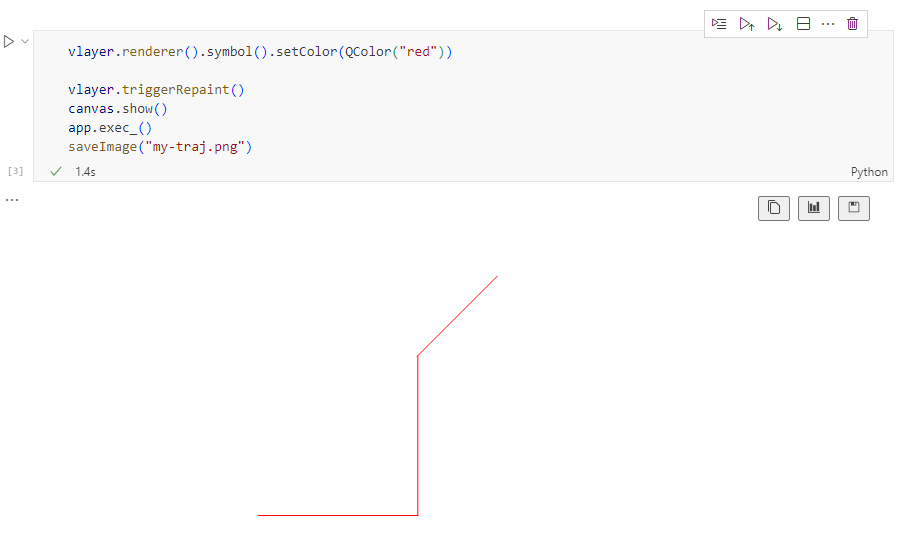
But regular lines are boring. We could easily create those with GeoPandas plots.
Things get way more interesting when we use QGIS’ custom symbols and renderers. For example, to draw arrows using a QgsArrowSymbolLayer, we can write:
vlayer.renderer().symbol().appendSymbolLayer(QgsArrowSymbolLayer())

vlayer.triggerRepaint()
canvas.show()
app.exec_()
saveImage("my-traj.png")
We can also create a QgsGraduatedSymbolRenderer:
geom_type = vlayer.geometryType()
myRangeList = []

symbol = QgsSymbol.defaultSymbol(geom_type)
symbol.setColor(QColor("#3333ff"))
myRange = QgsRendererRange(0, 1, symbol, 'Group 1')
myRangeList.append(myRange)

symbol = QgsSymbol.defaultSymbol(geom_type)
symbol.setColor(QColor("#33ff33"))
myRange = QgsRendererRange(1, 3, symbol, 'Group 2')
myRangeList.append(myRange)

myRenderer = QgsGraduatedSymbolRenderer('speed', myRangeList)
vlayer.setRenderer(myRenderer)

vlayer.triggerRepaint()
canvas.show()
app.exec_()
saveImage("my-traj.png")
And we can combine both QgsGraduatedSymbolRenderer and QgsArrowSymbolLayer:
geom_type = vlayer.geometryType()
myRangeList = []

symbol = QgsSymbol.defaultSymbol(geom_type)
symbol.appendSymbolLayer(QgsArrowSymbolLayer())
symbol.setColor(QColor("#3333ff"))
myRange = QgsRendererRange(0, 1, symbol, 'Group 1')
myRangeList.append(myRange)

symbol = QgsSymbol.defaultSymbol(geom_type)
symbol.appendSymbolLayer(QgsArrowSymbolLayer())
symbol.setColor(QColor("#33ff33"))
myRange = QgsRendererRange(1, 3, symbol, 'Group 2')
myRangeList.append(myRange)

myRenderer = QgsGraduatedSymbolRenderer('speed', myRangeList)
vlayer.setRenderer(myRenderer)

vlayer.triggerRepaint()
canvas.show()
app.exec_()
saveImage("my-traj.png")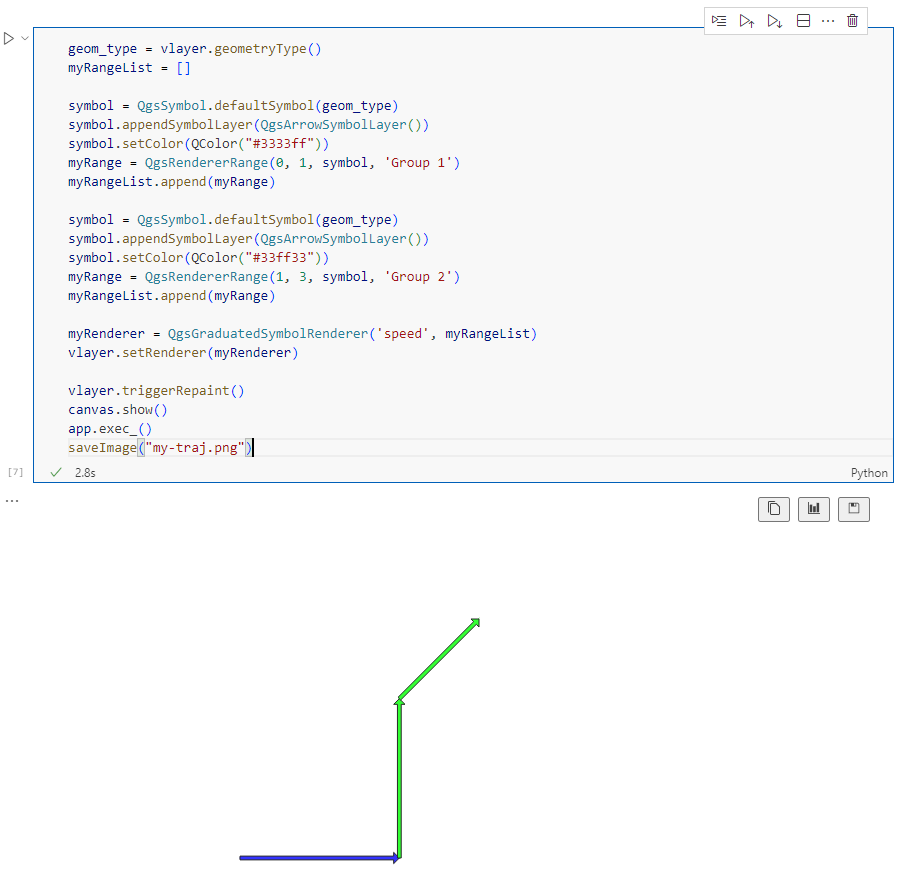
Maybe the most powerful option is to use data-defined symbology. For example, to control line width and color:
renderer = QgsSingleSymbolRenderer(QgsSymbol.defaultSymbol(geom_type))

exp_width = 'scale_linear("speed", 0, 3, 0, 7)'
exp_color = "coalesce(ramp_color('Viridis',scale_linear(\"speed\", 0, 3, 0, 1)), '#000000')"

# [https:] renderer.symbol().symbolLayer(0).setDataDefinedProperty(
    QgsSymbolLayer.PropertyStrokeWidth, QgsProperty.fromExpression(exp_width))
renderer.symbol().symbolLayer(0).setDataDefinedProperty(
    QgsSymbolLayer.PropertyStrokeColor, QgsProperty.fromExpression(exp_color))
renderer.symbol().symbolLayer(0).setDataDefinedProperty(
    QgsSymbolLayer.PropertyCapStyle, QgsProperty.fromExpression("'round'"))

vlayer.setRenderer(renderer)

vlayer.triggerRepaint()
canvas.show()
app.exec_()
saveImage("my-traj.png")
Find the full notebook at: [https:]]


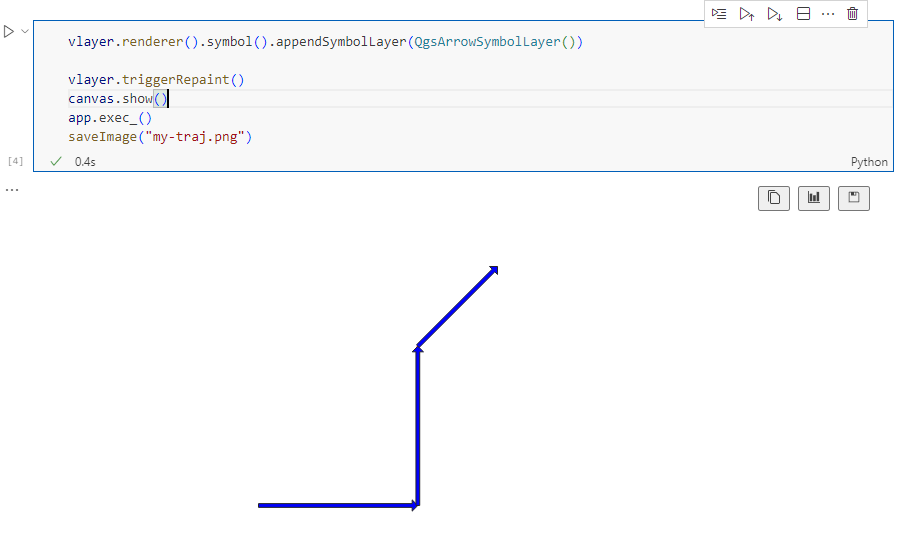


-
sur Peering into the Heart of Darkness
Publié: 10 November 2023, 9:08am CET par Keir Clarke
This week the European Space Agency released the first full-color images from the Euclid telescope. Euclid is a space telescope (situated in a halo orbit at an average distance of 1.5 million kilometers beyond Earth's orbit) which has been tasked to explore dark energy and dark matter. The telescope is capturing highly detailed astronomical images across a large area of the sky. The first five
-
sur Georg Heiler: Introduction to Geostatistics
Publié: 10 November 2023, 1:00am CET
Georg Heiler: Introduction to Geostatistics
-
sur How Long Will You Live?
Publié: 9 November 2023, 2:31pm CET par Keir Clarke
According to Population.io I can expect to live for another 26.9 years. This calculation is based on my age, sex and country of birth. I am lucky I don't live in the United States. If I did I'd have 16 months less to live. Mind you if I lived in Japan I'd be able to look forward to living an extra 7 months.Enter your date of birth, country of birth and sex into Population.io and it will tell -
sur Documenting Russian Crimes in Ukraine
Publié: 9 November 2023, 9:29am CET par Keir Clarke
In March 2022 Russian troops invaded the Ukrainian village of Yahidne. During their month long occupation of the village the Russian army locked the villagers in a school basement. 360 people, including children and the elderly, where forced to live together in cramped and unsanitary conditions. There was so little space that people had to sleep standing up, people had to use buckets for
-
sur GRASS GIS: Apply Now for Student Grants
Publié: 9 November 2023, 9:12am CET
We would like to announce a unique paid opportunity for students to contribute to GRASS GIS! GRASS GIS will offer a number of student grants for projects that include development of GRASS documentation, tests, new features or geospatial tools and bug fixing. Check the suggested topics on the Student Grant wiki. Why to apply? Experience: Gain hands-on experience in a thriving open-source community. Mentorship: Work alongside experienced developers who will guide you throughout your journey.
-
sur OGC and Joint Research Centre renew Collaboration Agreement to enhance Geospatial Standards
Publié: 8 November 2023, 3:00pm CET par Simon Chester
The Open Geospatial Consortium (OGC) and the Joint Research Centre of the European Commission (JRC) have renewed their collaboration agreement to enhance the development and use of geospatial standards.
The ongoing collaboration enables JRC to more effectively contribute to the OGC Standards process and facilitate the consideration of European objectives, requirements, and policies during the development of international open geospatial standards.
The agreement formalizes the partners’ collaboration in the field of development, application, maintenance, and promotion of international open geospatial standards and best practices that support the implementation of EU policies, for example, INSPIRE, European Data Spaces, Open Data, and Earth Observation, including Copernicus and Galileo.
Further, the agreement will enable OGC and JRC to jointly organize workshops for exchanging scientific and technological information on topics of mutual interest, for example, spatial law and policy, Spatial Data Infrastructure (SDI) Best Practices, and emerging technologies (e.g. metaverse, digital twins, cloud/edge computing, platforms, and Artificial Intelligence (AI)).
“We at OGC are pleased to continue our collaboration with the JRC,” commented Ingo Simonis, Ph.D, OGC Chief Technology Innovation Officer. “With the modernization of national and international spatial data infrastructures, the semantic enhancement of existing data offerings, and the development of cross-domain yet flexible solutions for heterogeneous communities, we have many core activities in common. Bringing the JRC and OGC communities together allows us to address these important topics far more efficiently.”
About JRC
The European Commission’s Joint Research Centre provides independent, evidence-based knowledge and science, supporting EU policies to positively impact society.?It plays a key role at multiple stages of the EU policy cycle.
It works closely with research and policy organisations in the Member States, with the European institutions and agencies, and with scientific partners in Europe and internationally, including within the United Nations system. In addition, the JRC offers scientific expertise and competences from a very wide range of disciplines in support of almost all EU policy areas.The post OGC and Joint Research Centre renew Collaboration Agreement to enhance Geospatial Standards appeared first on Open Geospatial Consortium.
-
sur Dutchify Your Street
Publié: 8 November 2023, 9:11am CET par Keir Clarke
Thanks to the Netherlands Board of Tourism you can now visualize how your street might look if you were able to get rid of all the cars & the ugly road, and replace them with a bike lane, a few trees & some beautiful flowers. It is a matter of great sadness to the Dutch people that people in the rest of the world are not able to live in cycle-friendly environments. Therefore the
-
sur SIG Libre Uruguay: web gratuito «Asociación con EOS Data Analytics: Ventajas de su red de socios y soporte».
Publié: 7 November 2023, 5:14pm CET

Todo tipo de empresas y organizaciones orientadas a la agricultura están invitadas a asistir al seminario web, así como periodistas, activistas, y ecologistas interesados en la agricultura de precisión. Cuándo: 21 de noviembre Hora: 9 AM CST / 4 PM CET Los ponentes del seminario web serán: Dmytro Svyrydenko, Ejecutivo de cuentas, EOSD?
Pablo Ezequiel Escudero, Socio gerente, Agro Gestión
Esteban Moschin, Consultor de Negocios Independiente, Agro Gestión
Pablo Astudillo, Gerente General, BM Monitoring
Daniel Marulanda, Director General de Tecnología, GeoSatLos ponentes debatirán sobre los siguientes temas: Beneficios del Programa de socios y soporte de EOSDA.
Transformación de la agricultura en Argentina en los últimos 10 años. Cómo cambió en este tiempo el servicio de consultoría agrícola.
La agricultura de precisión en España. Gestores y asesores agrícolas y su rol en la transformación de la agricultura en el país.
El rol de los consultores y asesores agrícolas en Chile. Requisitos principales de los clientes para cubrir todas sus necesidades.
Solución de marca blanca, qué ventajas tiene y proyecto con la FAO. Recomendaciones para los clientes que quieren pasarse a marca blanca.Para obtener más información, presione aquí. Idioma: Español Duración: 1,5 horas.
-
sur The Interactive Pathfinding Map
Publié: 7 November 2023, 10:20am CET par Keir Clarke
The Pathfinding Visualizer is an interactive pathfinding tool that allows you to discover the most direct route between any two points in the world, using a number of different pathfinding algorithms. A map pathfinding algorithm is a way to find the shortest or most efficient route between different points on a map. It helps you find the best path to go from one location to another, considering
-
sur SIG Libre Uruguay: Tercera edición del curso online gratuito del BID: Cartografía y Geografía Estadística
Publié: 6 November 2023, 6:41pm CET
El curso está dirigido al personal y/o profesionales del mundo de la estadística y de la geografía que estén interesados en conocer cómo se utilizan los mapas para las investigaciones de campo y cuál es el papel que juega la cartografía y las ciencias geográficas como apoyo a la ciencia estadística. No es necesario que se cuente con conocimientos previos muy especializados en manejo de herramientas de Sistemas de Información Geográfica (SIG). Click en la imagen para más información.
-Este curso es auto-regulado y no cuenta con clases o sesiones sincrónicas-
-Este curso no tiene el acompañamiento de un tutor/a-
-
sur Redesigning the World's Transit Maps
Publié: 6 November 2023, 9:11am CET par Keir Clarke
The University of Freiburg has redesigned the transit maps of every city in the world. Zoom in on any location on the university's LOOM Global Transit Map and you can view the local transit network mapped using your choice of four different transit map projections.In every city in the world you can view the local transit map in either a geographical, octilinear, geo-octilinear or orthoradial
-
sur Free and Open Source GIS Ramblings: Exploring a hierarchical graph-based model for mobility data representation and analysis
Publié: 5 November 2023, 10:17pm CET
Today’s post is a first quick dive into Neo4J (really just getting my toes wet). It’s based on a publicly available Neo4J dump containing mobility data, ship trajectories to be specific. You can find this data and the setup instructions at:
Maryam Maslek ELayam, Cyril Ray, & Christophe Claramunt. (2022). A hierarchical graph-based model for mobility data representation and analysis [Data set]. Zenodo. [https:]
I was made aware of this work since they cited MovingPandas in their paper in Data & Knowledge Engineering: “The implementation combines several open source tools such as Python, MovingPandas library, Uber H3 index, Neo4j graph database management system”
Once set up, this gives us a database with three hierarchical levels:

Neo4j comes with a nice graphical browser that lets us explore the data. We can switch between levels and click on individual node labels to get a quick preview:


Level 2 is a generalization / aggregation of level 1. Expanding the graph of one of the level 2 nodes shows its connection to level 1. For example, the level 2 port node “Audierne” actually refers to two level 1 nodes:
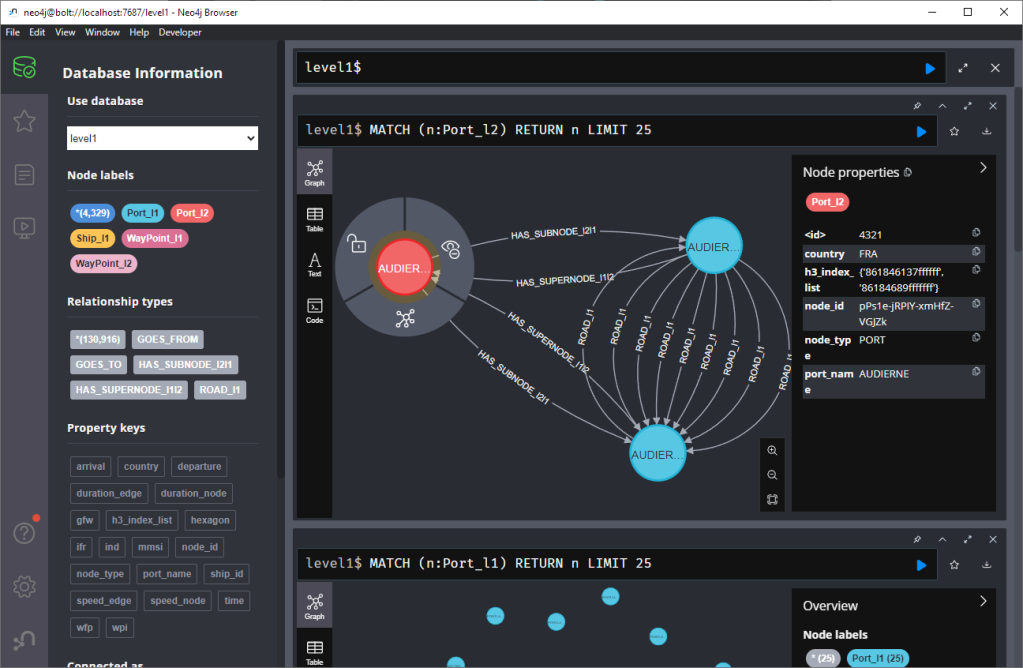
Every “road” level 1 relationship between ports provide information about the ship, its arrival, departure, travel time, and speed. We can see that this two level 1 ports must be pretty close since travel times are only 5 minutes:

Further expanding one of the port level 1 nodes shows its connection to waypoints of level1:

Switching to level 2, we gain access to nodes of type Traj(ectory). Additionally, the road level 2 relationships represent aggregations of the trajectories, for example, here’s a relationship with only one associated trajectory:

There are also some odd relationships, for example, trajectory 43 has two ends and begins relationships and there are also two road relationships referencing this trajectory (with identical information, only differing in their automatic <id>). I’m not yet sure if that is a feature or a bug:

On level 1, we also have access to ship nodes. They are connected to ports and waypoints. However, exploring them visually is challenging. Things look fine at first:
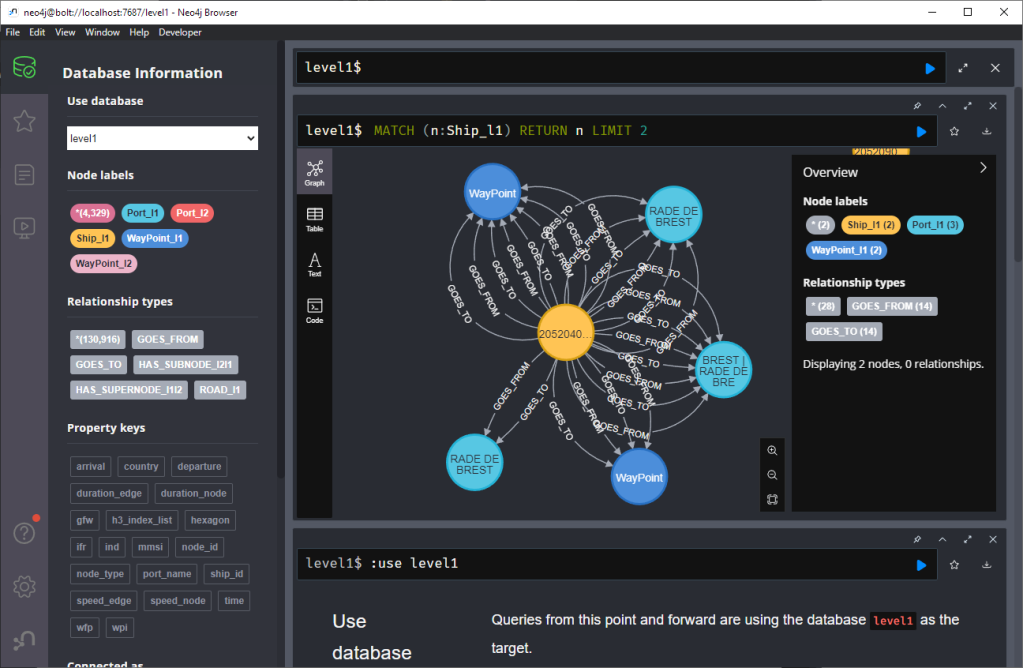
But after a while, once all relationships have loaded, we have it: the MIGHTY BALL OF YARN ™:

I guess this is the point where it becomes necessary to get accustomed to the query language. And no, it’s not SQL, it is Cypher. For example, selecting a specific trajectory with id 0, looks like this:
MATCH (t1 {traj_id: 0}) RETURN t1
But more on this another time.
This post is part of a series. Read more about movement data in GIS.
-
sur From GIS to Remote Sensing: Downloading free satellite images using the Semi-Automatic Classification Plugin: the Download product tab
Publié: 5 November 2023, 4:10pm CET
This is part of a series of video tutorials focused on the tools of the Semi-Automatic Classification Plugin (SCP).In this tutorial, the Download products tab is illustrated, which allows for downloading free satellite images such as Landsat and Sentinel-2.You can find more information in the user manual at this link.
Following the video tutorial.
For any comment or question, join the Facebook group or GitHub discussions about the Semi-Automatic Classification Plugin.
-
sur QGIS Blog: QGIS 3.34 Prizren is released!
Publié: 5 November 2023, 10:07am CET
We are pleased to announce the release of QGIS 3.34 Prizren!
Installers for Windows and Linux are already out. QGIS 3.34 comes with tons of new features, as you can see in our visual changelog. QGIS 3.34 Prizren is named after this year’s FOSS4G host city.
We would like to thank the developers, documenters, testers and all the many folks out there who volunteer their time and effort (or fund people to do so). From the QGIS community we hope you enjoy this release! If you wish to donate time, money or otherwise get involved in making QGIS more awesome, please wander along to qgis.org and lend a hand!
QGIS is supported by donors and sustaining members. A current list of donors who have made financial contributions large and small to the project can be seen on our donors list. If you would like to become a sustaining member, please visit our page for sustaining members for details. Your support helps us fund our six monthly developer meetings, maintain project infrastructure and fund bug fixing efforts.
QGIS is Free software and you are under no obligation to pay anything to use it – in fact we want to encourage people far and wide to use it regardless of what your financial or social status is – we believe empowering people with spatial decision making tools will result in a better society for all of humanity.


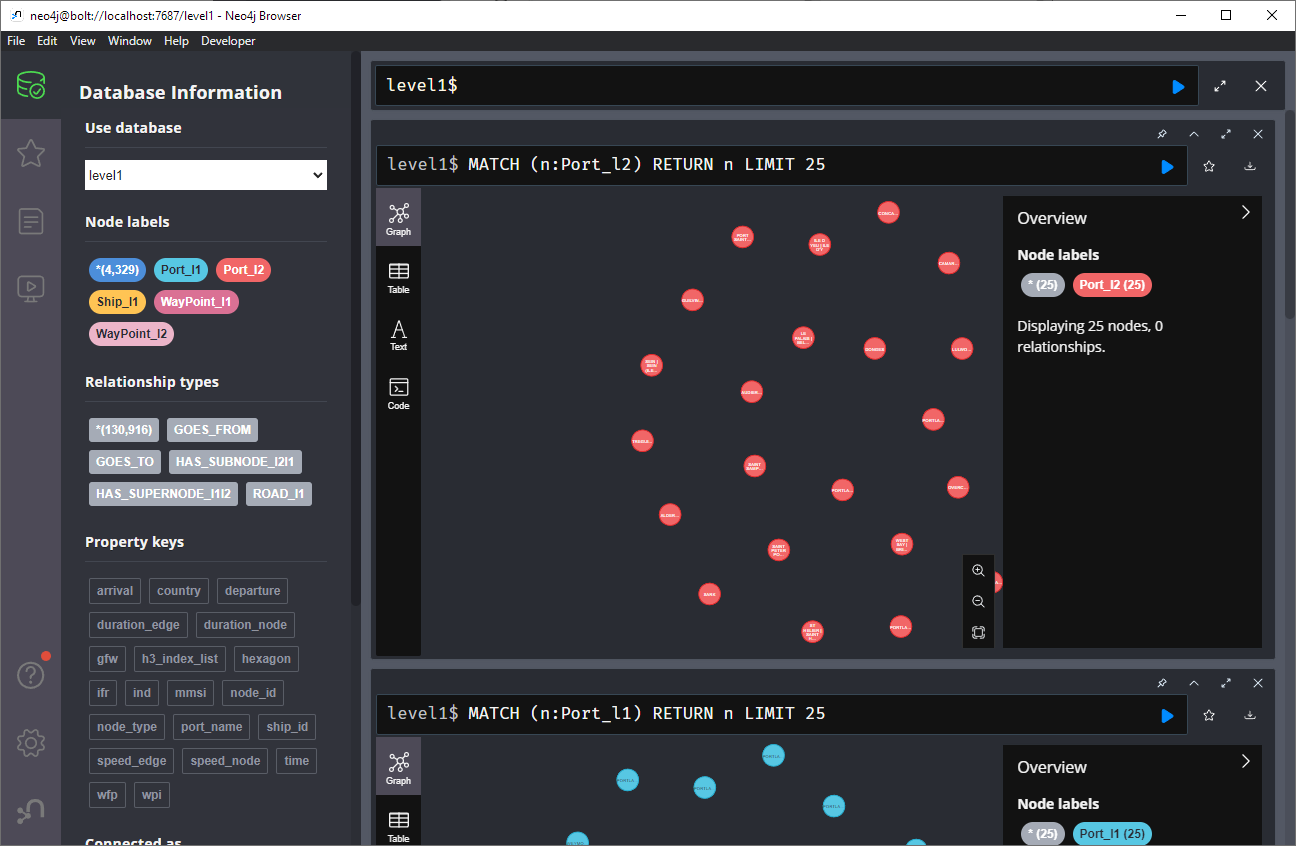


-
sur A Map of the World That Is Gone
Publié: 4 November 2023, 10:12am CET par Keir Clarke
When Elan Ullendorff moved to South Philadelphia this summer he realized that he knew very little about the recent history of his new neighborhood. So he decided to change that. The result is Love Letters to Places I'll Never Meet, an interactive map which summons up the recent past of South Philadelphia by creating an interactive map of some now shuttered stores. To create his love letter to
-
sur SIG Libre Uruguay: Premios Osor: gvSIG seleccionado entre los 6 mejores proyectos Open Source de la Comisión Europea
Publié: 3 November 2023, 6:20pm CET
-
sur SIG Libre Uruguay: XIII Jornada Educativa en Teledetección en el Ámbito del Mercosur
Publié: 3 November 2023, 6:15pm CET
Recibimos y publicamos: XIII Jornada de Educação em Sensoriamento Remoto no Âmbito do Mercosul
(click en la imagen para más información)

-
sur gvSIG Batoví: GIS DAY EN FACULTAD DE CIENCIAS FORESTALES (UNIVERSIDAD NACIONAL DE MISIONES)
Publié: 3 November 2023, 4:50pm CET

Con mucho gusto y honor Felipe Sodré Barros (Mgtr. Ecología y Biodiversidad) les hace la invitación a las actividades por el día SIG (GIS Day) organizado por sus alumnos de la Tecnicatura en SIG y Teledetección.

En una de ellas, tendremos la participación de Antoni Pérez Navarro, a quien agradecemos por la participación!
Existe un formulario de inscripción para facilitar la comunicación por si se necesita hacer algún cambio
-
sur SIG Libre Uruguay: GIS Day en Facultad de Ciencias Forestales (Universidad Nacional de Misiones)
Publié: 3 November 2023, 4:38pm CET

Con mucho gusto y honor Felipe Sodré Barros (Mgtr. Ecología y Biodiversidad) les hace la invitación a las actividades por el día SIG (GIS Day) organizado por sus alumnos de la Tecnicatura en SIG y Teledetección.

En una de ellas, tendremos la participación de Antoni Pérez Navarro, a quien agradecemos por la participación!

Existe un formulario de inscripción para facilitar la comunicación por si se necesita hacer algún cambio


-
sur Climate, Disaster, and Emergency Communities invited to Innovation Days 2023
Publié: 3 November 2023, 2:00pm CET par Simon Chester
The Open Geospatial Consortium (OGC) invites anyone involved in climate resilience, disaster response, and emergency management to attend OGC Innovation Days 2023. The event will be held December 5-7 at the American Red Cross Headquarters in Washington, D.C. Attendance is free for OGC Members using this link.
OGC Innovation Days 2023 brings together diverse members of the climate, disaster, and emergency resilience and response communities to explore what OGC-enabled geospatial technologies have made possible and to ask: what do we need to do next?
This multi-day event will benefit anyone interested or involved in climate resilience, disaster response, or emergency management by providing an opportunity to learn about the latest geospatial data and technology developments from the OGC community, contribute to shaping future work, and interact with stakeholders from industry, government, research, and the private sector.
OGC has for many years been developing solutions that support climate and disaster resilience and response, from supporting the development of FAIR (Findable, Accessible, Interoperable, and Reusable) climate resilience information systems, to empowering first responders with the information they need, when they need it.
But to most effectively address the multi-faceted challenges of the changing climate and associated disasters, we want to hear about the problems being faced by city-managers, community members, first responders, climate scientists, insurers, government bodies, and others, as they respond to the changing climate and associated disasters – so that we can use OGC’s collective expertise to address them.
By bringing the climate, disaster, and emergency communities together, OGC Innovation Days 2023 provides a unique opportunity for attendees to meet people facing similar challenges to their own and learn about the solutions that worked for them, while guiding OGC towards creating impactful free and open solutions where none currently exist.
The event runs across three days: a day of panels and discussions, a day of demonstrations, and a day exclusively for the OGC Strategic Member Advisory Committee, OGC Executive Planning Committee, and special guests.
Gain insights from experts from leading organizations, including: event hosts American Red Cross, OGC Strategic Members Department of Homeland Security (DHS) / Federal Emergency Management Agency (FEMA), National Aeronautics and Space Administration (NASA), National Oceanic and Atmospheric Administration (NOAA), Natural Resources Canada (NRCan), and United States Geological Survey (USGS), as well as others from across government and industry. See the full agenda here.
Day 1 consists of panels and discussions centered around 4 topics: Disaster Response & Emergency Management; Wildfires; Climate Change & Disaster Risk Reduction; and the role that Artificial Intelligence and related technologies can play in building disaster and climate resilience. Throughout each panel, expect information on the FAIR solutions and workflows developed through OGC initiatives – such as the Disasters Pilot 2023 and the Climate Resilience Pilot – the gaps that remain between the data & tools we have and the ones we need, panelists’ successes & challenges, and audience feedback.
Day 2 provides attendees the opportunity to see working demonstrations of cutting-edge solutions for climate, disaster, and emergency resilience and response developed in OGC COSI Program Initiatives or using OGC innovations in geospatial technologies such as Artificial Intelligence/Machine Learning, Earth Observation, Analysis Ready Data (ARD), Decision Ready Indicators (DRI) for emergency response, FAIR systems & data, cloud-native geospatial, and more.
Day 2 will also include a demonstration of General Dynamics Information Technology (GDIT)’s standards-based Raven mobile command-center, which collects and distributes mission-critical information at the edge. Powered by AI systems, the Raven can filter information so data-driven decisions can be made and disseminated to first responders, analysts, and decision makers in real-time.
Join us at the American Red Cross Headquarters in Washington, DC, USA, to tackle climate, disasters, and emergencies together using FAIR geospatial data and systems. A video overview of the 2022 OGC Innovation Days event is available on OGC’s YouTube channel.
For more information, including registration, agenda, venue & accommodation info, and more, visit the OGC 2023 Innovation Days webpage. The event is free for OGC Members – see this page on the OGC Portal for your discounted registration link. Sponsorship opportunities remain available, contact OGC to find out more.
The post Climate, Disaster, and Emergency Communities invited to Innovation Days 2023 appeared first on Open Geospatial Consortium.
-
sur Star-Gazing Hotels
Publié: 3 November 2023, 9:24am CET par Keir Clarke
If you live in a town or city and you want to observe the true astronomical splendor of the night sky then you need to plan an evening away, somewhere away from the bright lights of the city, somewhere where there is very little light pollution. Luckily there is a new interactive map that will not only help you find locations with reduced light pollution but will also show you the locations of -
sur 135,000 Years of Changing Sea Levels
Publié: 2 November 2023, 9:08am CET par Keir Clarke
The Sea Level Map is an interactive globe which visualizes global sea level and ice sheet interactions over the past 135,000 years. Using the map you can discover in which eras of Earth's history your home might have been under water.The date control at the bottom of the map allows you to adjust the sea level and ice sheets displayed by date. Using this control you can adjust the date shown on -
sur Mapping the Oct 7 Hamas Attacks
Publié: 1 November 2023, 8:32am CET par Keir Clarke
Over the last three weeks news organizations around the world have produced many maps in their efforts to help explain the 2023 Israel-Hamas war. Many of these have been curated in the Data Vis Dispatch. Unfortunately the paywalls of many of the major news websites make a lot of these maps inaccessible to many.The current attacks on the Palestinian people by Israel are in response to the events -
sur The Spookiest Places in the USA
Publié: 31 October 2023, 3:39pm CET par Keir Clarke
The United States is a very scary country. The Scariest Place Names in the US is an interactive map which plots some of the most frightening sounding locations across America. You've probably already heard of the towns of Hell in Michigan and Tombstone, Arizona. But have you heard of Transylvania, Louisiana and Slaughter Beach, Delaware. You can find many, many more spooky sounding locations on
-
sur GeoTools Team: GeoTools 29.3 released
Publié: 31 October 2023, 10:01am CET
The GeoTools team is pleased to announce the release of the latest maintenance version of GeoTools 29.3: geotools-29.3-bin.zip geotools-29.3-doc.zip geotools-29.3-userguide.zip geotools-29.3-project.zip This release is also available from the OSGeo Maven Repository and is made in conjunction with GeoServer 2.23.3 and GeoWebCache 1.23.2. We are
-
sur Halloween's Most Haunted Places
Publié: 31 October 2023, 1:04am CET par Keir Clarke
There are many haunted locations that you might want to visit (or avoid) on this All Hallows' Eve. Mashed World has released an interactive map which maps haunted locations across the world identified by the ChatGPT AI.Haunted Locations plots 37 locations in countries around the globe. These haunted locations include the Tower of London (the site of many historical executions), Bran Castle (
-
sur OGC Compliance Certification Available for v2.0 of the Web Processing Service (WPS) Standard
Publié: 30 October 2023, 2:00pm CET par Simon Chester
The Open Geospatial Consortium (OGC) is excited to announce that the Executable Test Suite (ETS) for version 2.0 of the Web Processing Service (WPS) Standard has been approved by the OGC Membership. Products that implement the Standard and pass the tests in the ETS can now be certified as OGC Compliant.
The OGC Compliance Program offers a certification process that ensures organizations’ solutions are compliant with OGC Standards. It is a universal credential that allows agencies, industry, and academia to better integrate their solutions. OGC Compliance provides confidence that a product will seamlessly integrate with other compliant solutions regardless of the vendor that created them.
The WPS Standard supports the wrapping of computational tasks into executable processes that can be offered by a server through a web service interface and be invoked by a client application. The processes typically combine coverage, raster, vector, and/or point cloud data with well-defined algorithms to produce new information. Some of those algorithms may apply Machine Learning and other Artificial Intelligence (AI) approaches, as demonstrated by the OGC Testbed-16 initiative.
Implementers of the WPS 2.0 Standard are invited to validate their products using the new test suite, which is available now on the OGC Validator Tool. Testing involves submitting the endpoint of a WPS implementation to be assessed. The validator tool sends the appropriate requests to the endpoint of the implementation and then evaluates the responses. These tests typically take only 5-10 minutes to complete. Once a product has passed the tests, the implementer can submit an application to OGC for use of the OGC Compliant trademark on their product.
To support developers with implementation of the standard, GeoLabs ZOO-Project 2.0 and the 52°North 52N Web Processing Service 4.0.0-beta.10 product have been designated as reference implementations of the standard after the software products successfully passed the compliance tests.
More information about the OGC compliance process, and how it can benefit your organization, is available at ogc.org/compliance. Implementers of version 2.0 of the WPS Standard – or other OGC Standards – can validate their products using the OGC Validator Tool.
The post OGC Compliance Certification Available for v2.0 of the Web Processing Service (WPS) Standard appeared first on Open Geospatial Consortium.
-
sur Markus Neteler: GRASS GIS 8.3.1 released
Publié: 30 October 2023, 1:47pm CET
What’s new in a nutshellThe GRASS GIS 8.3.1 maintenance release provides more than 60 changes compared to 8.3.0. This new patch release brings in important fixes and improvements in GRASS GIS modules and the graphical user interface (GUI) which stabilizes the new single window layout active by default.
Some of the most relevant changes include: fixes for
r.watershedwhich got partially broken in the 8.3.0 release; and a fix for installing addons on MS Windows withg.extension.Translations continue in Weblate, which automatically creates pull requests with the translated chunks. We’d like to thank the translators of all languages for their ongoing support!
Full list of changes and contributors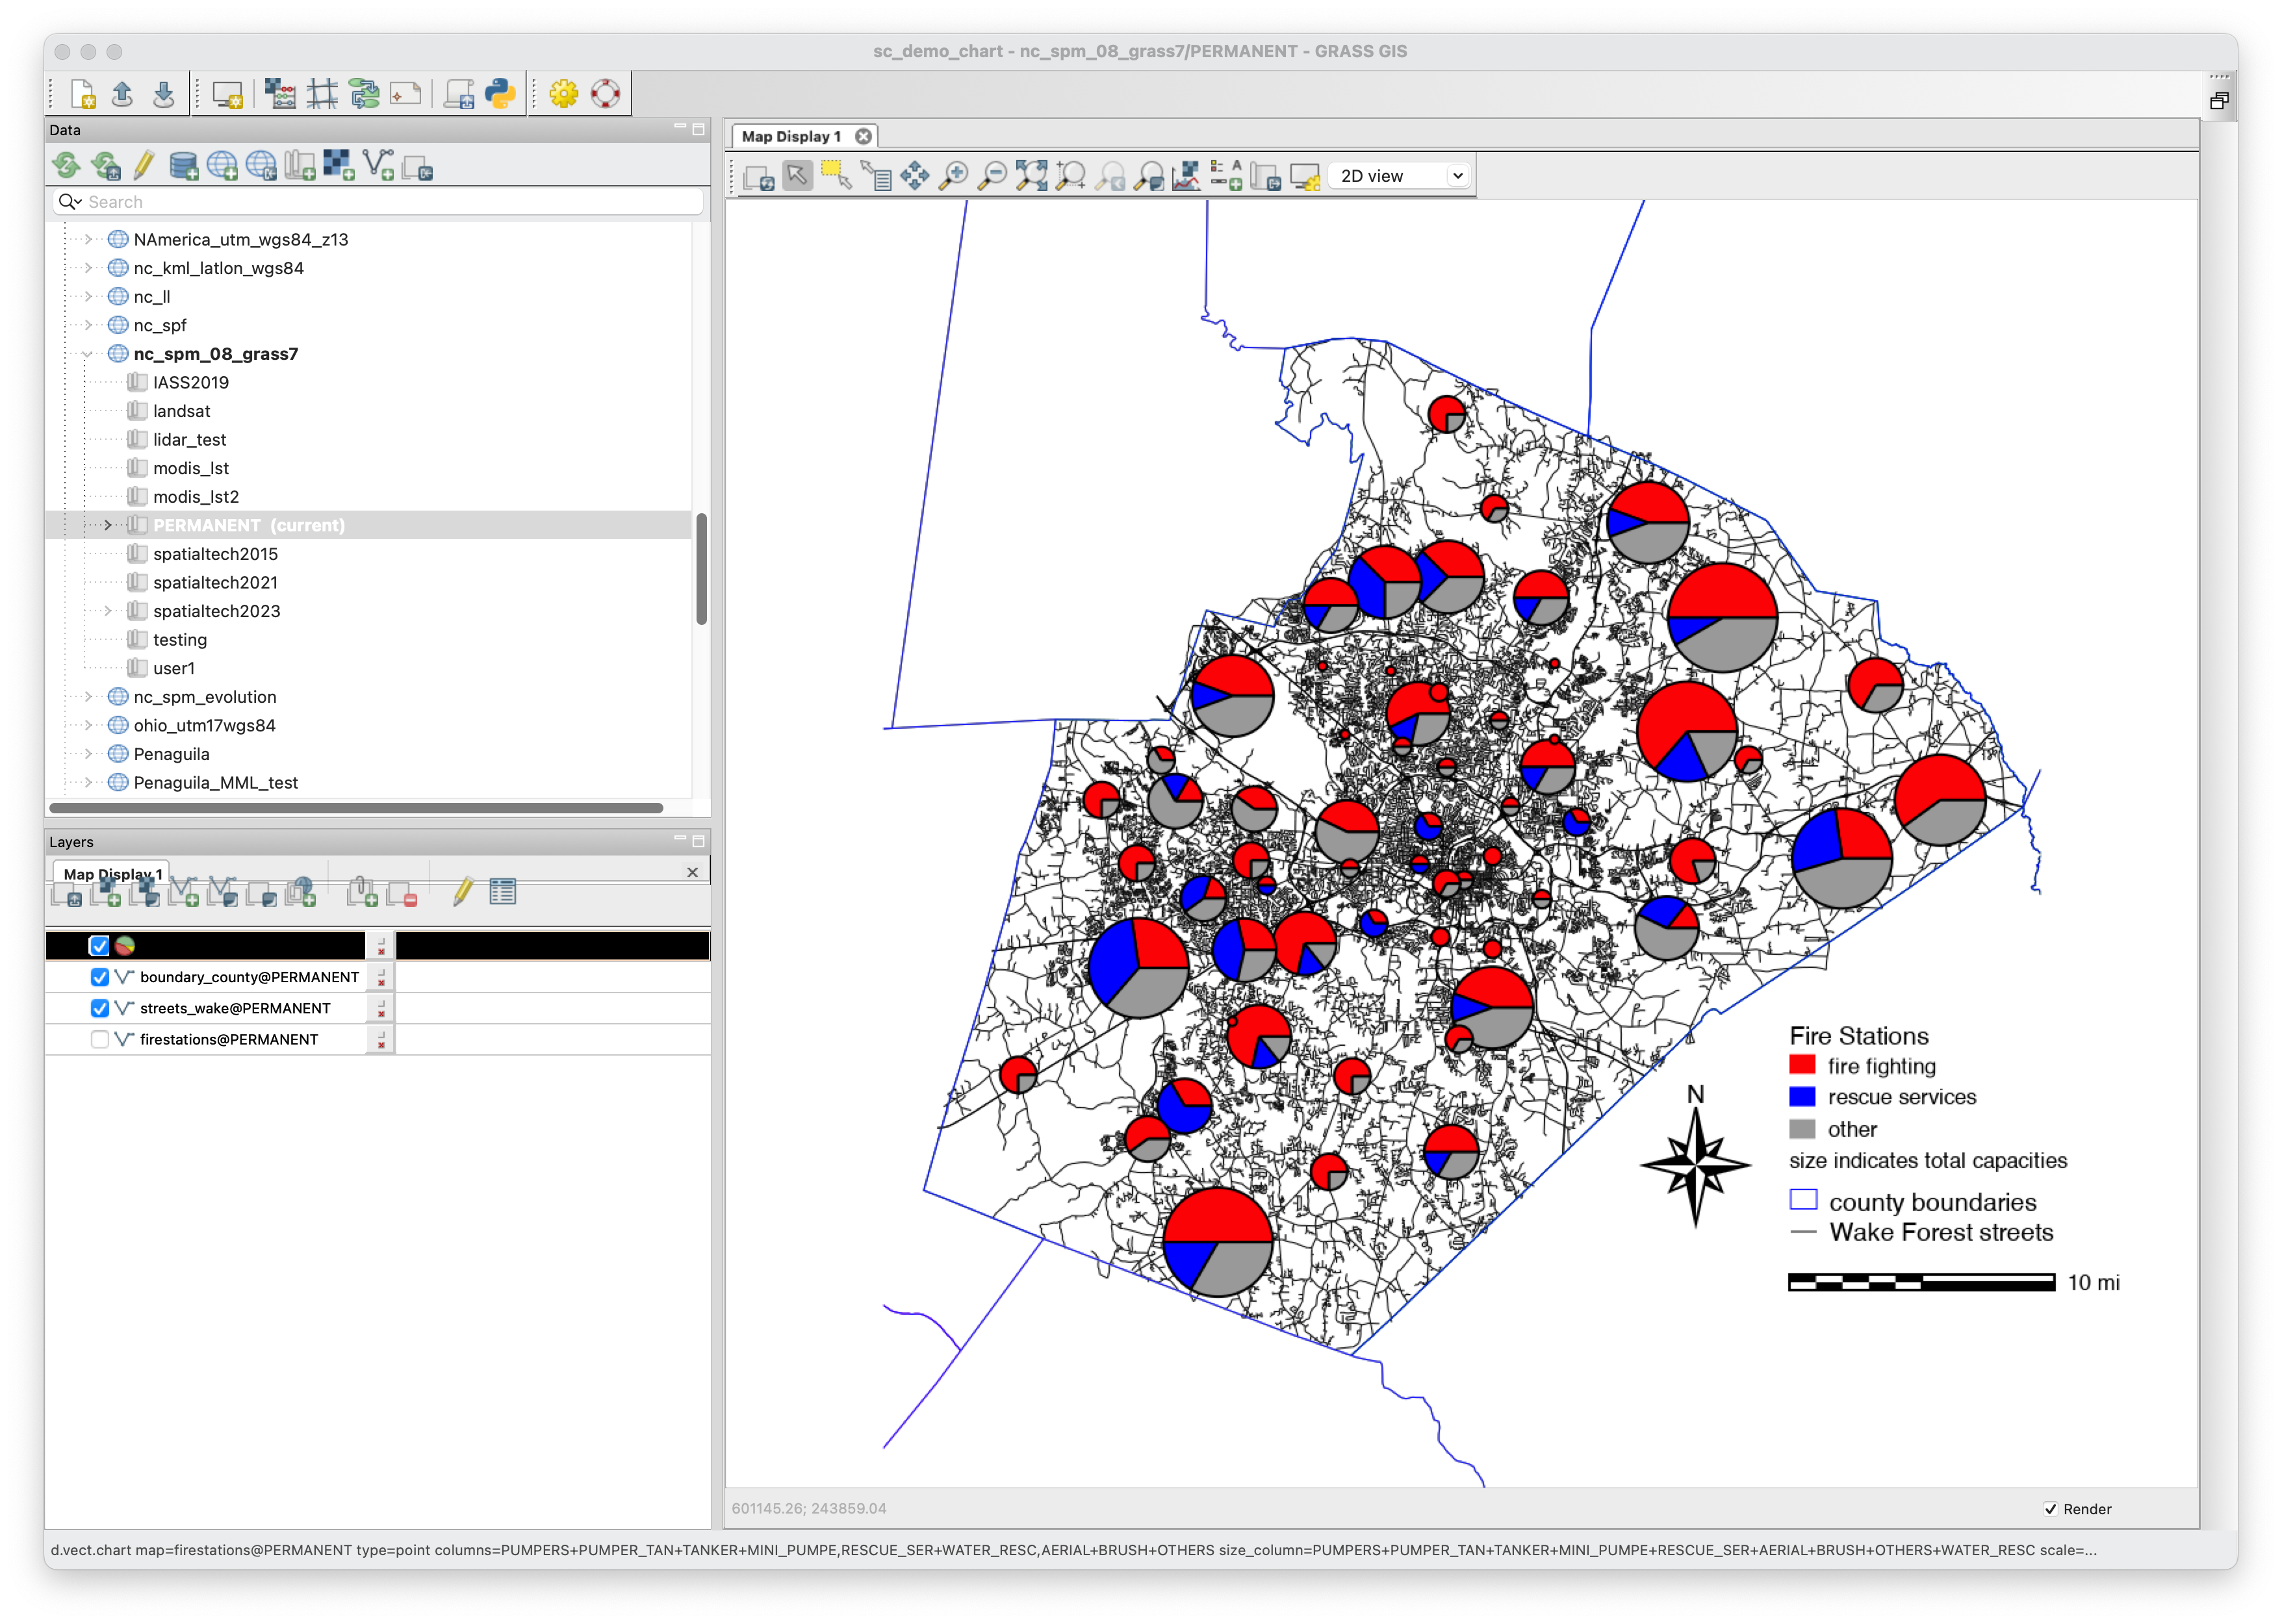
For all 60+ changes, see our detailed announcement with the full list of features and bugs fixed at GitHub / Releases / 8.3.1.
Thanks to all contributors!
Software downloads Binaries/Installers download- Windows
- macOS
- Linux
Further binary packages for other platforms and distributions will follow shortly, please check at software downloads.
Source code downloadFirst time users may explore the first steps tutorial after installation.
About GRASS GIS
The Geographic Resources Analysis Support System ( [https:]] ), commonly referred to as GRASS GIS, is an Open Source Geographic Information System providing powerful raster, vector and geospatial processing capabilities. It can be used either as a stand-alone application, as backend for other software packages such as QGIS and R, or in the cloud. It is distributed freely under the terms of the GNU General Public License (GPL). GRASS GIS is a founding member of the Open Source Geospatial Foundation (OSGeo).
The GRASS Dev Team
The post GRASS GIS 8.3.1 released appeared first on Markus Neteler | Geospatial Analysis | Remote sensing | GRASS GIS.
-
sur Oslandia: QField 3.0 release : field mapping app, based on QGIS
Publié: 30 October 2023, 1:03pm CET
We are very happy and enthusiasts at Oslandia to forward the QField 3.0 release announcement, the new major update of this mobile GIS application based on QGIS.
Oslandia is a strategic partner of OPENGIS.ch, the company at the heart of QField development, as well as the QFieldCloud associated SaaS offering. We join OPENGIS.ch to announce all the new features of QField 3.0.
Shipped with many new features and built with the latest generation of Qt’s cross-platform framework, this new chapter marks an important milestone for the most powerful open-source field GIS solution.
Main highlightsUpon launching this new version of QField, users will be greeted by a revamped recent projects list featuring shiny map canvas thumbnails. While this is one of the most obvious UI improvements, countless interface tweaks and harmonization have occurred. From the refreshed dark theme to the further polishing of countless widgets, QField has never looked and felt better.
The top search bar has a new functionality that allows users to look for features within the currently active vector layer by matching any of its attributes against a given search term. Users can also refine their searches by specifying a specific attribute. The new functionality can be triggered by typing the ‘f’ prefix in the search bar followed by a string or number to retrieve a list of matching features. When expanding it, a new list of functionalities appears to help users discover all of the tools available within the search bar.
QField’s tracking has also received some love. A new erroneous distance safeguard setting has been added, which, when enabled, will dictate the tracker not to add a new vertex if the distance between it and the previously added vertex is greater than a user-specified value. This aims at preventing “spikes” of poor position readings during a tracking session. QField is now also capable of resuming a tracking session after being stopped. When resuming, tracking will reuse the last feature used when first starting, allowing sessions interrupted by battery loss or momentary pause to be continued on a single line or polygon geometry.
On the feature form front, QField has gained support for feature form text widgets, a new read-only type introduced in QGIS 3.30, which allows users to create expression-based text labels within complex feature form configurations. In addition, relationship-related form widgets now allow for zooming to children/parent features within the form itself.
To enhance digitizing work in the field, QField now makes it possible to turn snapping on and off through a new snapping button on top of the map canvas when in digitizing mode. When a project has enabled advanced snapping, the dashboard’s legend item now showcases snapping badges, allowing users to toggle snapping for individual vector layers.
In addition, digitizing lines and polygons by using the volume up/down hardware keys on devices such as smartphones is now possible. This can come in handy when digitizing data in harsh conditions where gloves can make it harder to use a touch screen.
While we had to play favorites in describing some of the new functionalities in QField, we’ve barely touched the surface of this feature-packed release. Other major additions include support for Near-Field Communication (NFC) text tag reading and a new geometry editor’s eraser tool to delete part of lines and polygons as you would with a pencil sketch using an eraser.
Thanks to Deutsches Archäologisches Institut, Groupements forestiers Québec, Amsa, and Kanton Luzern for sponsoring these enhancements.
Quality of life improvementsStarting with this new version, the scale bar overlay will now respect projects’ distance measurement units, allowing for scale bars in imperial and nautical units.
QField now offers a rendering quality setting which, at the cost of a slightly reduced visual quality, results in faster rendering speeds and lower memory usage. This can be a lifesaver for older devices having difficulty handling large projects and helps save battery life.
Vector tile layer support has been improved with the automated download of missing fonts and the possibility of toggling label visibility. This pair of changes makes this resolution-independent layer type much more appealing.
On iOS, layouts are now printed by QField as PDF documents instead of images. While this was the case for other platforms, it only became possible on iOS recently after work done by one of our ninjas in QGIS itself.
Many thanks to DB Fahrwgdienste for sponsoring stabilization efforts and fixes during this development cycle.
Qt 6, the latest generation of the cross-platform framework powering QFieldLast but not least, QField 3.0 is now built against Qt 6. This is a significant technological milestone for the project as this means we can fully leverage the latest technological innovations into this cross-platform framework that has been powering QField since day one.
On top of the new possibilities, QField benefited from years of fixes and improvements, including better integration with Android and iOS platforms. In addition, the positioning framework in Qt 6 has been improved with awareness of the newer GNSS constellations that have emerged over the last decade.
Forest-themed release namesForests are critical in climate regulation, biodiversity preservation, and economic sustainability. Beginning with QField 3.0 “Amazonia” and throughout the 3.X’s life cycle, we will choose forest names to underscore the importance of and advocate for global forest conservation.
Software with service
OPENGIS.ch and Oslandia provides the full range of services around QField and QGIS : training, consulting, adaptation, specific development and core development, maintenance and assistance. Do not hesitate to contact us and detail your needs, we will be happy to collaborate : infos+qfield@oslandia.com
As always, we hope you enjoy this new release. Happy field mapping!
-
sur gvSIG Team: 19th International gvSIG Conference: Communication proposals submission is open
Publié: 30 October 2023, 12:59pm CET

The 19th International gvSIG Conference “Connected solutions” will be held on November 29th and 30th, 2023. Within the in-person and online alternation, this year the conferences will be held as online event, which facilitates participation both in terms of presentations/workshops and attendance.
The communication proposals submission is now open, which can be sent to the email address conference-contact@gvsig.com, following the information indicated in the Communications section of the conference website.
As always, registration for the conference will be free of charge, and will be able to be done once the program has been published.
We encourage you to participate!
-
sur gvSIG Team: 19as Jornadas Internacionales de gvSIG: abierto el periodo de envío de propuestas de comunicación
Publié: 30 October 2023, 10:20am CET

Los días 29 y 30 de noviembre de 2023 tendrán lugar las 19as Jornadas Internacionales de gvSIG “Soluciones conectadas”. Dentro de la alternancia presencial-online, este año se realizan las jornadas en modalidad online, lo que facilita la participación tanto a nivel de ponencias/talleres como de asistencia.
Ya está abierto el periodo de envío de propuestas de comunicación, que pueden enviarse a la dirección de correo electrónico conference-contact@gvsig.com, siguiendo la información indicada en el apartado «Comunicaciones» de la web de las jornadas.
Como siempre, la inscripción a las jornadas será gratuita, y podrá realizarse una vez publicado el programa de las mismas.
¡Os animamos a participar!

-
sur The Little Free Library World Map
Publié: 30 October 2023, 8:44am CET par Keir Clarke
I shall be eternally grateful to my local community's book sharing box. As an avid reader being able to borrow and read secondhand books during lock-down kept me from becoming completely stir crazy. Since lock-down my nearest book-sharing box has almost fallen into disuse. Which is why I'm delighted to have found the Little Free Library World Map.The Little Free Library World Map is an
-
sur GeoServer Team: GeoServer 2.23.3 Release
Publié: 30 October 2023, 1:00am CET
GeoServer 2.23.3 release is now available with downloads (bin, war, windows), along with docs and extensions.
This is a maintenance release of GeoServer providing existing installations with minor updates and bug fixes. GeoServer 2.23.3 is made in conjunction with GeoTools 29.3, and GeoWebCache 1.23.2.
Thanks to Peter Smythe (AfriGIS) for making this release.
Security PatchesThis release includes security patches from projects that GeoServer depends on and is considered a recommended upgrade for production systems.
- GEOS-11030 Update jetty-server to 9.4.51.v20230217
See project security policy for more information on how security vulnerabilities are managed.
Also, another reminder of the URL check security setting that was introduced to series 2.22.x and 2.23.x (but turned off by default) and is now enabled by default for series 2.24.x. If you are not yet in a position to upgrade to 2.24.0 you may wish to enable the recommended setting already.
Release notesNew Feature:
- GEOS-11000 WPS process to provide elevation profile for a linestring
Improvement:
- GEOS-10856 geoserver monitor plugin - scaling troubles
- GEOS-11081 Add option to disable GetFeatureInfo transforming raster layers
- GEOS-11087 Fix IsolatedCatalogFacade unnecessary performance overhead
- GEOS-11089 Performance penalty adding namespaces while loading catalog
- GEOS-11090 Use Catalog streaming API in WorkspacePage
- GEOS-11099 ElasticSearch DataStore Documentation Update for RESPONSE_BUFFER_LIMIT
- GEOS-11100 Add opacity parameter to the layer definitions in WPS-Download download maps
- GEOS-11102 Allow configuration of the CSV date format
- GEOS-11114 Improve extensibility in Pre-Authentication scenarios
- GEOS-11116 GetMap/GetFeatureInfo with groups and view params can with mismatched layers/params
- GEOS-11120 Create aggregates filterFunction in OSEO to support STAC Datacube extension implementation
- GEOS-11130 Sort parent role dropdown in Add a new role
- GEOS-11142 Add mime type mapping for yaml files
- GEOS-11148 Update response headers for the Resources REST API
- GEOS-11149 Update response headers for the Style Publisher
- GEOS-11153 Improve handling special characters in the WMS OpenLayers Format
- GEOS-11155 Add the X-Content-Type-Options header
Bug:
- GEOS-10452 Use of Active Directory authorisation seems broken since 2.15.2 (LDAP still works)
- GEOS-11032 Unlucky init order with GeoWebCacheExtension gwcFacade before DiskQuotaMonitor
- GEOS-11138 Jetty unable to start cvc-elt.1.a / org.xml.sax.SAXParseException
- GEOS-11140 WPS download can leak image references in the RasterCleaner
- GEOS-11145 The GUI “wait spinner” is not visible any longer
- GEOS-11166 OGC API Maps HTML representation fail without datetime parameter
Task:
- GEOS-10248 WPSInitializer NPE failure during GeoServer reload
- GEOS-11030 Update jetty-server to 9.4.51.v20230217
- GEOS-11084 Update text field css styling to look visually distinct
- GEOS-11091 Upgrade spring-security to 5.7.10
- GEOS-11092 acme-ldap.jar is compiled with Java 8
- GEOS-11094 Bump org.hsqldb:hsqldb:2.7.1 to 2.7.2
- GEOS-11124 Update json dependency to 20230227 in geowebcache-rest
- GEOS-11141 production consideration for logging configuration hardening
For the complete list see 2.23.3 release notes.
About GeoServer 2.23 SeriesAdditional information on GeoServer 2.23 series:
- GeoServer 2.23 User Manual
- Drop Java 8
- GUI CSS Cleanup
- Add the possibility to use fixed values in Capabilities for Dimension metadata
- State of GeoServer 2.23
- GeoServer Feature Frenzy 2023
- GeoServer used in fun and interesting ways
- GeoServer Orientation
Release notes: ( 2.23.3 | 2.23.2 | 2.23.1 | 2.23.0 | 2.23-RC1 )
-
sur The World Map of Podcasts
Publié: 28 October 2023, 10:07am CEST par Keir Clarke
MapsFM is an interactive map which can help you find and listen to podcasts produced around the world. Listening to location based podcasts could be a great way to learn more about a planned travel destination or even to learn more about your local neighborhood or town. Now you can easily find and listen to location based podcasts by using the MapsFM map of the podcast world.Simply share your -
sur 3D Middle-earth
Publié: 27 October 2023, 10:44am CEST par Keir Clarke
You can now explore the fantasy world of J.R.R Tolkein on a three dimensional globe. The Middle-earth 3D Map is a wonderful interactive map of the lands of the Shire, Mordor, Rohan and Gondor. A map that allows you to soar over the Misty Mountains, gaze upon the White City of Minas Tirith, and wander through the ancient forests of Lothlórien in a way that has never been possible before.Unlike
-
sur GeoCat: Cyber Resilience Act
Publié: 26 October 2023, 4:16pm CEST
As a small and medium business operating in Europe GeoCat BV is clearly affected by the forthcoming European Cyber Resilience Act (CRA). We are a proud open source company and are concerned about our friends and partners caught up in the uncertainty around this proposed legislation.
We applaud the goals of the CRA as security is a responsibility GeoCat handles with care on behalf of our customers and products.
GeoCat is proud of the products we offer our customers: GeoCat Live, GeoNetwork Enterprise and GeoServer Enterprise. Each of these products are offered with a clear vendor relationship, an aspect of which is the handling and communication of security vulnerabilities.
Part of the magic of free and open-source is the rich collaborations formed across industry, academia, and government working alongside non-governmental organizations and enthusiasts. We are concerned that the CRA as proposed places undue hardships on these relationships. These relationships form a network of trust, and cannot be reduced to a product relationship.
We encourage regulators to seek expert input at this time. With so much of technology based in free and open-source technology we encourage regulators to look at ways to support security priorities with a deeper understanding.
Dutch regulators are encouraged to read:
- Cyber Resilience Act
- Vrijschrift To Dutch Parliament: Eu Cyber Resilience Act Will Harm Competitiveness (Dutch)
The post Cyber Resilience Act appeared first on GeoCat B.V..
-
sur From GIS to Remote Sensing: Semi-Automatic Classification Plugin update: version 8.1
Publié: 26 October 2023, 2:26pm CEST
The Semi-Automatic Classification Plugin (SCP) has been updated to version 8.1 which solves a few bugs and in particular ease the installation of required dependencies.
This update automatically tries to install the required library Remotior Sensus in the plugin directory, if it is not already installed in the QGIS environment, which allows for using the main functions of SCP.However, it is still recommended to follow the installation instructions to download the required dependencies.
Moreover, an alternative Windows installation using the OSGeo4W network installer has been added to the user manual [https:]]
Also, the user manual describes the installation in macOS [https:]]
and Linux [https:]]
With this update the installation should work in most cases.
For any comment or question, join the Facebook group or GitHub discussions about the Semi-Automatic Classification Plugin.
-
sur gvSIG Team: Osor Awards: gvSIG selected among the top 6 open-source projects by the European Commission
Publié: 26 October 2023, 11:24am CEST

We have reason to celebrate. The gvSIG project, submitted by the Generalitat Valenciana and the gvSIG Association, has been chosen by the Osor Awards jury as one of the top 6 open-source projects. Undoubtedly, this is a recognition of the highest caliber for the work carried out by these institutions and the entire gvSIG community around the project.
About Osor Awards
The European Commission’s Open Source Observatory (OSOR) has organised the EU Public Services Open Source Achievement Awards to honour and showcase the best open source solutions and initiatives created by or for the public administrations in Europe.
As the title of the Awards indicates, the Jury focused on achievements of open source solutions and initiatives: the ambitious goals, determination in overcoming challenges, contribution towards furthering democracy, transparency and active participation of citizens in creating digital infrastructures serving constituents, the impact on their communities, and effective usage of public resources and exceptional response to solving problems.
Award ceremony
The representatives of the top 6 entries and the winner of the OSOR Community Award will be invited to Brussels for the event celebrating 15 years of our Observatory – OSOR Turns 15: From Pioneering to Mainstreaming Open Technologies in Public Services on 21 November 2023.
… We’re going to Brussels!

-
sur Why the Spanish Like Vertical Living
Publié: 26 October 2023, 10:38am CEST par Keir Clarke
Spaniards like living in apartments. In fact Spain has one of the highest percentages of apartment dwellers in the world. Only in South Korea do more people live in collective dwellings. There are historical reasons why so many Spaniards live in apartment buildings. You can learn more about the historical causes of Spain's vertical living in El Diario's story map Spain lives in flats: why we
-
sur GRASS GIS: GRASS GIS 8.3.1 released
Publié: 25 October 2023, 5:42pm CEST
What’s new in a nutshell The GRASS GIS 8.3.1 maintenance release provides more than 60 changes compared to 8.3.0. This new patch release brings in important fixes and improvements in GRASS GIS modules and the graphical user interface (GUI) which stabilizes the new single window layout active by default. Some of the most relevant changes include: fixes for r.watershed which got partially broken in the 8.3.0 release; and a fix for installing addons on MS Windows with g.
-
sur How to Avoid a Train Wreck
Publié: 25 October 2023, 9:26am CEST par Keir Clarke
A very simple chart designed by a French railway engineer in the 19th Century has helped save millions of lives. Charles Ibry's train schedule, originally developed to timetable and schedule trains on the Paris - Le Havre line, is an extremely effective tool for timetabling and visualizing train traffic on a railway line. Perhaps most importantly it provides railway companies with a powerful
-
sur XYCarto: GRASS GIS, Docker, Makefile
Publié: 25 October 2023, 12:47am CEST
Small example of using Docker and Makefile to implement GRASS GIS. This blog is written to be complimentary to the Github repository found here. Included in this post is a more verbose explanation of what is happening in the Github repository. Users can explore the scripts to see the underlying bits that make it each step. The intention is to help simplify the GRASS set-up and execution of processes using GRASS operations.
TL;DR
GitHub repository is here with the method and documents.
Summary
This is a basic example of setting up scripted GRASS process through a Docker image and using a
makefileto launch the process. The goal is remove the need to install GRASS on your machine and to fully containerize the process within Docker.It is assumed that users have a familiarity with Docker, Make, and GRASS.
In short, the repo is built to launch a GRASS environment and call a script with the users GRASS commands. Ideally, users should be able to clone the Github repository, build the Docker locally (or pull it), and run a simple
makecommand calling the primary script to perform the GRASS operations.Methods in the repository have been tested using Ubuntu and MacOS operating systems.
Important
This method is developed for scripting purposes and not intended for saving data in your GRASS environment. Using this method, each time the script is run the initial operation checks to see if a GRASS environment exists. If so, that environment is destroyed and a new environment is built.
Requirements
make
docker
Methods
If you prefer try out the commands given below, you will need to clone the Git repo:
git clone git@github.com:xycarto/grass-docker-make.git
These are the two primary commands to set-up the GRASS, Docker, Make operations. Users will first need to build a Docker containing the GRASS installation. Inside the
makefileare all the necessary components to find the Dockerfile and build the image. I’ve tagged this build with “xycarto” (see the top of the makefile); however, you can name this whatever you choose.Build GRASS Docker
make docker-local
Run GRASS Script
With the Docker image in place, you can test if the method is working by checking the GRASS version. This
makecommand uses two scripts. First, a script is called to construct the GRASS environment and then, call the script with all your GRASS operations. The second script is launched using:grass grass/GRASS_ENV/PERMANENT --exec bash grass-script.sh
The
—execindicates the script is run within the GRASS environment giving users access to all the GRASS capabilities.GRASS needs to run within a designated projection. Included in the
makecommand is a variable to set this. Users can implement any projection here using the EPSG value. The following is building a GRASS environment in New Zealand Transverse Mercator (NZTM), EPSG:2193:make grass-project proj="2193"
This should output the GRASS version installed in the Docker.
Modifications
Users can implement any GRASS commands and methods in the
run-grass.shscript, simply by modifying the file.How this can be used
File variables can be given to the GRASS process back in the
makecommand and passing this through therun-grass.shscript. For example, say you have a example.tif file you’d like to process in GRASS. Users can add a variable to the make file calledtif. It might look like this in the makefile:grass-project: $(RUN) bash run-grass.sh $(proj) $(tif)
The call of the command looks like:
make grass-project proj=“2193" tif=example.tif
Now with the makefile modified, you need to pass the variable through to the GRASS processing. First you need to modify the
run-grass.shscript to accept the new variable frommake. This can be done by adding the following line at the top:tif=$2
Where
$2means the second argument in the command given. Therun-grass.shscript now has the tif path variable. With this, you can now pass the path to the actual GRASS script by modifying the last line like so:grass grass/GRASS_ENV/PERMANENT --exec bash grass-script.sh $tif
The
grass-script.shcan now be modified to accept thetifvariable by adding the following line at the top:tif=$1
Once you get this all set up an running, the real power comes now in a scripted method run a large collection of tifs through a GRASS process.
Let’s say you have 1000 tifs that need to run. You can list these tifs and simply develop a method like the the following:
cat list-of-tifs.txt | xargs -P 1 -t -I % make grass-project proj=“2193" tif=%
This method would sequentially process the tif list through your GRASS process.
Having a hard time following? Please feel free to contact me and I’ll see if I can help.
-
sur CLIMOS and a FAIR data-to-information value chain
Publié: 24 October 2023, 5:00pm CEST par Simon Chester
The visible effects of climate change continue to grow over time, in both frequency and severity. Extreme meteorological events, such as heavy rains, severe storms, strong winds, and high temperatures, are causing extreme floods, landslides, droughts, heatwaves, wildfires, biodiversity loss, desertification and more, and severely impacting infrastructure, crops, livestock, and lives.
As such, the last three decades have seen policy initiatives put in place to try and limit the impacts of global warming, reverse land degradation/desertification, stop the loss of biodiversity, protect finite natural resources, and reduce the risks associated with environmental disasters. These initiatives are summarised under the umbrella of the United Nations Agenda 2030 and the Sustainable Development Goals (SDGs), which together aim at increasing the resilience of people and systems to the changing environmental and socioeconomic conditions. Within this framework, Climate Action (SDG 13) and particularly Health (SDG 3) are defined goals to be tackled by the international community through collaborative solutions.
Extreme weather-induced hazards and disasters certainly provide a very visible example of the impact of climate change. However, most of the mortality caused by climate change comes in less cataclysmic forms. One obvious example is the increased mortality rate during heatwaves. A less obvious example is the changing risk of exposure to disease for humans, other animals, and plants.
Changes in temperature and precipitation, combined with changes in land use and cover, are creating spatial shifts in the life-cycle dynamics of disease-transmitting vectors, such as bats, small mammals, or mosquitoes, which has resulted in changing risks of exposure to disease.
The EU project CLIMOS, which OGC is a partner, is examining one such change by focussing on diseases transmitted by sandflies. CLIMOS works towards enhancing the scientific knowledge of the parameters that affect the spread of sandflies – and thus their ability to transmit disease – in the context of a changing climate. The project calls for technical systems that can combine and process: raw data output by climate models; earth observations of ongoing meteorological events and changes to land cover; and ecological data describing the life cycles of the sandflies.
Technical systems that are able to find, access, integrate, and process data for use in building climate resilience are coming to be known as Climate Resilience Information Systems (CRIS). CRIS are already being used to develop and provide interoperable Analysis Ready Data (ARD), usually in the form of data cubes, to scientists for further processing using scientific algorithms, and/or for developing Decision Ready Indicators (DRI) that allow for clear interpretation of current events by decision makers.
The “raw data to information” value chain underpinning CRIS is made possible when the FAIR data principle is respected, that is that data and systems are developed in a manner that ensures they are Findable, Accessible, Interoperable, and Reusable. CLIMOS is therefore focussing on the use of FAIR-aligned Climate Services for data assessment, scientific knowledge generation, early warning, and to better understand how meteorological conditions are increasing the risk of sand fly-borne diseases in particular areas.
As part of the CLIMOS project, the Open Geospatial Consortium (OGC) is supporting the move toward FAIR systems for use in the emergency alert systems and data pipelines. Specifically, OGC is addressing the interoperability challenges faced when combining health, environmental, Earth observation, and climate model data. These challenges are being examined and addressed through various technical testbeds and data pilot studies that emphasise the FAIR principles, as well as within OGC Domain Working Groups. For the objectives of CLIMOS, OGC’s Climate Change Resilience, Emergency Management, and Health Domain Working Groups are each providing excellent sources of experience and knowledge related to these three aspects of the CLIMOS project.
The work of CLIMOS is an essential contribution to realise the SDG 3 goal to “Ensure healthy lives and promote well-being for all at all ages.”
This post originally appeared on the CLIMOS Project blog.
The post CLIMOS and a FAIR data-to-information value chain appeared first on Open Geospatial Consortium.
-
sur Marco Bernasocchi: QField 3.0 “Amazonia” is here – Feature-packed and super slick.
Publié: 24 October 2023, 3:20pm CEST
Pièce jointe: [télécharger]
We’re so excited and proud of this latest QField version that we’ve opted for a major 3.0 version update.
Get it nowShipped with many new features and built with the latest generation of Qt’s cross-platform framework, this new chapter marks an important milestone for the most powerful open-source field GIS solution.
Main highlights
Upon launching this new version of QField, users will be greeted by a revamped recent projects list featuring shiny map canvas thumbnails. While this is one of the most obvious UI improvements, countless interface tweaks and harmonization have occurred. From the refreshed dark theme to the further polishing of countless widgets, QField has never looked and felt better.
The top search bar has a new functionality that allows users to look for features within the currently active vector layer by matching any of its attributes against a given search term. Users can also refine their searches by specifying a specific attribute. The new functionality can be triggered by typing the ‘f’ prefix in the search bar followed by a string or number to retrieve a list of matching features. When expanding it, a new list of functionalities appears to help users discover all of the tools available within the search bar.
QField’s tracking has also received some love. A new erroneous distance safeguard setting has been added, which, when enabled, will dictate the tracker not to add a new vertex if the distance between it and the previously added vertex is greater than a user-specified value. This aims at preventing “spikes” of poor position readings during a tracking session. QField is now also capable of resuming a tracking session after being stopped. When resuming, tracking will reuse the last feature used when first starting, allowing sessions interrupted by battery loss or momentary pause to be continued on a single line or polygon geometry.
On the feature form front, QField has gained support for feature form text widgets, a new read-only type introduced in QGIS 3.30, which allows users to create expression-based text labels within complex feature form configurations. In addition, relationship-related form widgets now allow for zooming to children/parent features within the form itself.
To enhance digitizing work in the field, QField now makes it possible to turn snapping on and off through a new snapping button on top of the map canvas when in digitizing mode. When a project has enabled advanced snapping, the dashboard’s legend item now showcases snapping badges, allowing users to toggle snapping for individual vector layers.
In addition, digitising lines and polygons by using the volume up/down hardware keys on devices such as smartphones is now possible. This can come in handy when digitizing data in harsh conditions where gloves can make it harder to use a touch screen.
While we had to play favourites in describing some of the new functionalities in QField, we’ve barely touched the surface of this feature-packed release. Other major additions include support for Near-Field Communication (NFC) text tag reading and a new geometry editor’s eraser tool to delete part of lines and polygons as you would with a pencil sketch using an eraser.
Thanks to Deutsches Archäologisches Institut, Groupements forestiers Québec, Amsa, and Kanton Luzern for sponsoring these enhancements.
Quality of life improvementsStarting with this new version, the scale bar overlay will now respect projects’ distance measurement units, allowing for scale bars in imperial and nautical units.
QField now offers a rendering quality setting which, at the cost of a slightly reduced visual quality, results in faster rendering speeds and lower memory usage. This can be a lifesaver for older devices having difficulty handling large projects and helps save battery life.
Vector tile layer support has been improved with the automated download of missing fonts and the possibility of toggling label visibility. This pair of changes makes this resolution-independent layer type much more appealing.
On iOS, layouts are now printed by QField as PDF documents instead of images. While this was the case for other platforms, it only became possible on iOS recently after work done by one of our ninjas in QGIS itself.
Many thanks to DB Fahrwgdienste for sponsoring stabilization efforts and fixes during this development cycle.
Qt 6, the latest generation of the cross-platform framework powering QFieldLast but not least, QField 3.0 is now built against Qt 6. This is a significant technological milestone for the project as this means we can fully leverage the latest technological innovations into this cross-platform framework that has been powering QField since day one.
On top of the new possibilities, QField benefited from years of fixes and improvements, including better integration with Android and iOS platforms. In addition, the positioning framework in Qt 6 has been improved with awareness of the newer GNSS constellations that have emerged over the last decade.
Forest-themed release names
Forests are critical in climate regulation, biodiversity preservation, and economic sustainability. Beginning with QField 3.0 “Amazonia” and throughout the 3.X’s life cycle, we will choose forest names to underscore the importance of and advocate for global forest conservation.
As always, we hope you enjoy this new release. Happy field mapping!
-
sur The London Tube Memory Game
Publié: 24 October 2023, 9:20am CEST par Keir Clarke
I think I've started a new mapping trend. At the beginning of October I released my TubeQuiz map. Since then I have spotted three other new map games which also require players to name all the stations on the London Underground network. The latest incarnation of a London Underground station memory game is I Know The Tube. I Know The Tube follows the now well known format of a map memory
-
sur KAN T&IT Blog: Trabajo en conjunto con el INEC de Costa Rica
Publié: 23 October 2023, 9:51pm CEST
Estamos felices de anunciarles que desde Kan vamos a trabajar codo a codo con el Instituto Nacional de Estadística y Censos de Costa Rica (inec.cr).
Con la adopción del Marco Geoespacial y Estadístico Global (GSGF) propuesto por la ONU en América Latina y el Caribe a través de la Comisión Económica para América Latina y el Caribe (CEPAL), pondremos en marcha un conjunto de componentes tecnológicos específicos, incluyendo un gestor estadístico, un gestor de datos geoespaciales, APIs con posibilidad de consumir información de diferentes aplicaciones y un geoportal para visualizar, navegar y comparar la información estadística de este país.Al mismo tiempo, implementaremos componentes ya existentes en la comunidad como Kobo Toolbox, GeoNode, Airflow, MapLibre, Nominatim y Metabase para ofrecer una solución integral que abarque desde la recopilación de datos en terreno hasta la publicación de la información.

Esta plataforma será una valiosa herramienta tanto para gobiernos, investigadores, empresas como para cualquier persona interesada en obtener información actualizada y confiable sobre la región.
A medida de que vayamos avanzando, les contaremos más sobre este proyecto que nos tiene muy entusiasmados.
-
sur Stefano Costa: Research papers and case studies using iosacal
Publié: 23 October 2023, 6:30pm CEST
I have updated the documentation of iosacal with a new page that lists all research papers and case studies where the software gets a mention for being used.
 A collage of figures from the papers using iosacal
The list is at [https:]] and it’s longer than I thought, with 6 papers ranging from Norway to Antarctica, from the Last Glacial Maximum to the European Middle Ages.
It’s humbling to see this small piece of software find its way in so many research projects and I’m learning a lot by studying these publications.
Some authors contributed to iosacal with new features and bug fixes, and that is the most accurate metric of a healthy project that I can think of.
I’m going to add more useful content to the documentation as the main focus of the 0.7 release. In the meantime, you can continue using iosacal 0.6 in your research projects.
-
sur OGC Calls for Participation in its Open Science Persistent Demonstrator Pilot
Publié: 23 October 2023, 3:00pm CEST par Simon Chester
The Open Geospatial Consortium (OGC) invites organizations and individuals to join the OGC Open Science Persistent Demonstrator (OSPD) Pilot. The multi-year project will support collaborative open science for the scientific community, decision-makers, and the general public. Responses are due by December 1, 2023. Funding is available for Participants.
Collaborative Open Science is essential to addressing complex challenges whose solutions lie in cross-sector integrations that leverage expertise and data from diverse domains while prioritizing integrity. By making it simple to connect data and platforms together in transparent, reusable and reproducible workflows, the OGC OSPD Pilot aims to enable innovation through collaborative open science.
OGC’s OSPD Pilot focuses on connecting geospatial and Earth Observation (EO) data and platforms to enable and demonstrate solutions that create capacity for novel research and accelerate its practical implementation.
The Pilot will produce a web portal to demonstrate how platforms operated by different organizations can be used for collaborative research and data representation, facilitate testing the compatibility of in-development data or platforms with other elements in a multi-platform workflow, and promote training in methods for collaborative, open innovation by providing learning and outreach materials.
The OSPD Pilot will produce three main elements:
- The development of a web portal that demonstrates how platforms operated by different organizations can be used for collaborative research and data representation;
- A test environment for web platforms to explore mutual use and which provides a collaboration space for existing and in-development platforms to use each other and test aspects such as reproducibility of workflows; and
- The provision of learning and outreach materials that make the Open Science platforms known and accessible to a wide range of users and enable efficient use.
The OSDP is sponsored by OGC Strategic Members the European Space Agency (ESA) and the National Aeronautics and Space Agency (NASA), who will provide vision and leadership throughout the initiative.
The OGC Open Science Persistent Demonstrator Pilot will be conducted under OGC’s Collaborative Solutions and Innovation (COSI) Program, a collaborative, agile, and hands-on prototyping and engineering environment where sponsors and OGC members come together to address location interoperability challenges while validating international open standards. To learn about the benefits of sponsoring an OGC COSI Program Initiative such as this, visit the OGC COSI Program webpage.
More information on OGC’s OPSD Pilot, including the CFP document and how to respond, is available on the OGC Open Science Persistent Demonstrator Pilot webpage. Responses to the CFP are due by December 1, 2023.
The post OGC Calls for Participation in its Open Science Persistent Demonstrator Pilot appeared first on Open Geospatial Consortium.
-
sur Mapping the Brussels Terrorist Attack
Publié: 23 October 2023, 9:47am CEST par Keir Clarke
On the evening of Monday October 16, a man drew a gun and opened fire on Swedish football fans in the streets of Brussels. The terrorist attack left two people dead and one injured. The suspect, Abdesalem Lassoued, fled the scene. Soon after the shooting a video was posted on social media in which Abdesalem claimed responsibility for the attack. The next morning the terrorist was tracked down,
-
sur EOX' blog: VirES for (not only) Swarm - 2023 update
Publié: 23 October 2023, 2:00am CEST
It has been a while since the last blog post about VirES for Swarm, but don't let that make you think the level of activity has dropped. The service has moved from strength to strength and enjoys a continually growing number of users, a steady addition of features and datasets, and excitement about ... -
sur From GIS to Remote Sensing: Managing input bands using the Semi-Automatic Classification Plugin: the Band set tab
Publié: 22 October 2023, 11:46pm CEST
This is the first of a series of video tutorials focused on the tools of the Semi-Automatic Classification Plugin (SCP).In this tutorial, the Band set tab is illustrated, which allows for managing input bands.You can find more information in the user manual at this link.
Following the video tutorial.
For any comment or question, join the Facebook group or GitHub discussions about the Semi-Automatic Classification Plugin.
-
sur Mapping the Growth of America
Publié: 21 October 2023, 11:32am CEST par Keir Clarke
This animated map shows the growth of built-up areas in San Francisco from 1860-1930. It visualizes the rapid growth of the city following the California gold rush in the second half of the 19th Century.This animated GIF was made using the interactive map Historical Built-Up Areas, 1810 - 2015. This amazing map uses data from the HISDAC-US: Historical Settlement Data Compilation for the United -
sur Ephemeral Tweets
Publié: 20 October 2023, 3:54pm CEST par Keir Clarke
Musing appears to be an ephemeral version of Twitter. You might well argue that under Elon Musk the social media site 'X' itself appears to be disappearing into the ether at an alarming rate. But when I say that Musing is an ephemeral social media platform I mean that the social media messages themselves are short-lived, not the platform itself.Confused? Well don't be. Just open the Musing
-
sur Webinar: Location Innovation Academy for NMCA
Publié: 20 October 2023, 3:34pm CEST par Simon Chester
The online Location Innovation Academy recently launched to provide online training material for geospatial data management. It currently offers 12 e-learning modules in three clusters. These materials are designed to help government agencies, particularly national mapping organizations, make the most of their data and digital infrastructure.
On Thursday, 26th October, 2023 at 11:00 – 12:30 CET, OGC and GEOE3 will host a webinar that aims to serve as an introduction to the Academy for National Mapping and Cadastral Agencies (NMCA), and will focus on the integration of climate and meteorological data into data portals used and provided by NMCA.
Additionally, anyone who wishes to use materials from the online academy in their own training courses will learn the information needed to navigate the academy platform and its core content. Teachers, professors, coaches, consultants, and other professionals providing training in geoinformatics, spatial planning processes, and related fields are therefore also encouraged to attend.
During these demonstrations, training materials for the use of OGC climate resilience application packages and for integration of meteorological data into portals managed by NMCA will be presented as examples out of the GEOE3 project.
For more information about the Academy, or to enroll in a free course, visit the Location Innovation Academy website.
Topics: Integration of Meteorological Data; Climate Application Packages
Time: Thursday, 26th October. 11:00 – 12:30 CET
Registration: Click here for registration
Virtual Room: Dial-in info will be provided after registration.
Language: English
The post Webinar: Location Innovation Academy for NMCA appeared first on Open Geospatial Consortium.
-
sur GeoServer Team: Introducing GeoSpatial Techno with a Video Tutorial
Publié: 20 October 2023, 2:00am CEST
This is a community blog post introducing Geospatial Techno, along with a sample of one of their GeoServer training videos.
GeoSpatial Techno is a startup focused on geospatial information that is providing e-learning courses to enhance the knowledge of geospatial information users, students, and other startups. The main approach of this startup is providing quality, valid specialized training in the field of geospatial information.
( YouTube | LinkedIn | Reddit | Facebook | X )
Getting to know OGC web services and GeoServer softwareThe course guides you in using GeoServer software to create geospatial web services, styles and publish them step by step simply and practically. Now, before delving into OGC web services, it is important to familiarize yourself with the various types of services.
In this session, we introduced you to the basics of the OGC web services and GeoServer software. If you want to access the complete tutorial, simply click on the link.
I would highly appreciate it if you could subscribe to my channel and share it with your friends to help spread this tutorial. By subscribing, you will gain complete access to the training video, which will enable you to enhance your skills. Moreover, sharing it with your friends guarantees that they can also benefit from this valuable resource. Thank you for your support.
What is Service?A collection of operations, accessible through an interface, that allows a user to invoke a behavior of value to the user.
What are Web Services?Web services are internet-based applications that can perform a wide range of functions, from simple tasks to complex business processes.
What are GeoSpatial Web Services?GeoSpatial web services are online platforms that offer access to and analyze geographical information. They aim to overcome the lack of compatibility between different geospatial systems.
Why do you need standard web services?Standard web services provide a common platform for communication between modern-day business applications that use different programming languages. This enables convenient interaction regardless of development language.
What is OGC?The Open Geospatial Consortium (OGC) is an international organization that promotes the use of open standards to make geospatial information and services to be “FAIR”, which stands for Findable, Accessible, Interoperable, and Reusable. This goal applies to various areas such as data sharing, data processing, sensor web, and the Internet of Things.
What are OGC Web Services?OGC Web Services (OWS) are a set of standards that allow for seamless integration of various online geoprocessing and location services. With OWS, users can access and utilize services such as the Web Map Service (WMS), Web Feature Service (WFS), Web Coverage Service (WCS), and Web Map Tile Service (WMTS).
WMS enables users to retrieve and obtain detailed information on maps of geospatial data. WFS allows for data manipulation operations on geographic features, including querying, creating, modifying, and deleting features. WCS provides access to raster datasets like elevation models and remote sensing imagery. WMTS serves pre-rendered or computed map tiles over the internet.
These services provide an interoperable framework for accessing, integrating, analyzing, and visualizing online geodata sources, sensor-derived information, and geoprocessing capabilities.
What is GeoServer?GeoServer is a Java-based server that allows users to view and edit geospatial data. Using open standards set forth by the Open Geospatial Consortium (OGC), GeoServer allows for great flexibility in map creation and data sharing.
Open and Share Your Spatial DataGeoServer is a powerful open-source tool for displaying spatial information through maps in various formats. The tool integrates OpenLayers, a free mapping library, for easy and quick map generation. Moreover, It supports standards like WMS, WFS, WCS, and WMTS, enabling data sharing, editing, and easy integration with web and mobile applications. With modular functionality and extensions, GeoServer offers extensive processing options. For example, the Web Processing Service (WPS) extension provides a wide range of processing options, and users can even create their extensions.
Use Free and Open Source SoftwareGeoServer is a free and open-source software that brings down the financial barrier to using GIS products. It is released every six months with new features, bug fixes, and improvements, providing a quick turnaround time. This transparent process often leads to faster advancements compared to closed software solutions. By using GeoServer, organizations can avoid software lock-in and save money on support contracts in the future.
Integrate With Mapping APIsGeoServer is a versatile software that can integrate with popular mapping applications like Google Maps and Microsoft Bing Maps. It can also connect with traditional GIS architectures such as ESRI ArcGIS. OpenLayers and Leaflet are recommended as complementary tools to GeoServer for web mapping needs.
Join the CommunityGeoServer has an active global community of users and developers, offering support through email lists. The software has a fixed release cycle and public issue tracker, ensuring transparency and regular updates. Commercial support is also available. Overall, using GeoServer means being part of a supportive community.